Applying Soft Graphite Over Hard?

John emailed to ask:

As I understand it, the layering of graphite is a major part in order to achieve the desired effect of tone and texture. But what I cannot understand is, after reading somewhere that it is almost impossible to build up tone from light to dark and that it must be done from dark to light, I believe it has something to do with hard graphite filling in the hollows of the tooth and then preventing softer grades from staying on the paper. Is this understanding somewhere near the mark, or I am totally way off the mark?

As with all things in Art there are no rules, which means I agree with your understanding and observation but I also know excellent artists who work light to dark. Personally, I belong to the dark to light camp, and here’s why…

First, you must understand the properties of graphite and the manufacture of pencils.

The crystalline structure of graphite is layers of flat plates. That’s why graphite reflects light while the irregular grains of charcoal and carbon don’t, and why graphite is an excellent dry lubricant. It also helps to explain why erasers are usually ineffectual at removing graphite – because once the erasing surface becomes graphite coated it simply slides plates over plates.

Raw graphite produces a black mark. In order to create differing grades – degree of hardness or softness – the graphite is mixed with clay. Imagine that an 8B is almost pure graphite and an 8H contains mainly clay and little graphite. Clay does not possess the plate-like structure of graphite, so the flat-plate structure is diluted as the clay content increases and the grades become harder.

The more clay added to the mix, the harder the grade and the lighter the achievable tones. For example, 6B has a far greater graphite content than 6H, which contains much more clay. This means 6H has a very fine composition and draws smoothly and light, but the softer 6B draws darker with a much grainier appearance.

Of course, this is a general description. In reality, the process varies between manufacturers and the quality they set out to achieve. A manufacturer of cheap pencils, apart from using inferior graphite, might also use inferior clays, which may be ground for less time – possibly just a few hours instead of days. Personally, I use Staedtler leads that are wonderfully consistent and impurities are almost never encountered.

There are more variables to consider too. For example, papers differ greatly, so what works on my ultra-smooth Conqueror Diamond White might not work on a more textured paper, and vice versa. It’s the tooth (the pits and crests in the paper’s surface) that causes the graphite to flake off the pencil’s lead, and some papers possess much more tooth than others.

If you use a soft grade (B to 8B) its minimal clay content means the individual graphite grains are large and won’t fill the pits of the tooth entirely. This leaves flecks of white paper showing through it, but that can be solved by burnishing with a harder grade – HB over 2B, for example – so the harder grade breaks up the softer one and fills the remaining tooth.

Because the soft grades always leave some tooth unfilled, you can always layer a hard grade over a soft one.

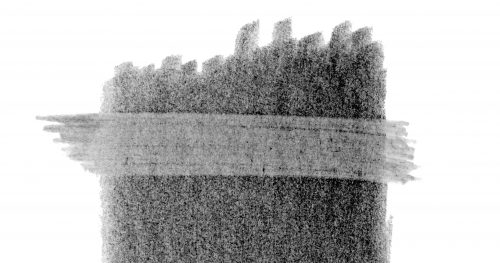
Conversely, hard grades (H to 8H) fill the tooth completely with a mix of clay and fine graphite particles, leaving insufficient tooth to accept the soft grades. Their large flat plates simply slide over the top and won’t hold. Remember, graphite is a dry lubricant, so it’s simply doing what it knows best. You can feel this in use, as the soft grade skates effortlessly over the harder grade. It’s much harder to get that soft graphite to stick to the harder underlying layer, and often impossible.
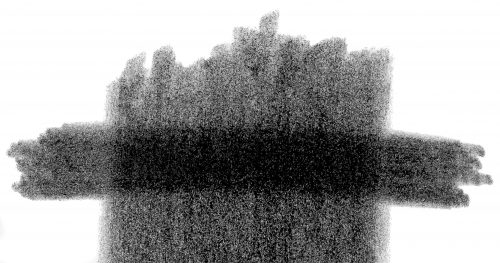
Hard over Soft – HB over 6B
Soft over Hard – 6B over 6H

TURNING DRAWBACKS INTO BENEFITS
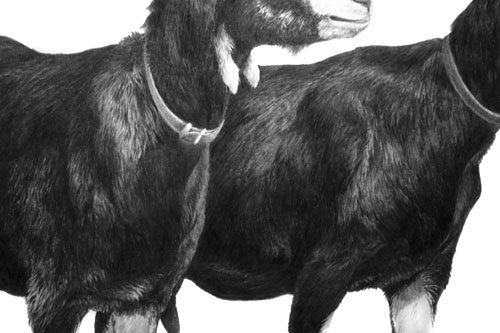
There is a technique that I’ve sometimes used that turns this problem into a benefit. You can create your own “masks” – like acid resist in etching. It works best in areas of high contrast, such as highlights on hairs within a black coat. Simply draw your highlights first, with a 4H or harder grade applied with some weight, and then apply a layer of soft grade over it, perhaps 2B or 6B. As the soft grade slides over the lines of hard grade, those lines turn from visible, comparatively dark lines into light highlights. It gives quick results but is not entirely controllable.
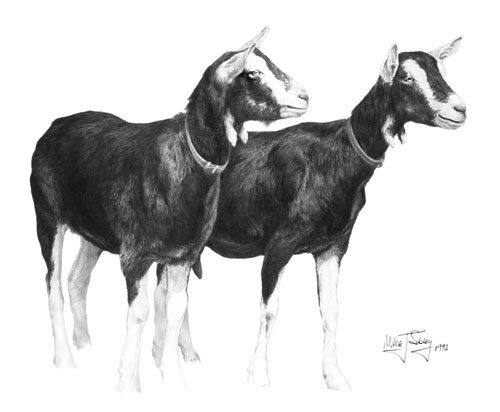
Minty and Bramble
Highlights drawn first with 4H then layered with 6B

THE IMPORTANCE OF DARKS
Personally, I feel the often-taught method of building up dark values from a lighter base is simply an admission that no firm decision has been made about the value required. Instead, I advocate the immediate application of the desired value. It produces the freshest drawing and, because it requires a confident approach, the result is sharp and clear. And, perhaps more importantly, as soon as the darkest value is established in a drawing, the entire palette of available greys is known and all midtones automatically fall into place.
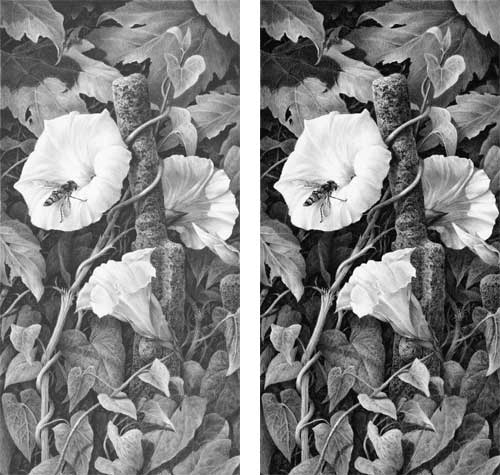
If the initial dark value is too light, the entire drawing will be based around a restricted palette of greys. It will lose depth, vitality and impact.

I know I often repeat myself when promoting the use of dense and solid blacks and darks but they really are important. It’s light and shadow that make a drawing, not middle values. If you want your subjects to appear three dimensional, you must have light and shade. Look at the drawings of Ingres or the paintings of Rembrandt for clear lights and darks. And if you work from photographic references, try to find high contrast ones and not ones with almost all middle values – although with practice you should be able to interpret mid-value photos as though they were high contrast.

When someone looks at your drawing their brain will register the darkest value, however small, and then read the white of your paper as being pure white. From those check points it will compare the two extremes and understand all the mid values. The wider the overall tonal range the more three-dimensional information you can impart.

FINALLY…
When you’ve completed your drawing, or a completed section of it, lightly shade with a 2H, or 4H, over everything, avoiding only the highlights. That will remove all non-intentional white from your drawing and your highlights will shine with an increased brilliance.
A Query on Size and Fading

Deidre emailed to ask:

I have just bought you book “Drawing from Line to Life“, and I’m really enjoying it. I was wondering if I could ask you a few questions? When you start out on any drawing, what is the most common pencil you use for the initial outline?

Lightly applied 2B, because I can erase it completely without leaving any indentations.

What is the largest size of drawing that you do? My current drawing is 14″ x 11″. I am enjoying it, but sometimes I wish it wasn’t so big. Do you think it is better to have a larger drawing or smaller?

I think my largest is around 17″ x 12″ and the head studies in print were about 8″ x 12″ – whatever size best suits the subject. With experience, you can more easily judge the size above which detail becomes unrealistic. I’ve also found that increasing the size by 20% almost doubles the work involved due to the extra detail required.

Personally, I’ve learned to not let size, and the time required, bother me. I just begin in the top left corner and work outwards. I split every drawing into one hour chunks as I’m working and ignore the unfinished portion, so I get to “complete” many small drawings rather than agonise over the time I need to complete the entire drawing.

On your head portraits of people or animals, why do you prefer not to put a shaded edge around the drawing like you see commonly from other artists?

It’s called a vignette, and I don’t like them because it’s unnatural and looks unrealistic. This is especially true if you’ve faded the drawing at the base of the neck – it really needs to just fade out at that point, but a vignette outlines it and ruins the implied continuance of the animal.

I think many artists use a vignette because it helps to increase the contrast within the drawing – this is especially true of a white animal – but there are other ways of handling that. I use what I call “edge shadows” – using the shadows beneath the hairs around the extremity to provide a clear visual boundary. Don’t worry about the overall lighting direction, you can lie quite convincingly and place shadows wherever you need them. The viewer just assumes there’s a reflective surface outside of the picture that is bouncing reflected light back into the drawing.

If you have to resort to outline, create a “lost and found” edge where the line alternately appears and disappears – sufficient line to tell the eye that it’s an edge but not so much that it looks like a line.

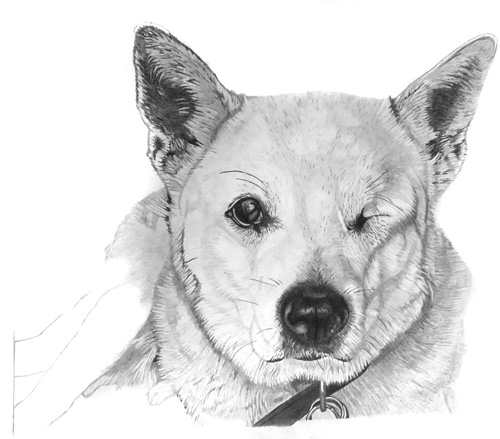
Deidre's unfinished drawing

I can clearly understand the edge of your dog and I don’t see any need to make it any clearer. The golden rule (for the inclusion of anything) is “If it doesn’t add to the understanding, don’t include it.” Subtlety is more natural than making something obvious. In your case, the ears are clearly defined, the head sufficiently so, and the neck doesn’t need its extremities defined, as it’s a secondary element. Personally, I’d terminate the collar half way down the rings, extend the drawing down an inch or so and use that extension to gently fade the rings and the bottom edge to white.

I can see guidelines on the left-hand side (its back legs?) that leads me to believe you intend to extend the drawing in that direction. Will that area add anything to our understanding of the dog? If those are its back legs, it will tell us that the dog is laying down, but is it necessary for us to know that? Will it helps us to better understand the head (the focus of the drawing)? Will we be distracted by wondering where the front feet are?

I’d just curve that side round to meet the collar and let it fade away to the left. That area is only required to put the head into context – and you don’t want to pull attention away from it.

The bottom of the collar of my dog, is just above the bottom of the paper, so I don’t have room to extend it down.

Golden Rule #1: Your paper should always be larger than your intended drawing! You can trim the excess paper off later but you can’t add it – as you found out. 🙂

My book and the dangers of working from B&W photos

This morning I received an email, and a separate enquiry through my Art Query page, from John asking:

Hi Mike, I have researched your book, “Drawing from Line to Life”, and the feedback that I have gained, is that it is the bible of drawing techniques. But would you tell me if it is geared towards the technique of drawing animals or would it help me with any aspects of drawing landscapes which is my personal preference.

I went to great pains to NOT write a book only about drawing animals – especially as that’s what I’m known for – and I fervently believe that if you can draw, you can draw anything. That’s one reason I included a chapter on the drawing of my granddaughter Charlotte – my one and only portrait.

The book itself features a chapter on trees and foliage, and it alludes to landscapes throughout – for example, the techniques required for shading a sky are the same as those for skin tones.

Incidentally, I also planned from the outset to always include the WHY as well as the HOW. I find too many books tells you how to do something but never explain when or why you should use it. I believe you need the WHY to fully understand the HOW. It’s like memorising a poem without understanding the meaning of the words.

The most useful of these is the good old Bostik Blue Tack, which is a truly magic piece of kit.

That features throughout the book – I even supply it worldwide now – and I personally couldn’t work without it. Once you cease thinking of it as an eraser, it opens up a whole host of possibilities. In my view, in one hand I hold a tool that can apply graphite and in the other is one that can remove it – brutally, gently, or by very subtle degrees with a simple light stroke of the surface.

I find converting the photos to monochrome and manipulating them within Photoshop gives me a more realistic idea of the tones and shades.

I absolutely don’t do that and never recommend it. The outcome can too easily be a copy of the photograph when it should be an interpretation that includes your feelings, emotions, and exaggerations of what is important. In any case, my compositions are almost always composites of a number of photographs held together by invention. Working from colour photos allows me to decide the tonal range and, as I said, to emphasise the importance of each element. Working from black and white tends to defeat that. And if I see someone at one of my workshops take out a B&W photo and a value chart, I shudder! There has to be invention and interpretation – otherwise the drawing will tell me no more than I can already gather from the photograph. And it will tell me nothing about the artist’s feelings for the scene.

I hope that helps answer your questions – and some that you didn’t ask 🙂

As Owen The Pencilneck remninded me below, you can lose a great deal of information if you convert colour to B&W. For example, if I’m drawing a black and tan dog (such as a Rottweiler) I lose the ability to tell a light patch of tan hair from a highlight in the black hair; following such a colour division through a patch of shade creates even more problems; and it interferes with my job as an artist to clearly differentiate for the viewer, using only tonal variations, between areas of tan and black.

I have at times used B&W photos because the detail can be studied more clearly – but that clarity is the result of removing the colour and most of the three-dimensional form that it describes.

But, as I said, the greatest problem with working from B&W photos is that they exert control over the tonal values that you use for your drawing – it’s almost inescapable. They stifle creativity and interpretation which, unlike copying, are what create art.

Donna commented to ask “…on the forum I hang out on, using Photoshop to greyscale a colour picture in order to better see values when using coloured pencil is considered the thing to do. Does your caution only apply to photos for graphite/monochrome work, or coloured work as well?”

I know many artists who use greyscale in Photoshop and the result can be very helpful in understanding the relative values within an image. But, personally, I think that’s as far as that strategy should be taken. Once understood, that knowledge should be used to aid interpretation, but the temptation is to use those relative values as requirements rather than suggestions.

My strategy is to first establish the darkest value in the drawing, so I now have the darkest and lightest (the white of the paper) values exposed, and all intermediate values should automatically fall into place. That puts me in control and not the greyscale image.

The following image is a composite one – Tom never stood in that water or even saw it.

Tom ~ Greyscale and Colour versions

Viewing the B&W version: on the plus side: detail can be sharper – Tom’s winter coat and ear, the ivy on the tree, detail within the dead grass. On the minus side: the foreground dead grass is difficult to separate from the water, the misty background appears to be closer and too sharply detailed, and the grass on the far bank cannot be distinguished from the green grass above it.

Both versions have plus and minus points, but attempting to draw from the B&W version is more likely to stifle artistic creativity. Would a lighter fence improve recession and push Tom further forwards? Would a more diffuse background give a better impression of mist and further aid recession and mood? I think both treatments would. The colour photo represents the way we actually see things so it possesses a “fence” that can more easily be engineered to suit the artist’s intention, where the B&W version (because it presents itself as a tonal study) tends to dictate the tones that should be used. It doesn’t contain a fence as we know it but a tonal representation of a fence, and it’s more difficult to engineer because it lacks the reality of the coloured version. Likewise, the lack of background detail in the coloured version invites interpretation, but the more sharply-defined B&W image almost demands an exact copy.

Whether working in colour or monochrome I would personally recommend using the B&W image for assistance in initial understanding, and for occasional viewing where sharper detail might be sought. But work with the colour version. That’s “with” and not “from” – to work with the assistance of the colour version to offer the maximum opportunity for artistic interpretation.

How To Draw Trees

Artist Stephen Sample, who works in Pen & Ink, emailed me to ask:

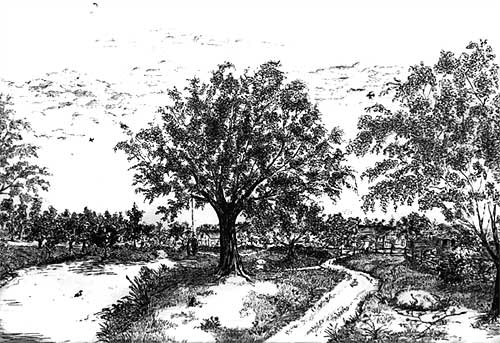
I have been working on trees for the last couple of years, and they turn out pretty nice, but it is predominately due to the amount of stippling I use to create the leaves. The difficulty that I am having, is that, although it looks fairly like a tree, it is choppy if you catch my meaning, not even close to as defined as the trees that you are drawing. Your work has incredible detail, and that is ultimately my goal. I have two questions so far (and I did read your tutorial on trees): How do you do the leaves, and how do you incorporate your shading into your leaves without taking from the “leaf” effect. In doing the leaves, do you do more of a small random dash, or perhaps is it more of a dot? I think that is where I am stuck. Here is a drawing from 2010. Would you at all be willing to give me a few pointers perhaps?

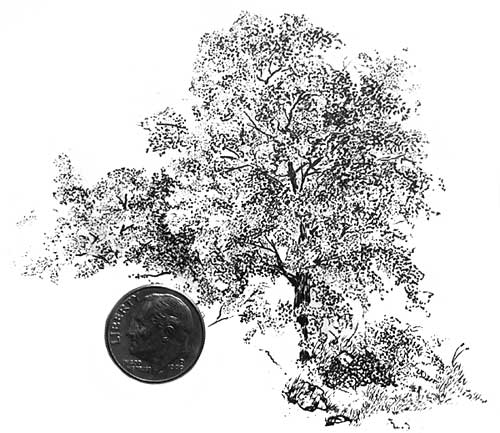
In most cases, except for the foreground, my leaves are simply result of scribbling, bearing in mind that the white areas are as important as the marks I am making. In other words, rather than draw the leaves themselves, I draw the shadows between the leaves, so the leaves are represented by the spaces and holes that remain. The second stage is to add overall three-dimensional shading, and it’s the previously white leaves that take this up. The more stages you can divide anything into the simpler it becomes.

Your trees are lacking depth. I’ll concentrate on the central one, which is fan-like – a series of radiating ribs with leaves attached. However, there is some depth, as a few of your leaf masses appear in front of some of the branches.

Stephen's submitted drawing
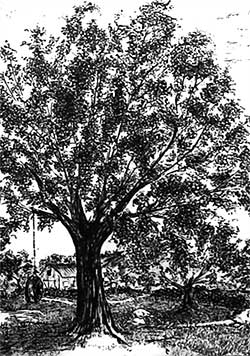
detail of central tree

What is missing is the mass of foliage in the foreground and, more importantly, foliage in the background. Bear in mind that a tree is basically a deformed ball. It is a round, three-dimensional shape that overall will have a shaded side and a highlighted side. The top will receive more light and the base of the foliage mass will cast a shadow beneath it. Then you have to consider local lighting – each individual mass of foliage is itself a rounded three-dimensional form that requires its own highlighting and shade.

How to fix it? First, I think there is an unnatural amount of light visible through the tree – there are too many holes through which we can see sky. Second, many of those holes need to be filled with the foliage behind the tree. To suggest depth, that background foliage needs to be a blurred suggestion rather than sharply drawn. You can think of a tree as being in three layers:

1. The background layer (the leaves behind the tree) that contain no detail at all.

2. The midground foliage that makes up the bulk of the tree – it possesses very little detail except for the silhouette of the outermost leaves against the sky.

3. The foreground foliage – those masses of leaves that are in front of the trunk and directly facing you. This layer requires the most detail. The eye will detect that detail and understand everything behind it as being more foliage that, receding from the viewer, is less distinct.

You need to give your viewer’s eye sufficient clues, often quite obvious ones, such as the midground foliage edge silhouettes.

Take a look at the ballpoint pen work of a friend of mine, Vincent Whitehead, at www.RuralRouteOne.com. Vincent has an excellent tutorial on how he draws his trees that you may find invaluable. And my good friend Diane Wright has another comprehensive “How to draw trees” tutorial.

Stephen replied:

I am very grateful for your splendid advice. I do however have a couple more questions now. I did look at Mr. Whitehead’s tutorial and found it must helpful indeed.

I appreciate that working in ballpoint allows Vincent to create half tones that are not easy to obtain with pen & ink or stippling. But those out of focus halftones are what gives depth by providing the rear half of a tree.

I created a second picture that I thought was more on your track, and was wondering what is needing to be improved as far as depth goes. On this scale it was a little difficult adding shading in the background and, as you can see, it is a lot of stippling still. Is that bad? Would it be better if I didn’t do that? I am trying to go for a leaf effect, but I don’t want to make it too busy.

Attempting a leaf effect is fine but don’t overdo it. Take a long hard look at trees and try to work out what you can really see – and what visual clues you gain from each element. You’re well on your way to achieving that -= especially the use of negative drawing at the left, which immediately adds depth. Your foliage now extends in front of the trunk and the glimpses of branches reinforces the depth of the tree. I still think it needs the incorporation of background foliage – a darker, enigmatic mass that will push the midground foliage forward, but I’ll have to leave the means to convey that to your expertise in Pen & Ink.

Let’s take this in three layers:

BACKGROUND
You cannot see leaves, only a silhouette of a mass of leaves, and it is devoid of three-dimensional detail.
A silhouette tells you little but the holes in that silhouette hold the clues because of the leaf shapes that surround their inner edges.
The outside of each dark silhouetted mass also has detectable leaf shapes.
The side of that background mass that you’re looking at is inside the tree and will thus receive very little or no light.

MIDGROUND
You can see leaf-like shapes, but mainly masses of leaves with some more visible and highlighted leaves within them. It contains little tight detail but each mass or clump of foliage will show three-dimensional form that depends on the lighting and its direction.
The leaf shapes that surround the edges and are starkly visible against the sky behind offer the most powerful visual clues to the viewer.

FOREGROUND
This is largely those masses of foliage that are directly facing you and are in front of the trunk.
You can see sharply defined leaf shapes with parts of leaves visible behind them that become less distinct as they recede into the internal shade.
You use these very visible and highlighted leaves to offer the clearest visual clues about the tree. Use sharp drawing and strong contrasts, and use the more shaded internal leaves to push the most foreground leaves forwards.
Use shade within the midground masses to strongly highlight the leaves around the most brightly lit side of each foreground mass. Thinks of those edge leaves as “icons” – recognisable shapes that instantly convey to the viewer the type and maybe even the species of the tree.

Combine all three and you achieve a good deal of depth; a drawing that is instantly understandable; and a tree that invites the eye to linger and explore ever deeper – but as the eye travels deeper, it has to find what it expects to find.

One final point (in graphite at least – I’m not certain about pen & ink): work from the background forwards. It’s the background that negatively defines the edge detail of the midground foliage, and the midground that defines the foreground edges. You cannot in my opinion, work from foreground to background for two reasons: the foreground will control what is possible in the drawing of the background, and the possibilities may not be sufficiently abundant; and you will be drawing the foreground with nothing to refer to. With no reference, its tonal range is a complete unknown and can only be guessed at. Guess wrong and the error extends right back through the tree. But by drawing the dark background first (including the silhouetted trunk and branches) you immediately establish the darkest tones in the drawing. The white of your paper is the lightest, and all other tones will then fall into place as you work.

Problems with Proportion?

I was recently asked:

I have been drawing portraits for a couple months but am still having a hard time with proportions. I’ve gone through websites, books and watched tons of tutorials, but I’m finding angled faces hard to draw. I always end up distorting them into looking straight ahead and it looks wrong. I was wondering if you have any tips to help me.

I think “looking straight ahead” might give me a clue to the problem. You haven’t yet taught yourself to see what is really there and you are drawing what you think is there. That’s a very common problem and one that you have to work at to overcome.

First, I suggest you try using the grid method to produce an accurate set of guidelines. I’m not suggesting that as a permanent answer but because it’s an excellent way of teaching your brain to stop interfering and to accept that what you see is actually correct. Take a look at my tutorial, which takes gridding a stage further: www.SibleyFineArt.com/tutorial–gridding-art.htm

This is a very involved subject so briefly: your brain is wired to store quickly-recognised features as a part of its defence mechanism. If you see a large face with huge teeth and a woolly mane, you need to recognise it instantly and get out of the way of the lion! All detail is discarded, only salient features are stored, and only those with hard edges, such as eyes and mouth. That’s why children usually omit the nose from drawings of people – it has no hard edges or clearly defined boundaries. Also everything is stored as a “straight on” image – when speed of recognition is paramount, simple is best.

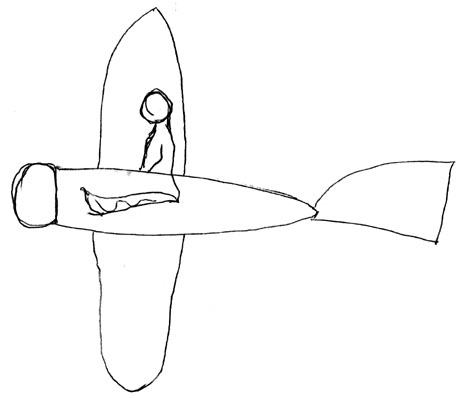
Here’s an illustration from my book (discovered behind wallpaper in our bedroom):

A child's interpretation of an airplane

The propeller is round and at the front. The wings are wing-shaped and correctly placed at each side. The pilot is inside the fuselage but can see out above it… it’s all logically correct but each element is seen straight on because that best describes its shape.

Try gridding first, because that removes three-dimensional form, textures, lighting, and detail and it reduces your subject to pure line. And by concentrating on just one square at a time, it divides each feature into unrecognisable shapes – shapes that the brain cannot recognise. Recognised shapes invoke the “I know all about that” response and the naming of parts. “That’s a ‘mouth’ and I know a mouth looks like this…” But that’s a generic stored-image mouth and not THIS mouth. It’s that naming and recognition you have to overcome and when you have, you’ll finally be able to see and draw what you are looking at – and not what you think you can see.