Julian emailed to ask:
I’ve always been told to keep my pencil sharp but in your book in the ‘Charlotte-portrait’ chapter you mention in stage 4 using a ‘flat’ tip. I’m not quite sure what ‘flat’ means.
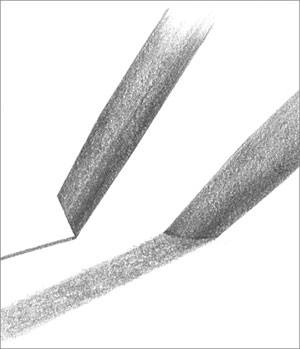
I always use a chisel point, which has many advantages.
To achieve that point, sharpen your lead as usual and then, holding it at your normal drawing angle, rub the point off on a piece of scrap paper. Now you’ll have a flat face surrounded by a sharp edge.
- Use the edge whenever you usually use a point – except the edge lasts a lot longer. Unlike a sharp point that wears very quickly, a usable edge extends half way around the flat face. Turn the pencil as you draw to maintain that narrow width of line.
- Use the flat face for shading. It cannot draw hard edged or thin lines so the coverage is smoother and more even. And there’s an added bonus…
- Every time you use the flat face you automatically sharpen the edge.
I sharpen my pencils every morning and probably don’t have to do it again for the rest of the day. If you’re not using the flat face and need to sharpen the edge, restore it by quickly scrubbing the face on scrap paper again. It’s almost an ever-lasting “point”; there is no constant pencil sharpening to break your concentration; and there’s one more major benefit…
You can switch from a broad flat face to a sharp point with a half turn of your pencil. Imagine being able to draw sharp linear detail and then applying a layer of tone to create the three-dimensional shaping without having to change pencils or reform the point. It leads to very spontaneous and intuitive drawing.
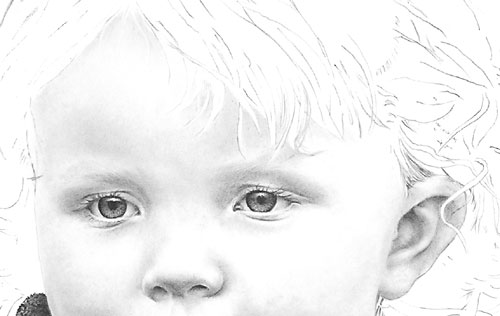
I’m aware I need to build the layers thru several applications and blending. Any advice?
Use the flat face of your chisel point and I think your problems will disappear. You can seamlessly build up layers of tone and blend at any stage. I would add that I personally work from dark to light. Hard grades tend to quickly fill the tooth with clay so soft grades won’t always successfully layer on top – but a hard grade will layer over a soft one. So, to build up a darker area of skin tone I first lightly apply 2B to the darkest areas and then build up the whole area with HB or, more usually, 2H. The 2H will burnish the 2B; it breaks up the graphite grains, spreads them more evenly and polishes the result. Result: seamless and flawless skin tones.