A Query on Size and Fading

Deidre emailed to ask:

I have just bought you book “Drawing from Line to Life“, and I’m really enjoying it. I was wondering if I could ask you a few questions? When you start out on any drawing, what is the most common pencil you use for the initial outline?

Lightly applied 2B, because I can erase it completely without leaving any indentations.

What is the largest size of drawing that you do? My current drawing is 14″ x 11″. I am enjoying it, but sometimes I wish it wasn’t so big. Do you think it is better to have a larger drawing or smaller?

I think my largest is around 17″ x 12″ and the head studies in print were about 8″ x 12″ – whatever size best suits the subject. With experience, you can more easily judge the size above which detail becomes unrealistic. I’ve also found that increasing the size by 20% almost doubles the work involved due to the extra detail required.

Personally, I’ve learned to not let size, and the time required, bother me. I just begin in the top left corner and work outwards. I split every drawing into one hour chunks as I’m working and ignore the unfinished portion, so I get to “complete” many small drawings rather than agonise over the time I need to complete the entire drawing.

On your head portraits of people or animals, why do you prefer not to put a shaded edge around the drawing like you see commonly from other artists?

It’s called a vignette, and I don’t like them because it’s unnatural and looks unrealistic. This is especially true if you’ve faded the drawing at the base of the neck – it really needs to just fade out at that point, but a vignette outlines it and ruins the implied continuance of the animal.

I think many artists use a vignette because it helps to increase the contrast within the drawing – this is especially true of a white animal – but there are other ways of handling that. I use what I call “edge shadows” – using the shadows beneath the hairs around the extremity to provide a clear visual boundary. Don’t worry about the overall lighting direction, you can lie quite convincingly and place shadows wherever you need them. The viewer just assumes there’s a reflective surface outside of the picture that is bouncing reflected light back into the drawing.

If you have to resort to outline, create a “lost and found” edge where the line alternately appears and disappears – sufficient line to tell the eye that it’s an edge but not so much that it looks like a line.
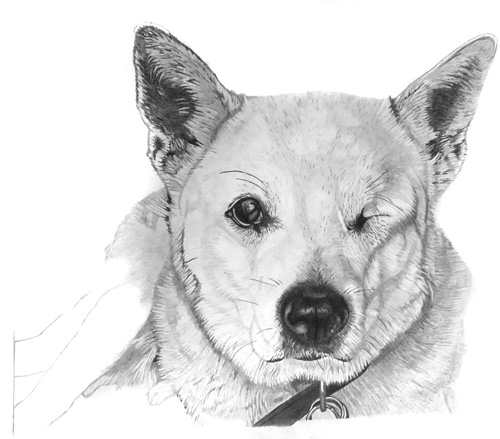
Deidre's unfinished drawing

I can clearly understand the edge of your dog and I don’t see any need to make it any clearer. The golden rule (for the inclusion of anything) is “If it doesn’t add to the understanding, don’t include it.” Subtlety is more natural than making something obvious. In your case, the ears are clearly defined, the head sufficiently so, and the neck doesn’t need its extremities defined, as it’s a secondary element. Personally, I’d terminate the collar half way down the rings, extend the drawing down an inch or so and use that extension to gently fade the rings and the bottom edge to white.

I can see guidelines on the left-hand side (its back legs?) that leads me to believe you intend to extend the drawing in that direction. Will that area add anything to our understanding of the dog? If those are its back legs, it will tell us that the dog is laying down, but is it necessary for us to know that? Will it helps us to better understand the head (the focus of the drawing)? Will we be distracted by wondering where the front feet are?

I’d just curve that side round to meet the collar and let it fade away to the left. That area is only required to put the head into context – and you don’t want to pull attention away from it.

The bottom of the collar of my dog, is just above the bottom of the paper, so I don’t have room to extend it down.

Golden Rule #1: Your paper should always be larger than your intended drawing! You can trim the excess paper off later but you can’t add it – as you found out. 🙂

My book and the dangers of working from B&W photos

This morning I received an email, and a separate enquiry through my Art Query page, from John asking:

Hi Mike, I have researched your book, “Drawing from Line to Life”, and the feedback that I have gained, is that it is the bible of drawing techniques. But would you tell me if it is geared towards the technique of drawing animals or would it help me with any aspects of drawing landscapes which is my personal preference.

I went to great pains to NOT write a book only about drawing animals – especially as that’s what I’m known for – and I fervently believe that if you can draw, you can draw anything. That’s one reason I included a chapter on the drawing of my granddaughter Charlotte – my one and only portrait.

The book itself features a chapter on trees and foliage, and it alludes to landscapes throughout – for example, the techniques required for shading a sky are the same as those for skin tones.

Incidentally, I also planned from the outset to always include the WHY as well as the HOW. I find too many books tells you how to do something but never explain when or why you should use it. I believe you need the WHY to fully understand the HOW. It’s like memorising a poem without understanding the meaning of the words.

The most useful of these is the good old Bostik Blue Tack, which is a truly magic piece of kit.

That features throughout the book – I even supply it worldwide now – and I personally couldn’t work without it. Once you cease thinking of it as an eraser, it opens up a whole host of possibilities. In my view, in one hand I hold a tool that can apply graphite and in the other is one that can remove it – brutally, gently, or by very subtle degrees with a simple light stroke of the surface.

I find converting the photos to monochrome and manipulating them within Photoshop gives me a more realistic idea of the tones and shades.

I absolutely don’t do that and never recommend it. The outcome can too easily be a copy of the photograph when it should be an interpretation that includes your feelings, emotions, and exaggerations of what is important. In any case, my compositions are almost always composites of a number of photographs held together by invention. Working from colour photos allows me to decide the tonal range and, as I said, to emphasise the importance of each element. Working from black and white tends to defeat that. And if I see someone at one of my workshops take out a B&W photo and a value chart, I shudder! There has to be invention and interpretation – otherwise the drawing will tell me no more than I can already gather from the photograph. And it will tell me nothing about the artist’s feelings for the scene.

I hope that helps answer your questions – and some that you didn’t ask 🙂

As Owen The Pencilneck remninded me below, you can lose a great deal of information if you convert colour to B&W. For example, if I’m drawing a black and tan dog (such as a Rottweiler) I lose the ability to tell a light patch of tan hair from a highlight in the black hair; following such a colour division through a patch of shade creates even more problems; and it interferes with my job as an artist to clearly differentiate for the viewer, using only tonal variations, between areas of tan and black.

I have at times used B&W photos because the detail can be studied more clearly – but that clarity is the result of removing the colour and most of the three-dimensional form that it describes.

But, as I said, the greatest problem with working from B&W photos is that they exert control over the tonal values that you use for your drawing – it’s almost inescapable. They stifle creativity and interpretation which, unlike copying, are what create art.

Donna commented to ask “…on the forum I hang out on, using Photoshop to greyscale a colour picture in order to better see values when using coloured pencil is considered the thing to do. Does your caution only apply to photos for graphite/monochrome work, or coloured work as well?”

I know many artists who use greyscale in Photoshop and the result can be very helpful in understanding the relative values within an image. But, personally, I think that’s as far as that strategy should be taken. Once understood, that knowledge should be used to aid interpretation, but the temptation is to use those relative values as requirements rather than suggestions.

My strategy is to first establish the darkest value in the drawing, so I now have the darkest and lightest (the white of the paper) values exposed, and all intermediate values should automatically fall into place. That puts me in control and not the greyscale image.

The following image is a composite one – Tom never stood in that water or even saw it.

Tom ~ Greyscale and Colour versions

Viewing the B&W version: on the plus side: detail can be sharper – Tom’s winter coat and ear, the ivy on the tree, detail within the dead grass. On the minus side: the foreground dead grass is difficult to separate from the water, the misty background appears to be closer and too sharply detailed, and the grass on the far bank cannot be distinguished from the green grass above it.

Both versions have plus and minus points, but attempting to draw from the B&W version is more likely to stifle artistic creativity. Would a lighter fence improve recession and push Tom further forwards? Would a more diffuse background give a better impression of mist and further aid recession and mood? I think both treatments would. The colour photo represents the way we actually see things so it possesses a “fence” that can more easily be engineered to suit the artist’s intention, where the B&W version (because it presents itself as a tonal study) tends to dictate the tones that should be used. It doesn’t contain a fence as we know it but a tonal representation of a fence, and it’s more difficult to engineer because it lacks the reality of the coloured version. Likewise, the lack of background detail in the coloured version invites interpretation, but the more sharply-defined B&W image almost demands an exact copy.

Whether working in colour or monochrome I would personally recommend using the B&W image for assistance in initial understanding, and for occasional viewing where sharper detail might be sought. But work with the colour version. That’s “with” and not “from” – to work with the assistance of the colour version to offer the maximum opportunity for artistic interpretation.