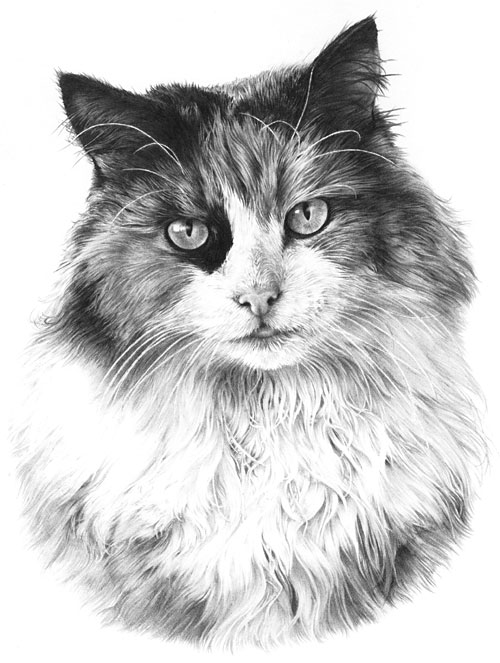
John emailed to ask about indenting – a technique that isn’t working too well for him:
I tried to draw the cat in the ‘Cat Food Advert’ as an exercise but it never really came off. I’m happy with the drawing as such but my indenting never really worked and I gave up trying to draw the chest area fur.

The chest fur of our lovely tortoiseshell cat is all negative drawing, which is quite easy once you get used to seeing white shapes on white paper and using the shadows to make them appear.
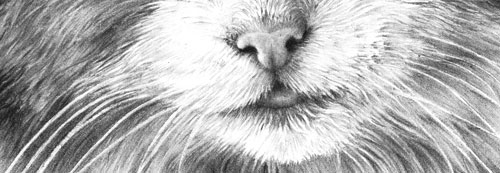
I’m happy with the drawing as such but my indenting never really worked… The width of the whiskers looked to vary due, I think, to not having even pressure of lines crossing the indentation.
Indenting, in my experience, has to be applied with as much pressure as your paper will stand – and the pressure has to be consistent, except for the final taper of course. It works best on a smooth surface – my Mellotex takes it like a dream – and ( this is important) you must have a hard, smooth surface beneath your paper. My drawing board is both hard and smooth, but if you’re using a wooden board or like to work with additional sheets below the one you’re working on, it won’t work effectively.
There always seems to be minute gaps between it crossing!, if that makes sense.
I’m not certain what you mean, unless your indent is throwing up a burr on each side? My Mellotex does that and I like it – it gives a very sharply defined edge. Also I don’t find it to be a problem, so I don’t think I have a ready answer for you.
Then there is a problem when the underlying fur runs in the same direct as the indentation. I keep getting stuck in the ‘tram lines’!
Often I divide the drawing of an area into line and tone – line detail first and then shaping tone on top – but if I meet an indent, I’ll sometimes reverse that. By applying tone with the flat face of a chisel point, I avoid dropping into the indent. That tone clearly displays the indent, and then it’s just a question of drawing the line content carefully so each stops at the indent and continues on the other side. If the hair direction is the same as the indent, that procedure works just as well, although more care has to be taking with lines that cross “underneath” the indent.
I have tried practicing but I’m not sure what I really should be doing about the above, even having read the book. Is there an ultimate width for the tip of the inscriber and can one use different widths. I think of the difference between the main whiskers and those round the mouth area of the cat. Does one use a broad one for the whiskers and a narrower one for the mouth area.
I have two indenting tools, both mounted into old clutch pencils. The one for whiskers is a darning needle that has a rounded point, ideal for indenting. For the smaller hairs of the top lip that extend over the darker mouth below, I have a smaller needle that has had the sharp point blunted on an oil stone.
If you’re trying to indent hairs to either side of the nose, or below it, I would never do that. Indenting works best in areas of high contrast – where the indent runs over black or very dark areas – but it produces a very mechanical line. I overcome that to some extent by drawing into the root of the indent to merge it into the surrounding drawing. For all areas above the fringe on the top lip, I always use negative drawing. The results are far more natural, and more controllable.
However, if you meant you indent thinner short whiskers on your cat’s muzzle, by all means use a thinner needle, but do ensure it does not have a sharp point that might tear the fibres of your paper. If you try to use a thick needle to indent thin lines, your pressure will not be great enough to indent deeply and cleanly. A little light flat-face shading with 2B will display their positions, and it can be removed or faded with Blu-Tack as you reach each area.
I e-mailed you a few weeks ago, about doing another course next year if you are doing some. What I really want to get to grips with is draw long fur, like a Spaniels ears and the throat ruff of the cat (as above). If you do another course, is it possible to be there but do my own thing!!
You certainly can do your own thing! 🙂 I have an new Intermediate course on April 12-14, 2013, which I haven’t written yet, but it will be based around my Drawspace 8-week course. That includes a week on drawing hair, and another partial week, so I can virtually guarantee the workshop will also include long tresses and curls.
There are three exercises in the Drawspace course that between them virtually cover the drawing of all types of hair and at any distance and they will undoubtedly be included. Other subjects will be negative space, negative drawing, advanced and creative shading techniques, using contrasts and drawing weeds and grass (the latter uses very similar techniques to hair).
Oh, my picture from the course this year; my wife framed it and actually has it in the lounge on the book cabinet for all to see!!
A wife with a refined artistic eye – what could be better! 🙂 There’s so much to fit into the 3-day Intermediate course there may not be a final drawing, but at least you’ll have the opportunity to work on your own. I hope you can join us.

