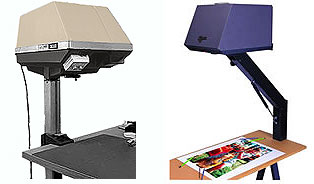
Shanti, who attended one of my workshops last year, has emailed to ask:
“I have been reading your book like a fiend and wanted to ask a question about projectors for tracing. It must be a huge time saver and I was interested in knowing what you might recommend.”
A Graphics Projector is definitely a great time saver – but to be used with caution, as I shall explain.
The best, in my opinion, is the Artograph DB300 (which I use) or the more powerful DB400. Unfortunately, neither are still in production but if you find one on eBay or a similar site, seriously consider purchasing it. It’s a huge and heavy beast, so you need permanent space for it, and a strong table or worktop to clamp it on to. The nearest equivalent that I know of, although not as solid as the DB300, is the Kopykake Kobra 5000. This has a similar sized copyboard to the DB300’s impressive 10″× 8″, but I’m told it can be a little inaccurate towards the outer edges of the image. That’s a common fault, as I shall also explain.

Incidentally, for mural or large-scale works, the DB300 can be lifted off its pedestal and replaced on its side to project horizontally.
PROBLEM:
Some Graphics Projectors have front-silvered mirrors and others are more conventionally rear-silvered. Which do I choose?
SOLUTION:
Always choose a front-silvered mirror. A rear-silvered one presents two surfaces for the image to reflect from – the front of the glass and, slightly behind it, the actual silvered surface. This can result in ghost images appearing.
PROBLEM:
My Graphics Projector displays distortion towards the outer edges of the projected image.
SOLUTION:
This is a common problem and easy to check. Draw out a grid of squares, load it onto the copyholder and view the result. Any distortion will immediately become apparent. Knowing that distortion is present is useful, but knowing WHERE that distortion occurs is invaluable. In most cases you should find the central section to be sufficiently distortion-free for most uses.
I overcome that problem by projecting multiple images to build up a complete composition. I’ll project an overall sketch of my proposed composition, resize it as required, and then outline only the background onto my final drawing paper, bearing in mind that it might not be totally accurate. At the same time I’ll mark the positions (placeholders) of the important elements – those that have to be accurate. Each of those elements will have been worked on as separate line drawings, and each is individually projected, placed in its placeholder and traced off. As these smaller line drawing occupy only the central area, they are free of distortion.
That might sound like extra work but, by isolating them, I learn much more about each of those elements while I finalise their appearances.
PROBLEM:
When I begin drawing, I find I only have a half-formed idea of how to tackle each element.
SOLUTION:
This can be a common problem when you simply trace directly from reference material. You have (and require) no understanding of the subject when you merely trace outlines and features. The solution is to use at least two steps.
Step #1: Project and trace the reference, so you remove all lighting, three-dimensional form, and texture. Boiled down to a simple line drawing, you can now easily alter it to suit your requirements, build in emotion, fix potential visual problems and even (if required) work out an entirely new lighting source direction. During this stage you will discover potential problems, work out what parts actually look like, and make the majority of the errors that might otherwise ruin your drawing.
Step #2: Project and trace your Stage 1 line drawing. Resize it to fit the placeholder or paper (if it is a stand-alone subject). What you are now projecting is YOUR drawing and not just a mechanical tracing of a reference.
Finally, a Graphics Projector can perform more tasks than you might consider possible. I now use a computer to perform many of those tasks, but previously I would, for example, use my DB300 to project one photograph of a dog onto another, using a piece of card to blank out unwanted areas so I could see the effect of one head attached to another body. Or I can superimpose the original photograph onto my line drawing and, waving a piece card from side to side through the projected light, easily check for substantial inaccuracies – any deviations between the two flash on and off. With some imagination, the uses are endless.