ARTOGRAPH DB300 – BULBS and MODIFICATIONS

ARTOGRAPH DB300 REPLACEMENT BULBS

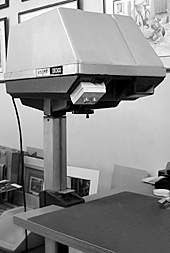
I’m a great fan of Artograph and I’ve been using my Artograph DB300 for over 25 years. Alex Dow of Artograph Customer Services contacted me unexpectedly, as a result of one of my Artograph posts, and has generously posted links to my website, “Drawing from Line to Life” book, and my Starving Artists website on Artograph’s Facebook page. Thanks Alex!

It also reminded me that I have a Post-It note (one of many!) stuck to my monitor as a reminder to pass on the news about replacement bulbs. My DB300 use two 150 watt photofloods in screw-fitting holders. Although my bulbs very rarely fail (more about this later) one inevitably did and, of course, at just the wrong time. I Googled for a replacement only to find the screw-fitting version is no longer available. So I had to either find an alternative or source ceramic bayonet sockets to fit the available bulbs.

Fortuitously, as is often the case, I received an email from Lesley Brown who told me “It’s my husband who is the creative genius. Chris has been an illustrator for the past 30 years or so. I just get lovely jobs like searching for bulbs.” 🙂 She needed the bulb’s code number, which I know (Phillips Photocresenta PF 605 E/51), but I warned her about the availability problem. Within a short time Lesley replied to say she’d found a possible replacement. She says “I emailed the company who say they ‘use this product to replace the old Philips code P3-4 which was the PF605E’. And I have ordered a couple to try.”

I ordered a couple too, and they work! They’re halogen, so a little cheaper to run, indistinguishable from the old E/51’s light output, and – I’m getting ahead of myself here – they’re fully dimmable.

The link you need at Easy Lightbulbs is:
www.easy-lightbulbs.com/light-bulbs/halogen-lighting/

View Chris Brown’s amazing artwork: www.ChrisBrownArtist.com

and his excellent illustrations: www.ChrisBrownIllustrator.com

ARTOGRAPH DB300 MODIFICATIONS

Lesley was pleased to report that the replacement halogen bulbs have a life of 2000 hours. That sounds good… but mine last for years! And here’s why…

I fitted my Artograph with twin dimmers because sometimes, if my source entirely covers the 10″ x 8″ copyboard, I need to reduce glare on one or even both sides. That glare can severely reduce visibility of crucial detail. For a while I would unscrew the bulb on the offending side, but that reduced the light output by a full 50%. The solution? I altered my DB300’s wring, and moved the on/off switch to make way for a pair of domestic lighting dimmers.

The re-sited on/off switch can just be seen above the dimmer box

This allows me to control the lighting on one or both sides simultaneously. As a bonus, I always run both bulbs at 90% power – the reduction in light is barely noticeable and it greatly increases the lifespan of the bulbs. I’m also pleased to report that the dimmers work with the new halogen bulbs! I knew halogen bulbs are dimmable but I believed they needed dedicated dimmers – not so!

You can view and copy the original and modified wiring diagram here:
www.SibleyFineArt.com/artograph-wiring.jpg

And I’m asked so often for details of the Artograph DB300 that I put together a PDF version of the manual. You can download a copy here:
www.SibleyFineArt.com/artograph-manual.zip (2.6MB)

If you make the modification, encounter any problems, or have installed any other interesting modification, I’d be delighted to hear from you.

Thanks again Alex. Thanks Lesley for finding the bulb source for us.

Choosing a Graphics Projector

Shanti, who attended one of my workshops last year, has emailed to ask:

“I have been reading your book like a fiend and wanted to ask a question about projectors for tracing. It must be a huge time saver and I was interested in knowing what you might recommend.”

A Graphics Projector is definitely a great time saver – but to be used with caution, as I shall explain.

The best, in my opinion, is the Artograph DB300 (which I use) or the more powerful DB400. Unfortunately, neither are still in production but if you find one on eBay or a similar site, seriously consider purchasing it. It’s a huge and heavy beast, so you need permanent space for it, and a strong table or worktop to clamp it on to. The nearest equivalent that I know of, although not as solid as the DB300, is the Kopykake Kobra 5000. This has a similar sized copyboard to the DB300’s impressive 10″× 8″, but I’m told it can be a little inaccurate towards the outer edges of the image. That’s a common fault, as I shall also explain.

Artograph DB300 and Kopykake Kobra 5000

Incidentally, for mural or large-scale works, the DB300 can be lifted off its pedestal and replaced on its side to project horizontally.

PROBLEM:
Some Graphics Projectors have front-silvered mirrors and others are more conventionally rear-silvered. Which do I choose?
SOLUTION:
Always choose a front-silvered mirror. A rear-silvered one presents two surfaces for the image to reflect from – the front of the glass and, slightly behind it, the actual silvered surface. This can result in ghost images appearing.

PROBLEM:
My Graphics Projector displays distortion towards the outer edges of the projected image.
SOLUTION:
This is a common problem and easy to check. Draw out a grid of squares, load it onto the copyholder and view the result. Any distortion will immediately become apparent. Knowing that distortion is present is useful, but knowing WHERE that distortion occurs is invaluable. In most cases you should find the central section to be sufficiently distortion-free for most uses.

I overcome that problem by projecting multiple images to build up a complete composition. I’ll project an overall sketch of my proposed composition, resize it as required, and then outline only the background onto my final drawing paper, bearing in mind that it might not be totally accurate. At the same time I’ll mark the positions (placeholders) of the important elements – those that have to be accurate. Each of those elements will have been worked on as separate line drawings, and each is individually projected, placed in its placeholder and traced off. As these smaller line drawing occupy only the central area, they are free of distortion.

That might sound like extra work but, by isolating them, I learn much more about each of those elements while I finalise their appearances.

PROBLEM:
When I begin drawing, I find I only have a half-formed idea of how to tackle each element.
SOLUTION:
This can be a common problem when you simply trace directly from reference material. You have (and require) no understanding of the subject when you merely trace outlines and features. The solution is to use at least two steps.

Step #1: Project and trace the reference, so you remove all lighting, three-dimensional form, and texture. Boiled down to a simple line drawing, you can now easily alter it to suit your requirements, build in emotion, fix potential visual problems and even (if required) work out an entirely new lighting source direction. During this stage you will discover potential problems, work out what parts actually look like, and make the majority of the errors that might otherwise ruin your drawing.

Step #2: Project and trace your Stage 1 line drawing. Resize it to fit the placeholder or paper (if it is a stand-alone subject). What you are now projecting is YOUR drawing and not just a mechanical tracing of a reference.

Finally, a Graphics Projector can perform more tasks than you might consider possible. I now use a computer to perform many of those tasks, but previously I would, for example, use my DB300 to project one photograph of a dog onto another, using a piece of card to blank out unwanted areas so I could see the effect of one head attached to another body. Or I can superimpose the original photograph onto my line drawing and, waving a piece card from side to side through the projected light, easily check for substantial inaccuracies – any deviations between the two flash on and off. With some imagination, the uses are endless.