DRAWING BOARDS
Gary recently emailed me to ask:
At present I am unable to afford a decent drawing board so I’m looking to make my own. I was just wondering if you may be able to offer some advice on which materials may be best for the job? For example, would a piece of MDF be okay on it’s own or is there a material you suggest for covering the wood? I was thinking about covering the would with that sticky-backed vinyl covering you can buy to line kitchen drawers but would the surface be too slippery to hold the drawing paper? Alternatively would Melamine faced chipboard be any better (Being made of chipboard it may not be as versatile as MDF and therefore not offer a suitable surface for drawing). Just wondered if you might be able to recommend anything suitable?
When I first began I was in the same situation that you are – working on the dining room table at that time! From there I progressed to building my own drawing boards and have used Melamine-faced chipboard satisfactorily. My current draughtsman’s drawing board is simply made of that too.
MDF (Medium Density Fibreboard) on its own would be fine. However, for best results, I suggest you need a hard surface under your paper, as you don’t want any give under your pencil as you draw, so plastic laminate on MDF would be ideal. By that I mean Formica or any similar plastic laminate, such as is used for counter tops. Don’t used a textured laminate but search for a smooth flat surface – they do exist.
I certainly wouldn’t use sticky-back vinyl – it has a habit of shrinking over time and with temperature changes, which will probably lead to an annoying border of adhesive on your board. It’s also, in my opinion, far too soft for a drawing surface.
My first home-made board was a plastic laminate covered cupboard door! I fitted angled wooden brackets beneath it to angle it by lifting up the back edge. My next was an old sheet of 24″ x 36″ blockboard that I covered with plastic laminate. This time I hinged two angled brackets beneath it to lift up the back edge by 12″, although you may prefer a lower angle. It was also thick enough for me to use standard drawing board clips to hold my paper in place.
Now I use a draughtsman’s full-size (A0) drawing board, which is so heavy that after I installed I kept checking the ceiling of the room below to make sure it wasn’t about to drop down a floor!
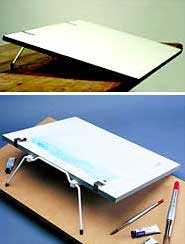
An ideal, especially if you don’t have dedicated studio space, is to use a commercial table-top drawing board.

I have 15 of these that I use for my UK drawing workshops. Measuring 18″ x 24″, the folding handle swings down to form legs that give it a working slope – raising the top edge by about 5″. They also have notched rubbed strips at each side near the base, so the board can be moved forwards over your lap and the strips grip the edge of the table.
