Mounted or Unmounted paper?

Michael Benee wrote to ask:

“I have just finished my first dog portrait, and I mounted the cartridge paper onto a mounting board before I started. I notice that you use a heavy weight Mellotex paper is this so that there is no need for mounting, and is this how you supply your originals to your clients i.e.unmounted?”

You don’t say how you mounted your drawing paper to the stiffer support. I’d recommend vacuum mounting by your local framer, because other methods (spray adhesives, for example) may not be permanent or may bleed through to the surface with time.

I don’t ever mount my drawing paper mainly because I detest any “bounce” in the paper as I’m drawing. A smooth and hard surface beneath my Mellotex means that the mark I make is the mark as I intended it – not one that sinks into a soft surface that interferes with my control. If your paper is lightweight, change to a heavier weight and place it on a melamine or similarly hard surface, such as a drawing board. Even tabletop drawing boards usually possess such a surface.

Another reason why I don’t mount my paper is that most of my work is destined to be released as limited edition prints. That means it has to be scanned and, in my opinion, you can’t beat a laser drum scanner, which demands that the paper be sufficiently flexible to wrap around the scanner’s drum.

When (rarely these days) I present a commissioned original to my client it is always in its raw state – trimmed to a suitable size and displayed in a custom-made matboard folder. The folder protects the drawing and doubles as a presentation easel, further protecting the drawing from being handled.

Michael added:

“Please find enclosed a pic of my first attempt at drawing my dog, any comments would be welcomed with open arms”
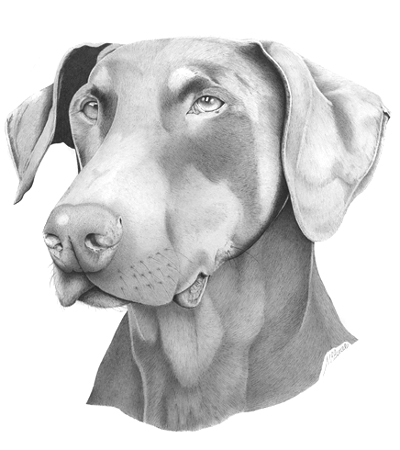
Copper by Michael Benee

For a first attempt (even for a tenth) this is admirable! Weimaraners suit graphite so well. The eyes are beautifully studied and executed and sufficient directional facial hair suggests the texture. My only criticisms are that the texture does not extend to the muzzle, which appears to be too smooth; that the dog overall is too tidy (it’s the out of place hairs, flecks of foam etc that add a sense of reality); and the nose has a highlight suggesting a shine, although Weimaraners have quite a dry, non-reflective nose.

Finally, just a personal preference, I would have feathered the bottom edge of the neck to suggest an unseen continuation.

That said, well done!

Having Prints Made?

REPAIRING DAMAGED DRAWING PAPER

My friend Mary Ellen wrote to ask:

I am thinking about trying to get the graphite barn picture I did printed. Can you give me an idea what I should look for and ask from the printer? I have never had a print made so your advice would be invaluable to me.

I see your chosen printer has a Cruse scanner – the best flat-bed scanner many thousands of dollars can buy. My friend Dave in the UK giclée printing business (www.dace-digital.com) says he finds it to be too good – it picks up the texture of the paper, for example, when that might be a distraction. Personally, I always have my work drum laser scanned – the results are superb!

Are you doing this online or by personal visit? It’s worth pointing out to them, which area is supposed to be read as white. If you don’t, they might not set the white balance point, and all your whites will contain a proportion of tone. I had that happen once. Compare the original to the print and the latter looks as though a maverick cloud has obscured the sun.

If you’re giclée printing, suggest that they desaturate the image or print using only blacks and greys. What you don’t want is the use of colours to create the greys, because you stand the risk of metamerism, which is an overall colour-cast that varies under different lights.

If you will be offset-litho printing, suggest they use the Duotone process (uses two of the colour plates of the 4-plate colour system) and print using a black and a warm grey.

Choose a decent weight of paper and one that is at least as white as your original. If it’s whiter, that’s OK, because it will simply increase the contrast in the piece.

I’m sure they’ll offer a proof, or a selection of proofs for you to choose from. Don’t necessarily choose the one that is closest to the original – this is a print, so compromise and choose the one that is the most likely to appeal to buyers. Boosting the contrast can help in that respect, hence my advice to choose a whiter paper. The print will be a true reflection of your original but with a subtle contrast shift that helps to catch the eye of potential purchasers – especially useful in a gallery situation.

Talking of galleries: they have tendency to mat graphite works in black. In my opinion that kills them stone dead. Instead, double-mat – use an off-white main mat (it will increase the intensity of the white of your paper) and pick a secondary “colour” from the piece for the rear mat reveal. You could, for example, use green from the leaves or a brown from the timber. Incidentally, browns work well for matting originals, because they bring out the subtle warmth of the clay in the graphite mix.

Drawing Paper Repairs

REPAIRING DAMAGED DRAWING PAPER

Kerri Higgins (www.ArtWanted.com) asked me this morning:

I have done the unthinkable on one of my favourite artpieces rendered with colored pencil and light watercolor wash. It is still not right and I need to fix it, why oh why did I screw around with it! Is there a way to cover damaged final drawing paper?

Well, Kerri, I wish I had the answer for you but I probably don’t. It’s the sort of problem that only arises once, because after that first time you take the utmost care to ensure you don’t do it again! I know – I’ve been there.

In my case I have an early drawing and print of a Rough Collie head-study. I was unhappy with the highlight in the eye and, like you, I changed it once too often. This was almost thirty years ago when erasers were not as developed as they are now, so my final “improvement” was carried out with a sharpened typewriter correction pencil. Well you guessed – I rubbed a hole right through the paper!

I didn’t know how to repair it but typewriter correction fluid seemed like a good idea. It did fill the hole… but it dried with a greenish colour-cast, quite different from the white of my paper.

As I said, you only ever make that mistake once!

You didn’t fully explain what your problem is, so I’m assuming it’s not a hole but an area of raised fibres, where you’ve broken through the top surface. Nor did you tell me what paper you were working on. Paper, incidentally, is not nearly the flimsy material that many artists believe – particularly the Mellotex that I draw on – but repairs are best left to professional Paper Conservators, who are not necessarily as expensive as you might think.

In the case of raised fibres or removal of the paper surface caused by excessive erasing, there is nothing that you can do to restore the original condition. If you attempt a repair, dry media, such as your coloured pencils or my graphite, will sit awkwardly in the fibres of the paper and will be visibly different as the viewing angle of the repair changes. In the case of graphite, the overall sheen will alter too, due to the broken surface reflecting light haphazardly.

An attempted repair to a watercolour work might be even more disastrous, because the openness of the paper’s surface in the damaged area will cause it to wick any wet medium into the paper with alarming consequences.

There is, however, one solution that you might try if the surface is only suffering from raised fibres – it’s one I’ve used myself with some success in localised areas. Take a fingernail emery board, stroke it lightly along the area, following the grain of the paper, to realign the fibres, and then simply use the back of one your fingernails to smooth the fibres back down. If you wish to draw within that area again, do so only in the direction of the grain. It’s not perfect but it does work.