Transcript
INTRODUCTION
While sketching on paper is an excellent way to explore your ideas - these videos will help you to take those sketches - or even selected parts of them - and combine them with other sources, such as photos, or even stills from videos.
REMOVING BACKGROUNDS showed you how to extract those sources from their backgrounds and, if you need to, reduce them to outlined silhouettes that more comfortably fit into your sketches of settings.
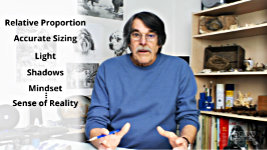
Then PART ONE of MULTI-SOURCE COMPOSING explained how you might put all those elements together to tell a story. However, there are potential problems involved with forming multi-source compositions - such as:
Relative Proportion
Accurate Sizing of known-size objects
Light and associated Shadows
And the Mindset needed to turn your manufactured world into one with a
Sense Of Reality.
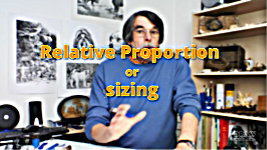
RELATIVE SIZING
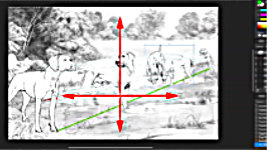
So, let's begin with relative proportion - or how to ensure everything is the right size when compared to everything else in the scene. I have covered this elsewhere - RECESSION AND DEPTH in the Creative Series - but the fundamentals are this: you can use measurement and convergence lines (or Orthogonals). In this case the orthogonals are sourced back to the vanishing point. But in this composition we can use two elements that we know are the same size.
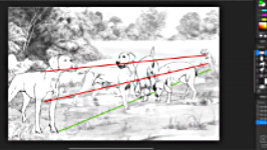
We can connect the foreground bitch and the one in the background from shoulder to shoulder, and breast bone to breast bone. Now anything in between those two can be resized -
relative to those two - and with sufficient accuracy for our purposes.
This dog, for example, at first appears to be a little too big - it doesn't fit exactly between the lines. But we also know it's a male - so it's larger - and a little further forward on the ground than the other two. So all is good. Much the same applies to the jostling pair. I think they're about right. Slightly larger than expected but not unnaturally large because, again, they are forward of our imaginary line.
Try looking at it this way: You could resize the dogs to match a particular distance into the scene and now you can move them horizontally, because they remain at the same depth... the same distance away from us. But what you cannot do is move them vertically because, now separated from the ground, we see them as travelling back into the scene - or forwards if they're moved down. In both cases, they're on a new plane and need to be resized again. Oh! And this is very often relevant - everything else in this scene is ORGANIC - natural - so it could be almost any size.
ADDING A KNOWN-SIZE ELEMENT
But what if they're not? What if you want to include something that we know the size of? Well, we use relative sizing... like this:
You need to find one measurement in the scene that you know to be accurate. That's the secret to success. In this case, a quick online search tells us: The Weimaraner breed standard height from the ground to the withers - or shoulder - is, for males, between 24 to 27 inches (that's 61 to 69cm), while females stand between 22 to 25 inches (or 56 to 64cm).
Now, what follows looks like maths and trigonometry... but it's mainly just three-dimensional thinking and common sense.
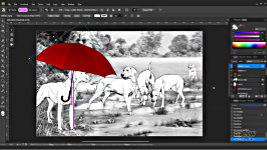
As the weather is inclement, let's give our dog on the left some protection.
Umbrellas vary in length but mine is 34 inches - about 86cm - so I'll use that. We've established she's 24 inches from the ground to her shoulder, so, using the PEN tool, create a line that we know is 24 inches long. Copy and move it up until its half way up the original line... That's 36" in total. Now bring in the umbrella, rotate it to vertical, position alongside our measure, and resize it, until it's slightly smaller - 34" remember?
Flip and Rotate it to suit. And lift it up into place. Lifting it vertically is OK in this case, because it remains at the same distance from us. Now it's doing its job and protecting the dog. Although it looks a bit ridiculous floating.... So let's add even more ridiculous... by calling for some local assistance.
As we know the left-hand and right-hand dogs are the same size, we can connect them. Cats vary in size but, standing upright, this one looks OK at three-quarters the height of the dog. So join the top of the cat to a point three-quarters of the way up the right-hand dog. Now link puss to the umbrella - and you have three options:
1) Select the top layer and Press CTRL+E to merge it with the layer below.
But that's permanent, so let's UNDO that - CTRL+Z.
2) SHIFT+CLICK to select both layers, and then use CTRL+G to group them together.
Give them a name if it helps. Now they're separate but will behave and resize as though they're a single image.
Or do as I'm doing...
3) Group them, and use CTRL+J to duplicate the group. Then turn one copy off, and resize the other at will. That way, you can experiment and quickly return to the originals if it doesn't work out. And now - using the change in scale between the left-hand and right-hand dog, puss can accurately protect any dog along that route.
But I could also just choose a Vanishing Point on the horizon and connect two orthogonals from it to the cat. Now you can accurately resize the cat to be correct at any distance. And, once sized, you can move it sideways anywhere in the scene, because its distance from us is constant. And you can move it vertically, because the wind could launch our poor cat into the air. But, in almost all situations, you cannot move it below the position that it was sized to be, because we see that as being progressively closer to us. This does take some thought, because you have to be thinking three-dimensionally, but it is essentially just using common sense.bb
LIGHTING and SHADOWS
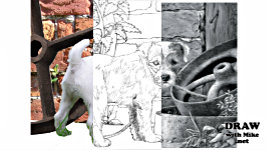
When all the photos were converted to line, did you notice something important?
All the lighting was cancelled. It's all line. Look - there's shadow between the dog's legs, and its head is casting a shadow on its neck. But, once it's reduced to line... you can
light it in any way you want to. It's really not difficult. Heck, you don't even have to be completely accurate.
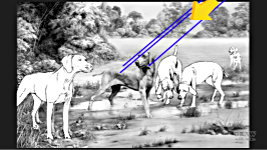
I like to think of it from the Sun's point of view. Draw an arrow in the margin to constantly remind you of the sun's direction. Look at my trees; the light is from the right, the shadows are on the left... and that's all your mind needs to understand what's going on. So, decide on the lighting direction and then, just think: "If the light is shining from up there, it can see this part but not this."
And what the sun cannot see is in shade. And that thinking really helps you to see your "flat" subject in three dimensions.
For example, let's see where the sun was positioned when this photo was taken. If we connect the furthest point of the ear's shadow to the tip of the ear and up into the sky... And again from the nose tip's shadow up past the nose... we find the sun was almost directly overhead. Now lets see what changes need to be carried out on the drawing if we decide to move the sun to the right. And - bearing in mind that the sun's rays are always parallel - the tip of the ear casts a shadow higher up. The nose casts its shadow along the dog's back. And we can use another orthogonal to discover where the top of the head extends that shadow to, which results in a shadow similar to this. "Similar" because accuracy really isn't essential. Our brains know how to decode it and that's all that matters.
And if you're really unsure about the shadows, you can change the quality of the light. Perhaps from bright and sunny with its strong, hard-edged shadows, to overcast where shadows are weak and very soft-edged, or misty - and now you have very diffused shadows. And our brains understand what our eyes are seeing, and seek to make everything agree with what they know.
Or - and this a serious suggestion - you can completely omit many or even all the shadows. And, to some extent,
you should. Have you noticed that my dog is casting the shadow of its head on its body... but nothing else is casting a shadow. Not its legs on the ground. Not a blade of grass or a stone. And there's a good reason for that. If you include all the shadows, you reduce the impact of the shadows that matter. The shadows become so over-complicated that the mind just notes "shadows" and then ignores them. Any shadows that add to the story are now rendered useless. The shadow of that dog's head emphasises the turn of its head. It adds movement, action, three-dimensionality.
Include shadows only when they mean something. Beneath this ear, for example, because it lifts the ear away from the face and creates depth. The minds of your viewers will search for understanding - as they always do. They'll recognise your soft-edged, weak shadows as being a result of a wide spread of dull light - and deduce an overcast day. Your hard-edged shadows as being created by strong sunlight. Or the absence of shadows as the sun being directly overhead. A single shadow can provide that data - so don't complicate by over-populating your drawing with shadows.
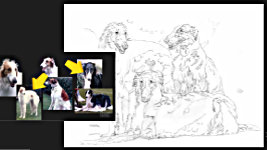
So, changing the lighting direction, or quality, does take a degree of confidence coupled with patience, but it certainly can be done. And once you take the plunge and begin to learn, you have a much wider range of source material available to you. Now you can include an object illuminated from the left with other images lit,
from the right, or vice versa. I did that with these Borzoi - the Russian Wolfhound. Combine this body, with this head,. And you get... This body and head come together to add.. And finally, this prone body, with this preferred head, produces the lovely black, tan and white dog - just like our old Karlyanne. And the White and Tan at the right looks a lot like our Anneka. Long gone now, but both lived to the grand old age of 14.
The setting is completely imaginary. We had an old dark Berberis hedge at our previous house, and that inspired the choice. It's that "B-Roll" again. Always look around you and photograph anything you think might later be of use. Not to copy but to inspire.
BUILDING AN IMAGE LIBRARY
Finally, there's another major benefit to composing this way - you can repurpose images you've previously prepared and used. You could, for example, keep a library of parts that you add to after each composition.
This is a composition I've used in workshops that consists entirely of photographic sources. As your library holds images already separated from their backgrounds, you can very quickly throw an idea together, backed up by images from the Internet and your own photography. Forget light and shadow. Just think "content" and put those parts together. And the result has one major aspect of importance - it's
so totally false that you have to interpret it - believe in it - see it as being your own world - just to make it work. And that mindset will roll over into your other work too. It's a win-win situation, and here's how...
Initially, I re-used an earlier, composition that featured my dog Buster, which was way too complex to use in a physical workshop. But, simplified, it could be used in an online workshop, where a week or two could be spent on the drawing. So, I took Buster out, leaving a mix of foliage from our lane, a log - pretending to be a tree - and a large stone. Combined, they offer a good range of textures - but there are opportunities to include more.
I zoomed in a bit, and lowered the base and stone. But it's still too complex. You can learn a lot from drawing a few leaves, but this is overkill! So, I simplified it by adding the wall. That adds more texture and hides a lot of time-consuming foliage. I added rust with this cast iron wheel from an old henhouse - which will,
cast a shadow on the wall - so I created one with the BURN tool. Now I need to seal that side - to stop the viewer's eye travelling out of the scene. The wheel is floating, and I need to hide the bottom to prevent it becoming a distraction. So, I used the base of Buster's composition. Nothing needs to be carefully cut out. This has been roughly erased into shape at some earlier time, and that's OK. We're not producing a finished work of art, just the foundation that will give rise to a set of outlines that in turn will guide the drawing. And, at the same time, there's a need to direct the viewer's eye.
So, there's an unfortunate arrow shape there, pointing out of the scene that needs to be corrected. That looks OK, but the wall, and its vertical edge, is now dominant. And that might be because it cut off a couple of leaves when it was included. Restoring those leaves to overlap, pushes the bricks further back and hides the brightest and most distracting part of that edge - although it's still splitting the composition vertically. Well, that might be fixed when I introduce a new feature at the right... And it has. This old concrete step not only removes more of the brick's edge, it also gives us a stage for our main character, who I'll introduce to you soon.
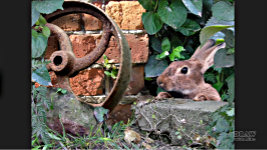
But first, I really want to concentrate the viewer's attention within the frame, so I'd prefer to soften the end of the step, or even cover it entirely. That works. But more features along that edge would also help. The big leaf alone brings that area into the foreground and, as we're adding elements that either balance or steer the eye, it helpfully points into the scene. There's hole in the top right corner to fill, so I copied the leaf in the top left-hand corner, flipped it, and used that. And now the scene is set to introduce our main character... The RABBIT.
But see how soft-focused it is, compared to the wall or the wheel? Well, that's OK, as long as you take photos - as you should - that concentrates on detail.
I typically did that for a dog's nose, eyes and ears. If you always do that, you can confidently use, any soft-focus or blurry image for a pose, because you can rebuild it using the detail photos.
Here, I much prefer this pose but I can use this photo to rebuild it, because it contains all the detail information that's missing. I could even, overlay the relevant parts from the good photo upon the poor one. Well, I could... but, personally, I prefer to choose what I need from the detail photo while I'm drawing and rebuilding the other one.
Well, we're almost done, but that bright leaf behind the ear troubles me, because it forms an awkward extension to the curve of the ear. So, I'll use a copy of the big leaf behind the ear to bring it into the foreground, and move it up a bit, to cover it. And that also nudges the rabbit back in space - placing another layer between us, the viewers, and the naturally-apprehensive rabbit. Now there's just one thing missing - our rabbit's left foot. And the easiest easy to fix that - bearing in mind that we're artists - is to copy its right foot and use that. Yes, it looks entirely false, but - and here's the kicker, SO DOES THE REST.
THE MINDSET YOU NEED TO DEVELOP
The lighting, the shadows, are all over the place and need fixing. There are duplicate leaves - even a foot that's the wrong way round - and it's your job, as the artist to fix that. You cannot copy. You have to interpret. You have to believe that what you're drawing is three-dimensional and real, so it recalls actual experiences in your mind.
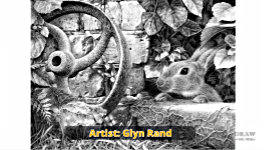
And here - courtesy of artist Glyn Rand - is what I mean. Glyn chose a direction for his lighting, and then applied it to everything, because he saw every element as being three-dimensional. Look at this leaf where it overlaps the wall. Every vein picks up a highlight. It's partially shaded by the leaf above it. Even it's thickness picks up a subtle highlight, as does the waxy surface. And this leaf alongside the rabbit, well, in the reference it's lifeless and probably a copy of the leaf to the right of the rabbit. But in Glyn's world, it protrudes out from the wall to catch the light, and the leaves above cast their shadow on it. Is that shadow correct? It really doesn't matter. It tells us
depth, recession, and that it's
a three-dimensional world.
Glyn took every aspect of the reference, turned it into something he recognised or had experience of, and then applied the lighting. Even down to the rabbit's foot. Is that foot correct? I've no idea. And neither have you. But it's essentially not a copy of its other foot, and that's all our minds need to know - to accept it as reality. And Glyn's drawing is an excellent example of the approach you need to develop when composing this way.
Find or take the photos. Immerse yourself in them until a story emerges. Compose the elements to relate that story. Then convert it to line, so you can change that world into yours. Add features here, move or alter others there. And then use those guidelines to tell your story.
Remember, nothing about guidelines is carved in stone. Anything could - and probably should - be altered as you draw. This was our pup Maisie. And if rudely interrupted, she would simply ask "What?" - which is the title of this Limited Edition print.
My thanks go to Glyn for his drawing of the rabbit. Don't forget to download the Cheat Sheet provided below of all the keyboard shortcuts used in this and the previous two videos. And next time we'll complete the subject by exploring a few of my ideas that made it to print, and the process that got them there.
So, I'll see you there...
© copyright: Mike Sibley 2026


A lightbulb turned on over my head too when I saw how you determine the position of the original source of light. It just never occurred to me.
Thank you as always for demystifying the process for us!