
The CREATIVE TECHNIQUE series
DRAWING HAIR: Part 3
Mike introduces you to Visual Clues and how to use them. These are the visible keys that tell you, for example, that you're looking at curly hair, or any other type. You instinctively know it's curly, so you need to search for the clues that are telling you that. Repeat them in your drawing, and you'll send the same message.
Learn too, the basics and benefits of indenting; how to extract additional information from your reference photos; and quickly recreating the tight V-shaped locks of 'wet and wiry' hair.
WHAT YOU GET...
Introduction
This video begins with a quick digest of the previous three videos. And it explains that human hair is easier to draw than the more complex hair of animals, but they share the same techniques.
Different types of hair...
A brief look at the different types of hair. To understand each, you need to explore the way our brains see and decode them, and then use what you discover to send the 'this is hair' message in your drawing.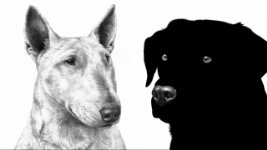
Black and White hair: intro
A common belief is that drawing black hair is difficult because "black doesn't show anything", nor white. But reflections of light - the highlights and shadows - on black hair, and white or blonde, describe the structure beneath.
Sharpness is important...
Handy Hint #1: Sharp edges are of vital importance. Having created the sharp edges, seek to preserve the sharpness and clarity of your drawing for it to resemble reality.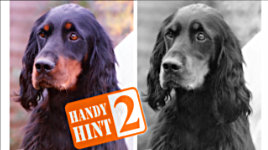
B&W or Colour references?
Converting your coloured photos into B&W might help you to match values in the reference to your drawing, but you immediately have at least one major problem. And you risk copying the photo, and not drawing the subject.
Drawing: Long Black Hair
The simplest hair to draw - it's all blacks and highlights. But, you do need to able to see those highlights in your reference, so Mike shows you how to bring out all the detail in your photos, using Photoshop or any similar app.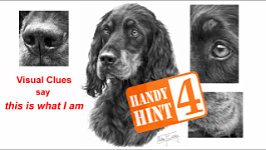
Using VISUAL CLUES...
HANDY HINT #4: Analyse each area, and work out why the hair looks the way it does. Look for the "Visual Clues" - the elements that say, "this is what I am". The clues are there. They must be. If the hair looks Soft... there's a reason for that. Now discover why you know that.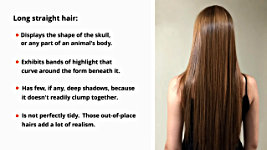
Drawing: Long Straight Hair
This clings to the shape of the skull or body. There will be few deep shadows, as locks don't readily form. And the hair hangs like a curtain. Mike helps you find the crucial clues. And gives advice on toning the paper for white or light hair.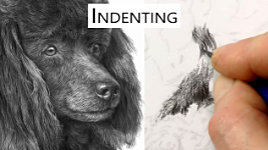
Drawing: Fine Hair
Mike helps you analyse fine hair, with its crimped tips, and light-scattering stray hairs. And he demonstrates the basics of Indenting, which produces wonderful parallel-sided hairs with fine tapers. Ideal for wispy ends!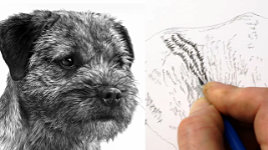
Drawing: Wiry Hair
Drawing Wiry hair, with a demonstration of "Wet & Wiry". This technique is a speedy method intended for small scale use. It could be a useful building block on which to develop your own technique.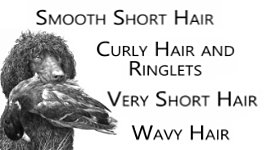
More Hair...
Further sections comprehensively cover the drawing and understanding of: Smooth, short hair. Curly hair and Ringlets. Very short hair. And Wavy hair.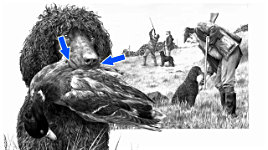
Conclusion...
These methods of drawing hair apply also to feathers, fleece, and other skin covering. Before putting pencil to paper, analyse its appearance, extract the visual clues, and then incorporate them into your drawing for super results.Watch the 5-minute PREVIEW:
Transcript...
Transcript
Fortunately, the drawing of both human and animal hair share the same techniques. Although, human hair is easier to draw than the more complex hair of animals, because of the diverse variety of textures and underlying forms.
In the previous three videos we've found that:
• Believable results don't rely on the drawing of every hair.
• Suggesting detail that isn't actually present, produces a more natural sense of reality.
• Drawing only the underlying three-dimensional form doesn't work.
• Drawing hair over the solidly shaded form is doomed to fail.
• Depicting the way light hits the hair creates realistic form.
And that the last most realistically resembles reality.
It's also the best solution for the drawing of animals, which have more complex body forms beneath their hair than the simple cranial domes of humans.
So, we now know the basic methods of constructing hair and how to break it up into manageable sections, and now we'll look at the different types and their peculiarities. And to understand those, you need to explore the way our brains see and decode them, and how you can use what you discover to send the messages that not only say "hair", but wavy, and curly, and spiky, and so on. Each has its own set of clues to its type that you need to discover. And the clues are there, no matter what you might believe.
For example, the most basic misunderstanding, and a fairly common belief, is that drawing black hair is difficult because "black doesn't show anything", and drawing white hair on white paper appears to be illogical and not possible.
It's true that if everything 'black' was really black, and everything 'white' was pure white we would see nothing except featureless, flat shapes. But in reality reflections of light play a big part in what we see. It's the highlights and shadows of a Black Labrador's glossy coat that describe the dog's underlying structure and features. And the same is true of a white Bull Terrier except that the emphasis is reversed - the shadows play a greater part than the highlights.
And that's what I was referring to when I said, "you need to explore the way our brains see and understand hair". Because without that observation, you'll struggle to recreate the realistic appearance.
For example, while you draw a white dog by drawing the shadows cast by the airs, you also need to realise that those shadows are weak, because the coat of a white dog reflects a lot of light internally, which dilutes their strength. So, knowing that, you can decide to stretch the contrast.
In this case, the nostrils and eyes are very dark, as are the inside of the ears. Those strong darks cause the white to shine more brightly. And they permit the use of darker mid-values to suggest the overall three-dimensional form.
So, in many ways, both colours share the same technique, except that the white hairs on a white dog form the highlights on the coat of a black dog. And, in both cases, the hairs themselves are of lesser importance than their reflections and shadows. And notice too that we can easily detect the edges of the hairs because they are sharply defined. Those edges are of vital importance. So, having created the sharp edges don't blend hair! You need to preserve the sharpness and clarity of your drawing for it to resemble reality.
With the sole exception of softening an area to suggest recession... never blend. Soft edges flow adjacent areas into each other. Sharp edges separate, even if they are adjacent and touching. If we move one, that becomes obvious. Edges must be sharp.
Colour vs B&W reference
So, what about different textures and lengths of hair? And colours? Well, we'll look at different textures soon, but there's one hint I can give you: Do not draw from B&W photos, or turn your coloured photos into B&W. You might... many artists do. Because that "solves" the problem of matching values in the reference to your drawing. Oh boy! No! And again... No! You immediately have at least one major problem.First - How do you know what is tan, and what is highlight in the black hair? Another Black and Tan dog. Or is this a black dog in patchy light? For now, simply accept that B&W leads to multiple errors. Work from colour.
And the second reason I'm saying that is because matching values in the reference to your drawing means - you are drawing the photo. You're not telling me anything about your feelings for the subject. Or anything new. You're simply repeating the vision of the photographer... including the dead eyes!
But when you work from colour, you have to interpret the values you see. Now, you are drawing the dog. Or cat, or horse, or person... The way you see it.
Drawing: Long Black Hair
So, let's begin with the simplest hair to draw long black hair. No... really.. it is. It's all blacks and highlights.First - and this is important - you must reserve the darkest values for the shadows that define the edges of the black hairs, and not use them for the hairs themselves. And remember, in black hair, the highlights, which range from bright white through a series of greys, are important. However, you do need to able to SEE those highlights in your reference, as well as the hairs themselves. So, briefly, when you take your reference photos you need to over-expose black hair. And, because the shadows are most important, you under-expose white hair. Or you can do that later in Photoshop or similar.
Here in Affinity Photo this is a reasonably good photograph of a Black Labrador - but, as artists, it's not a great deal of use. We need detail. So I suggest you work with two photos. One without changes, and the other lightened - over-exposed - to reveal all the detail within the shadows - and inside the top lips in this case. Let's sharpen it too. That's a terribly washed-out photo, but far more useful to us. Now you can build in the detail gained from photo #2 while you work from photo #1. And you have the information you need. But before you begin to plan or draw, you first need to make sense of that information. So, analyse what you are seeing.
Actually, this isn't really a Handy Hint - it's a critical step in drawing hair, or anything else. To draw convincingly, you have to understand what you are about to draw. And that requires analysis of what you can see.
Look at the part of the photo that you're about to draw. First work out exactly what it is you are looking at the three-dimensional shaping where the hairs start and end, and so on. A common error is to draw your immediate reaction to what you see - but that leads to errors. What you should be doing is understanding what you're seeing. You cannot draw realistically, what you do not fully understand. You can copy the photo, but your drawing will always look like a copy. You need to dig deeper. To work out what's going on, and then draw it your way.
So, you need to analyse each area, and work out why the hair looks the way it does. Look for what I call "Visual Clues" - the elements that say "this is what I am". You might, for example, notice that the shaping at a particular point is the result of highlights - light reflecting from the hair.
Essentially, you understand the subject, not by being aware of individual hairs, but by the highlights that shine from the black hair. It's the highlights - the negatives - the non-blacks - that describe the form beneath the covering of black. And now it makes sense to draw the dark gaps between the hairs SUPER-DARK, because your highlights will glow more brightly.
Don't guess - Study your reference; look for the Visual Clues; and consider how you can use them.
Drawing: Long Straight Hair
For example, when drawing long, straight hair on a human head, you might notice that it tends to cling to the shape of the skull, due to gravity and the weight of the hair. The same is true of dogs or any other animal and is, as I said, the easiest to draw, because it follows the underlying structure. And there will be few, if any, deep shadows occurring, as individual locks don't readily form, and the hair hangs like a curtain. Study it more closely, and you'll see that hair from blonde to black exhibits bands of highlight that conform to the shape of the underlying structure, such as the head or shoulders. And that the hair is not entirely tidy - stray hairs, or groups of hairs, might be seen crossing over or under other hair.So, you've discovered that:
Long straight hair:
• Displays the shape of the skull, or any body part of an animal.
• Because - whatever the colour - it exhibits bands of highlight that curve around the form beneath it.
• It Has few, if any, deep shadows, because it doesn't readily clump together.
• And It's not perfectly tidy. Those out-of-place hairs add a lot of realism.
That analysis helps you to stay in control, and draw what you know rather than think you can see. And if you work on only one small area, you'll have time to establish what you know; and it will make your overall project far easier to handle.
The analysis can help you solve problems too. Removing the background from behind your blonde or white-haired subject - or feathered, of course - can cause difficulties on white paper. So, you might consider solving that problem by making the background darker. Not necessarily black, but dark enough to display the outer edge of the hair. If you choose that design, shade the background first so you can judge the values of the hair against it. Alternatively, if you prefer to leave the paper white, you can help the eye understand where the outside edge of the hair is by using lost and found edges. That's an edge that the eye can follow without it being unnaturally continuous. But these are your decisions, based on what you know, and not directly related to your reference.
And, while we're on the subject of helping the eye understand - when drawing light or blonde hair, draw lightly into the white highlight to suggest faint detail. Simply emphasising the occasional line will be sufficient for the eye to follow the direction of the hair and send the 'this is hair' signal. And occasionally, invent a gap or other reason to inject a shadow running through it. That will increase the perceived contrast and brighten the white hair and highlight.
Drawing: Fine Hair
Now let's take a look at drawing fine hair, and analyse it in the same way.
Immediately, we can see that it's almost devoid of deep shadows, because the hair doesn't part cleanly. Long, fine hair tends to be flyaway - it can be moved by the slightest breath of air - so it has many hairs not following the general direction of growth.Many variations of fine hair also have crimped tips, which form its most notable feature. And light reflection is scattered and minimised by the sometimes profuse stray hairs. You can clearly see that in the Poodle's frizzy topknot. And, again, it's those out-of-place hairs that add a great deal of realism. There's a particular technique for creating those hairs that works for me, and that you might find useful. Here they are again in the Pekingese. They're indented prior to drawing. You could, of course, just draw around them. But indenting is more convenient, produces parallel-sided hairs, and perfect tapers. Like this:
Indenting produces white marks with clean, sharp, parallel edges - and fine tapers. You simply apply graphite to indented paper and pure white lines appear. Watch this BASICS video for help with tools and application. For now, we'll just concentrate on the use of indenting within frizzy hair.
As you saw, a poodle's topknot is troublesome to draw because it contains so many weird and wayward fine hairs. So, I looked for areas where that would be most evident. Then I indented random haphazard lines before drawing began. I didn't shade over them to show their positions, I simply used them to break up the lines I was drawing. I used the same approach for the frizzy hair of this Irish Wolfhound. Again, I used the indenting to break up my lines, although it was a little more controlled this time. And even more controlled in the Pekingese, where indenting produced the kinked, thin hairs that show against the areas in shade. And I must mention that indenting is particularly effective in areas of high contrast, where those sharp edges and fine tapers really look their best.
As with other hair types, extract and concentrate on drawing the most prominent visual clues. Here in this Pekingese, the clues are the softly defined hair, and the flyaway, crinkly ends. This type of hair is not an easy task to draw, as there are no apparent hard edges within which you can work. It can be very time-consuming - this 15" x 10" (38 x 25 cm) drawing took 110 hours to complete - but, to achieve a believable result, it's worth spending that time.
This Shih Tzu has slightly thicker hair, and the visual signals sent by the frizzy ends around the periphery and crinkled, random hairs within the topknot, clearly signal its texture. BUT, there was very little indenting used, only in this high contrast area, and very few others. And the same is true in this lovely Chow. Its hair-type is defined by the almost complete absence of partings and edges, and the way the hair curves smoothly into and out of the depths of the facial creases. And, apart from one area of high contrast, there was no indenting used at all. Everything else you see was created by negative drawing. Indenting is a great tool, but take care to not over-use it. If an alternative exists: use that. Because indenting can look unnaturally mechanical.
Drawing: Smooth Short Hair
Now we're moving on to one of the most time-consuming and difficult types to draw - smooth, short hair. Compare this Beagle to Long Straight hair, and you'll see that where long hair loosely describes the form beneath it, smooth short hair closely follows and defines the underlying bone structure. You can't take short cuts - it's all there in the open.What else? Well, the reflective properties depend on the quality of the hair, but are similar in many respects to smooth, long hair. And there will be few deep shadows occurring within the hair, because it has insufficient length to form locks. Does that all sound obvious? Good. It means we're asking the right questions. Because if you don't question what you're seeing, you begin drawing without a plan.
This is the coat-type where I see the greatest divergence in treatment by artists. At first glance, the most prominent property appears to be the three-dimensional form so the presence of hair is often overlooked. Or, as in this case, it's followed by an attempt to suggest hair on top of the tone. I've improved the ways I view and understand things since I drew this way back in 1979. Now, my approach is the reverse. Here, the body structure of this Dachshund is entirely suggested by the highlights and shadows within the hair. It really is. The hair covers everything. You can't see the skull or the flesh and skin of the body... yet, you know its three-dimensional form. And only the hair - it's shadows and highlights - can tell you that. And you, as a human, have a brain hard-wired to instantly understand those highlights and shadows.
So, first, look closely at the quality of the hair you're about to draw, because it often subtly varies from area to area. Can you feel these different textures? The short, stubbly nose hairs. The harsher muzzle top. The soft cheek hair. The coarser guard hairs that cover the downy body hair. Imagine running your finger over and through the hair, and you'll find that to be a great help.
Back to our Dachshund: I was attracted by the softness of the hair on its ears and sought to contrast it to the hair on the head and body. The two play against each other, and emphasise the difference textures. When drawing any area (working only in one small area at a time), first define the hair, and then, taking note of how the light will strike it, use layers of tone to describe its three-dimensional form.
And, talking of lighting... These are our goats Bramble and Araminta (known as Minty). I don't have the original photos, but they were not photographed standing together like this. And the lighting was different for each. So, one or both had the lighting shifted until their poses agreed. Also, although these are short-haired animals, I used a completely different technique to draw them. It still relies on using the hair highlights to describe the form, but only the highlights were drawn. Well, let me explain... it used mainly 2H indenting in the dark areas of their bodies. Remember, soft grades slide over hard grades? The 2H highlights are drawn first, then the subsequent layers of 6B and 2B slide over the 2H and only fill the gaps - or any area not containing 2H. It's an effective and quick method, but not 100% reliable, which is why I rarely use it.
Drawing: Very Short Hair
Now let's go even shorter - and more complex, because this type of hair exactly follows the underlying structure. Every facet of the skull and body-shape are evident, and you have only the hair to portray it.The hair is usually not very reflective; has insufficient length or substance to form locks; and highlights can appear as mere flecks, but their inclusion is essential.
This type of hair can have variations that further compound the problems - such as the brush-like, short bristles of this European Mole, which has a profusion of short, erect hairs that visually blend into a velvety smooth surface. It's seemingly solid, but we know it's hair, so it must contain visual clues. I'd use those multiple flecks of highlight on the tips to show that. Conversely, some Pigs can have such short, sparse hair that you hardly give it more than a passing glance. But, even though the three-dimensional information is almost entirely derived from the skin, to maintain realism, the hair does need to be represented.
Fortunately, most animals fall between these two extremes. The major requirements when drawing this type of hair are sharpness and clarity of line. And well-defined highlights. You can see that here in the horse. Any softening would lead to a muddied result and fail to realistically describe the form beneath.
And the drawing of this Lynx-point Siamese gave as much importance to the white space between lines as the lines themselves. The edges between dark and white are sharp - because sharp edges divide values. we need to instantly understand which is hair and which is shadow. And notice how the hair at the back of the skull is less defined, giving a sense of recession. And that only works when the foreground drawing is sharp.
There's another reason for sharpness too. Animals with very short hair often expose areas of skin to view. So, you use the sharp hair to contrast with the smoothness of the skin. This Bulldog and the Pug exhibit bare skin on both their top and bottom lips. It's important that you find a way of showing the different surface textures as clearly as possible. Here the lack of bright reflection from the short hair has been used to advantage, as highlights have been incorporated into the more shiny skin. Analyse - and then use your findings to your advantage.
Drawing: Wiry Hair
And, while we're on the subject of analysing... You won't find anything sinuous or silky about wiry hair. 'Spiky' might best describe it - sharp V-shaped shadows predominate, and harsh contrasts between shadows and highlights combine to reinforce the coarseness of its texture.The main features of the hair - its Visual Clues - are those deep, V-shaped shadows between narrow locks; the many minor divergences from the general direction of growth; and the seemingly blunt-ended appearance of individual locks.
In common with short hair, it displays the underlying bone structure, but to a lesser extent, because the coarse surface does not reflect light well, so no bright key highlights are present. This hair texture requires clear, sharp drawing of detail, coupled with severe shadows and highlights. And there's a particular method of drawing hair that's very relevant. So let me introduce you to the V-shape "Wet and Wire" hair technique.
Demonstration: Grizzly Bear hair
In this case it's wet, but you can easily adapt the method for wiry hair too. However, this is a speedy method intended for small scale use. I'd use it for animals up to 3 or 4 inches high (7 to 10 cm), so you might find it suitable for midground characters rather than foreground.I have two photos. One 'as taken' for tonal information and character. And the other lightened to expose detail. I'm looking at the wet bear - fresh from its pool at Yellowstone - and, as expected, the V-shapes between individual clumps of hair are the obvious "visual clues". You'll find the same in dry coats too, such as on the top of our wild rabbit's muzzle. It's a fairly common clue in spiky, or short and stiff hair.
In previous videos I've often mentioned separating LINE from TONE - or DETAIL from SHAPING. This is an ideal candidate for doing that. Detail, is often easy to understand when you ignore the three-dimensional shaping. And the basic technique is this...
Forming quick Vs. "Quick" because you don't want to over-think them. Don't look at the lines you're drawing but at the spaces between them. You're creating white locks of hair. That might not make much sense - until you block in the shadows. And the white tapered spaces between them are the HAIRS, which will later accept the tone layers that describe the shaping. So, I'll use that technique but adapt it slightly to better represent this Bear's wet locks.
We'll begin with LINE for the Vs. If it helps, begin to fill in the darks too, but you can do that at any time. As I said, instead of trying to understand and depict both DETAIL and SHAPING at the same time, separate them. It's much easier to understand the surface texture and features once your eye stops trying to take tonal values into account. And that's the foundation of this method.
This is simply my interpretation of what I can see in the reference, and all I'm looking at is the coarseness of the coat, the length of the hair, and any dominant features that I decide to include. Again, I'm not drawing locks of hair. I'm marking where the shade is in between them. And that becomes more obvious once I switch my concentration from LINE to the three-dimensional SHADING to describe the form and lighting. It's begun by filling in the dark areas and then blending them into the next layer beneath. You can do that at any time, and you'll know when the time feels right. And then you shade over the entire area to produce the overall three-dimensional shaping. This method will always give a sharper, cleaner image than applying tone and then attempting to erase it to create light hairs. Here's the completed bear - using just 2B and HB line, and then HB and 2H three-dimensional shaping.
That technique, coupled with the two in the previous videos, forms the basis of drawing all types of hair. And it only needs a minor modification to change from drawing a Grizzly's wet hair to a Border Terrier's wire hair - because the visual clues are very similar. Deep dark V-shaped depths, and a feeling of coarseness.
That coarseness can be used to great advantage as it offers ideal conditions for contrasting dissimilar textures. In this case the relatively silky ears work against the coarse facial hair to the greater benefit of both. The eyes gain also, as the hair texture accentuates the smooth, glassy appearance of their surfaces.
Wire-haired dogs are complex subjects to draw and require a close observation and full understanding of each element that is about to be drawn. There are so many visibly out-of-place hairs that you can't simply generalise and suggest anything. I've found you really DO have to draw everything, or the result lacks a feeling of reality.
Drawing: Curly Hair and Ringlets
As before, let's first analyse what we can see. We need to extract the clues that are describing the surface because by building them in to our drawing, we'll be sending the same message. Include the obvious too, because sometimes the obvious is easy to overlook.• So, curls are circular
• or spiral when they form ringlets, or a messy distortion of either.
• They exhibit deep shadows between each other.
• This Irish Water Spaniel has hair that naturally forms locks that often tail off into spiky ends, which point in random directions.
• And the curls and ringlets possess the highlights expected of curved surfaces.
Armed with that information, you are many steps closer to drawing the hair in a believable way. And we can delve even deeper. The degree of reflection depends on the smoothness of the hair. However, no matter how coarse the texture, an exception is the bright key highlights reflected by wet hair. This is an important consideration where dogs are concerned, as curly coats belong in the main to hunting dogs bred to work in water, such as the Poodle, Chesapeake Bay Retriever and these Irish Water Spaniels.
Like many of the other hair types mentioned so far, the drawing of curly hair relates as much to humans as it does to dogs and other animals. The most important points are shown here in this Irish Water Spaniel's head-study. And a good 3-step plan - because it makes life easy - is to treat each lock or curl as a solid three-dimensional object. First, described its internal detail - splits, gaps, and other features - using LINE. Then - as though it's receiving full light - layer tone on top, to give the correct three-dimensional shaping. And finally, layer additional tone so it conforms to the overall global lighting - pushing it back into the shade, if that's what it needs.
Remember I mentioned that curly hair naturally forms locks, and these often terminate in wayward ends that point in random directions. Those ends are as important as the locks. However, compare that to this Poodle, which has softer hair. Here the curls on the body have the appearance of almost fusing, as the stray wispy ends and loose hairs diffuse the shadows. That itself is a visual clue you need to be aware of. It's an important part of describing the hair type to viewers of your drawing. And it's even more apparent on the looser curls on top of the head. In both cases, the fine indenting has produced the wispy look.
Sending the right visual clues is more important than the indenting actually looking like fine hairs - even if it involves a little exaggeration. The clues are always present. They must be. If you think hair looks soft or wiry... there's a reason for that. Now explore and discover why you know that. Find those clues.
Drawing: Wavy Hair
Ask yourself "Why does the hair on this dog look different from the Water Spaniel? They're both spaniels, yet the Springer appears to have softer hair. Why?Well, deep shadows are usually present between the locks, from which the waves are formed. The same is true of the Irish Water Spaniel, but here the waves are longer, and more sinuous. And hair that clumps together easily into locks often doesn't possess stray hairs or wispy ends. Because of their absence, the resulting smooth surface is highly reflective. I think "fluid" best describes these ears.
If you were thinking those strange wispy hairs can be ignored... you're wrong. To a large extent, they're responsible for the degree of reflection. In both cases, the waves conform to the lighting rules of curved surfaces, but the loose ends scatter the light. This sort of analysis, which really brings out the Sherlock Holmes in you, is crucial to a successful outcome. Know what you're drawing.
The same techniques and objectives apply to the hair of both humans and dogs. However, human wavy hair is often finer, so expect to find more stray hairs and adopt a softer approach. As with drawing all hair, first imagine running your fingers through it and keep that texture in mind as you draw. Personally, I enjoy drawing this type of hair because its deep shadows and bright highlights can be engineered to work against each other - exaggerating the overall contrast. And - I like to think of them as built-in coffee breaks - the profusion of hard edges easily breaks down any area into small, manageable elements.
Conclusion
The aspects of drawing hair covered in this, and the previous three videos, apply equally to feathers, fleece, and other skin covering. Always - before you put pencil to paper - analyse why it looks the way it does, extract the visual clues, then incorporate your findings into your drawing. That includes representing different colours and markings, but we'll tackle those in the next and final DRAWING HAIR video. Mentally, run your hands over and through the surfaces, determine their textures and, with your newfound knowledge, picture each in your mind as you work.Talk to yourself as you draw; explain how the fleece of the ewe you are drawing is laying flat to the sides here... and now curving around the neck - so, surely, at this point the wool should part, creating a deep dark valley? Indeed it should. Don't draw a resemblance of fleece, or hair, or feathers. Observe, research, and then draw what you see in your mind. And use what you know to tell your story.
This is a nylon jacket with leather elbow patches... but I didn't need to tell you that, did I? The unique shine on the pocket tells you its nylon. The lack of shine on the patch says "leather" or "suede".
The duck has feathers. The dog has hair. They share much in technique. But the straggly ends of the feathers tell you its not hair. It's worth mentioning here that my reference for this dog was retrieving a pheasant. I substituted the duck from a separate reference, and that it "belongs" is because I spread the dog's lips, and made the mouth interact with the feathers.
You can only do that when you realise it's not a "subject for a drawing" made up of values, shapes and forms. It's a three-dimensional, mobile, living, thinking person or animal.
It has history and a future. You're just looking at, and creating, a split second of frozen time in its life.
© copyright: Mike Sibley 2023

There is so much useful information here, it's difficult to know where to start. Overexposing a photograph to reveal detail in the shadows is brilliant. The Dachshund comparison at 20:10 is especially striking. It demonstrates so clearly how the highlights and shadows between the hairs are what actually enable us to see form and shape.
The wet Grizzly hair comparison to the wiry terrier hair was another eye opener for me. Instead of depending on our predetermined ideas of what hair looks like, it's so much easier to understand if we look at it objectively like this.