Transcript
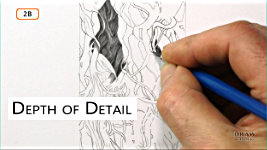
Last time - in Part 1 - we'd reached "Depth of Detail". Or, to suggest reality, how deep - behind the foreground - do we need to supply detail in the midground and background. This final aspect of drawing hair is so helpful, to you as an artist, especially for medium to long hair, that we'll cover it in some depth.
Let me ask you a question. If this was your dog, what would you remember about it? The look in its eyes? Surely, that's certain. Maybe it's tan eyebrows? The hair on its neck that you loved to run your fingers through... and so did the dog. Probably, its lovely wavy ears. But you wouldn't necessarily remember those waves
exactly - just that the hair fell in waves.
What's important to any artist embarking on drawing an animal or human portrait is that we remember
major characteristics not details. So, you need to incorporate the memorable shape and position of prominent features within the hair, but not necessarily their internal make up, because nobody remembers that!
And, because nobody remembers it, you can let your creative juices flow and wallow in pure inventive enjoyment. Feel free to invent the foreground detail, and create imaginary midground and background depth.
And creating that Depth Of Detail involves two things:
• the ability to invent, based on observation and knowledge,
• and supplying sufficient detail to suggest realism, which might mean no detail at all if the area is deeply embedded in the background.
So, before we begin to create that detail, I want to expand on a technique we looked at last time -
Drawing Breaks.
Drawing Breaks - on steroids!
The "layers" I used, for simplicity, were shapes, bordered by dark markings, rather than actual layers. They made excellent Drawing Breaks - natural boundaries that we can draw within - but in reality, true layers can be broken down into much smaller sections. And every time you can divide a drawing, the easier it becomes to both handle and imagine. For example, this "layer" you saw previously is really made up of multiple layers of hair within it. At least five. And each of those layers has a visible edge, and can be treated as an entire drawing in its own right. In this case, you create the ends of the most foreground layer, and then connect the base of that area to them. Then you look for the ends of the next layer - the Drawing Break - and create its edge. Now you can connect the previous layer to this one - lock by lock if its width warrants it. Then you repeat that process for the next layer. Then the next. And this one. Each time, creating the ends first, and then pulling the hair out from the previous shadow to join those ends. The important word there is
creating. Not copying what you can see in the reference, but interpreting what you understand.
I must mention three things here. This reference photo is 30 years old and is fading with age. Second, you might think it's large - but it isn't. This is it. I prefer to work from small photos, because I have to interpret.
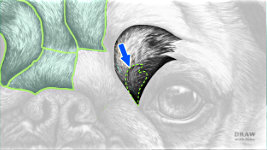
So, what you see here has been scanned and heavily sharpened. I can see enough detail to identify the features and understand the structure, but not so clearly that I can copy it. So, that means I have to analyse an area before I begin to draw it. The little area we were just looking at:
• is covered in layers of hair that are growing upwards
• it's three-dimensionally curved in all directions
• And it has visible layers. If we wish, we can reproduce the borders of those layers as seen, because they are entirely natural. And then create our own impression of the detail within them.
And to convey that, we only need to establish where the edges are - the drawing breaks. Remember, you draw the gaps between the hairs. At this stage, the hairs are left white. Then join the previous edge to this one. If you've marked all the key layers in your guidelines, you no longer need the reference. Just create the next edge and complete the gap. You know where the light is shining from, so build in the three-dimensional form as you draw. And that lighting need not be from the direction in the reference. Your free to choose your own now.
So, long hair can be drawn in sections, using any natural feature, such as a twist or bend, to break it into logical pieces. And short hair has multiple layers that permit you to break it up into very small and easily manageable sections. Wherever you look at this Pug's face, every part exhibits layer upon layer of hair. And each of those layers forms a natural break in the drawing.
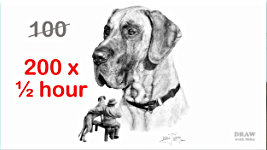
In this drawing of Riley - the Great Dane - you can see how the short hair lets me divide every area into very small sections. My mind has time to explore, and that helps my imagination create the hair in each of those sections.
Notice too, that my lines are quite deliberate - and tapered. They're not random, quickly produced flicks, but controlled marks.
One of the most major errors you can make - if your aim is a sense of realism in your drawing - is to work too fast.
Fast forces you to draw superficially - because you're giving your mind very little time to react to the marks you're making. I used to rush through a drawing too at one time, but it never looked realistic - the way I saw it in my mind. Then I found that if I concentrated on just one section- treating it as a drawing its own right - it looked much better. Then I'd move on to the next "drawing". And I discovered that a major result of hurrying was the time wasted later, trying to "repair" the drawing I'd done. Its actually quicker to slow right down and get it right the first time. And first time is sharp - no fuzziness from overworking.
Now I mentally divide every drawing into manageable sections, and complete each section to the point where it more exactly matches the way I imagined it. Then I found that helped in other ways too. Because the depth of the ear, or the shiny nose, or curving lock of hair - was living in my mind as a three-dimensional reality - it became obvious where, for example, it might cast its shadow, or how it might emerge from beneath the adjacent edge of hair.
It doesn't matter how long a drawing takes to complete. Give it the time it needs. If it needs 5 hours, that's OK. If you spend only 2 hour on it, it won't be better - or 7 hours, because now its overworked. So, if it needs 100 hours, give it 100. And if you divide that 100 hour drawing into 200 half-hour drawings you get to pat yourself on the back for a job well done 200 times instead of once!
When you slow down, you give yourself time to "exist" within the drawing. Your drawing is your world that you're creating, so never think "drawing", just think "what would I expect to see in this area of my world?". And then reconstruct your thoughts. Like this:
Foreground guidelines fix positions and shapes of the memorable key areas. But not the detail within them. Unless a detail or feature is so dominant that you have to include it, there's every chance that you can be very inventive within those guidelines. For example: These ends form a feature that cannot be overlooked. As we did previously, you divide the area into manageable sections, pull hair out from the shade at the top, and then join them to the established ends. Incidentally, this technique isn't confined to hair. Here, the feathers were drawn in exactly the same way. Edges defined first, then detail and tonal shaping added. And in this tiny drawing (it's 2", or 50mm, wide), the defined ends do all the work, There really are no feathers - just ends that suggest feathers.
Moving to the next section, we can create that. Notice that I've let this tuck itself underneath the next still-to-be-drawn lock. That might be a deliberate decision or a happy accident, but it increases the appearance of realism.
Lock by lock, the area is drawn to completion. By working slowly, and drawing what you might expect to see, the realism continuously grows. If anything looks wrong in any way, that's your brain telling you it doesn't accept what it sees as being realistic. So change it, until it looks "right". Because what looks right to you will most probably look OK to everyone else too.
You see - when you concentrate on small areas, you create realism. The edge of this ear, for example, is not just a single drawn line. That wouldn't be at all realistic. And it doesn't take a great length of time to create a hairy edge, if that's all you're concentrating on. Don't overthink it; let your imagination and intuition suggest the shapes and features. Now, as you draw the ear, you can run your drawing into those ends. They form a Drawing Break, just as you saw previously with the Pug. They help to concentrate your attention, and make logical sense out of all the lines you're drawing. They give each of those lines a purpose, and a terminus to aim for.
You might think that's time wasted on a slight improvement - but the difference in realism is HUGE!
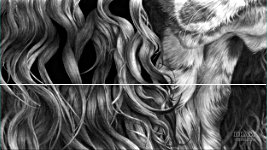
To recap, before we get into mechanics of Depth of Detail. We know that taking your time to work on one section at a time generates clear and understandable drawing. And that, while the position and shape of prominent features is usually required, you can freely invent the detail within those areas. Here's Charlotte, at 2-years-old. She had curly blonde hair, but what we remember is just the essence of those curls - and, of course, her facial features. So there's a need to include the curls, but not the exact curls.
The face of an animal is important too, but the hair is usually the dominant feature. Again, we recall, the principle features that appear in the foreground of anywhere we look. Which implies that nobody remembers the midground and background hair, or has probably ever studied it.
Depth of Detail
So, let's get creative. Rather than slavishly copy detail that nobody remembers, we can safely invent suitable hair. Because we're tapping into "what feels right" as we draw, it will probably look a lot more realistic too. And, more importantly, it offers artistic freedom, and releases you from the terror of the grip of the reference. Suddenly, whole areas become both more enjoyable, and quicker, to draw; and the result will contain a depth of detail that the reference can only dream of.
As it's the foreground that contains the features we recall, it makes sense to include all the key features, by purposefully designing the foreground, or even directly copying it from a reference. Then creating the background, while dividing it into sections you can handle. Then divide that again into line and tone. And, because you can only successfully draw what you understand, begin with what you DO understand. In this case, that's the extreme shade - the areas that are as far back as you can see. The totally black, featureless holes. And, as a bonus, you now know the full tonal range at your disposal - from these blacks to the white of your paper.
When you feel the time is right - there are no rules - begin work on the background locks. Personally, I prefer to work from black holes to background locks to midground locks - always working forwards. So, whatever I'm working on has something behind it to react to. From your reference, you know the general direction of growth, and the way the locks of hair are formed and hang. Use that knowledge to create similar, or sympathetic, shapes within the background, which you can outline. But concentrate on the background around them; the deep black holes.
If you create a hole that's so big you realise you'd expect to see something in there, don't worry. Just use Blu-Tack or a kneadable eraser to remove a portion or cut shapes through it and then sharpen the edges. Now it conforms to Nature; to real life.
I'm not a believer in flitting about from area to area within a drawing - but this is different. When you're working entirely from your imagination, move to wherever the mood takes you. Well, within reason. I mean within the same general area. And notice that work begins again with the blacks in the deepest background. That provides a value reference for when the drawing moves forwards, layer by layer. Remind yourself: "This is background and midground, so DON'T use foreground values". And, bearing the direction of the light in mind, create cast shadows where they should appear. Cast shadows emphasise edges and help us to see recession, even in very dark areas.
Outline edges that need to be kept sharp. As I mentioned earlier, it will give you a safety margin to shade up to or, preferably, away from. And all your lines must be tapered. It only takes one blunt end to destroy the reality you're attempting to represent.
The guidelines are
guides, not instructions. Feel free to accept them, change them, or ignore them as you work. Do whatever feels best for your drawing, and don't be ruled by any reference.
You really must keep sharp edges sharp. Soft, fuzzy edges suggest one plane flows into another. They flatten. You need sharp edges to make one element appear to be in front of those behind it. And everything must have a beginning, middle, and end. Don't start a shape and then not take it somewhere. Or leave a shape hanging in space.
The necessity to not use foreground values in these areas is because you need the foreground to be your focal point. You achieve that by using less contrast in the midground and background. And less detail too. The foreground shades all the hair behind it, so strong light cannot enter and create bright highlights. It's the lack of the foreground's highlights that cause the hair behind to fade into the background.
If something feels unnatural or wrong, it IS wrong, because you instinctively know what looks right. Just believe that to be true, and be bold. Simply be aware that everything further back than the foreground can be pure invention - as I'm doing here. Nothing planned. Just creating on the fly.
Spend time looking around you into shadows and deep shade. Nobody ever does - well, why would you? But you, the artist, need to know what happens in there. It doesn't matter what you study. What you learn from looking into bushes or grass, for example, will equally apply to drawing hair, or anything else - because the same rules of recession apply, no matter what the subject is.
And why go to all this trouble - when you could just copy what you see in a reference? Well, in a reference, you might not fully understand what you can see in the dark depths. That results in you reproducing shapes and values that you don't understand. And if YOU don't understand them, neither will viewers of your work. So, one good reason for invention is that you create depth that people can understand. And another is... it's far more enjoyable!
In conclusion...
So... how difficult was that? Not at all difficult. By dividing a drawing into smaller and smaller manageable sections, you can realistically draw anything, no matter how complex the overall drawing might be.
We began with the areas we knew most about - the black holes. Then moved on to the background locks. And, by establishing the background first, the foreground now has a known world in which it can exist. Drawing the foreground first, when you don't have anything to refer to, involves guesswork. And probably later alteration, which wastes time and creates overwork.
There were only two techniques used here. One that creates a flowing lock of hair, repeated over and over. The locks provided natural breaks to divide the work. And another for the smooth hair on the face. Here, layers were the divisions. You look for the end of the next layer, draw that, and then connect your drawing to it.
Negative Drawing and Drawing Breaks are methods well worth adding to your armoury. In complex drawings, such as this one, I find them to be an absolute blessing. You can break the composition down into smaller and smaller elements, which makes keeping control so much easier. You can concentrate purely on that one section and, where required, easily work out the cast shadows as you progress. And, of course, you can even choose your own lighting direction. And that means you can now combine elements from different references into one scene - which is what I did here.
But three important aspects demand a mention:
First, the ears have waves where the dog itself had waves - memorable waves. But the curling, wayward locks of hair do not necessarily exist as drawn. And the midground and background locks most certainly bear little or no relation to that dog at that moment in time.
Second - and this applies to all the animals I've ever drawn - I know what this dog is thinking, or was doing, and is about to do. It is not a static image.
I'm going to repeat that, because I think it's really important.
I know what the dog, or horse, or person, or cat, is
thinking. I can imagine what it
was doing just before the photos were taken. And what it is
about to do.
So, here - the principle elements are present; the overall
feel of this dog exists; and it's far from being a copy of a reference.
Write a story about it in your mind, and now - instead or looking at a lifeless, two-dimensional reference - you're recreating a living subject.
And you'll subconsciously build that life in as you draw, because in your mind, it's
alive.
© copyright: Mike Sibley 2022


Experiencing Mike's work makes me want to pick up the pencil and draw - and that's the feeling that I have been searching for the same as a treasure chest tucked away. Thanks Mike :)
Working from background to foreground, as you explain it, makes so much sense and makes drawing that mass of curly hair seem achievable.
I find myself, during your teaching, seeing you work differently. I can actually see the subsections. Yet, when I stand back and look at the overall picture, I am in awe at how it looks more real and precise than most photographs.