Transcript
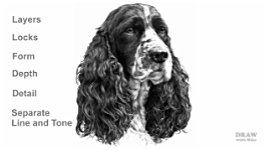
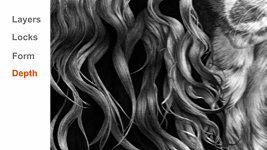
To draw hair realistically, you first have to understand, and be aware of, its five fundamental properties: Layers, Locks, Form, Depth and the related Depth of Detail. And one drawing technique that simplifies everything; and that's to Separate Line and Tone. So, let's begin with that.
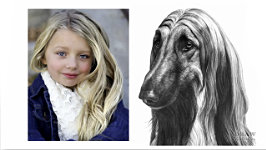
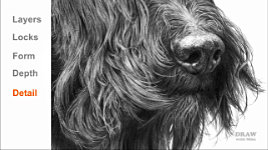
This is something that you'll see being used throughout these videos. LINE first, then TONE. And I must stress that all that follows is equally applicable to human AND animal hair. To draw this young girl's hair, you use the same techniques that you would use for this Afghan Hound. And this curly hair, with its fly-away ends, uses the same drawing techniques as this Irish Water Spaniel.
By now, if you've watched the previous video, you'll be aware that we draw not the hairs but the sharp-edged shadows between them. That requires LINE - think of it as
detail. Tone is something we use to shade the three-dimensional form - so think of that as
shaping. Why mix the two, when it's far simpler to divide each area into detail and shaping, so you can fully concentrate on one without being distracted by the other.
Line defines the edges of each hair. The hairs themselves are left white, and your focus is purely on creating the shadows that separate each hair from its neighbours. That's it - nothing else. No regard for the lighting, or its three-dimensional form. Just its shape and position. Then you add tone layers on top.
Also, I'm using a chisel point. The sharp edge draws the line. The flat face applies the shading, because it draws soft-edged lines that flow into each other. And that shading suggests the three-dimensional form. Both locally, within the lock you're drawing, and globally - where the lock is positioned within the body. That shaping might be light on top of an animal's back, for example, and then curve down the ribcage into the deep shade beneath the chest.
Bear the separation of line and tone, or detail and shaping, in mind, because it applies to all that follows.
WHAT YOU NEED TO KNOW
Let's get back to our "basic properties" list, and begin to look at it in more depth. Hair grows in Layers - layers that lay one upon another. And each layer emerges from under the layer above it - creating a smooth surface. As you'll see later - that offers us a natural and very welcome advantage. And notice that the reason you can see the ends of the hairs is because each layer shades the layer beneath it from the light. So, the hairs we see are always lighter than the surface behind them.
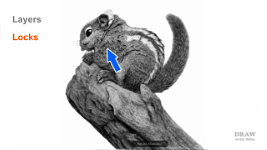
Hairs, especially long hairs, often clump together. They cling to each other to form Locks, which might be anything from small groups of hairs to large waves, or even ringlets. And each lock, no matter what size, behaves as a single, unified mass. Locks move independently of adjacent locks too, when the animal moves. And when the surface bends or stretches, the locks part. You can see that more clearly in a sheep's fleece, which often mimics the pile of a carpet. The hairs mass together parallel to each other and, just like the Chipmunk's locks, they split and separate on curves. However, a fleece can clump and split - as you can see in this Manx Loughtan, which is the breed we used to keep.
When you're drawing animals, this is the sort of knowledge that's invaluable. You can, for example, successfully invent what you don't have references for - the body of one of the pups in this case. And knowing what to expect in hair, or fleece, means you can more easily analyse what you see, rather than blindly copying.
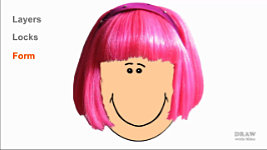
Form, as we discovered last time, cannot be shaded first with hair added on top. Because that's the
exact opposite of Nature. When anything is covered in hair it's hidden from view, so the hair, and only the hair, describes the three-dimensional form. We instinctively decode its highlights and shadows to understand the form beneath. So, we artists can describe that form by creating suitable highlights. Which is great... because we can lie very convincingly, if the need arises.
And now to the actual creation of hair, its visible depth; and a way to simplify its drawing. The part everyone recognises is the foreground. It contains all those features that make that animal - or person - memorable. By foreground I mean, wherever we look, those hairs and locks that are in front of others.
The foreground, then, is purposefully designed - even directly copied from a reference. But the midground and background can be drawn spontaneously. Pure invention. That means you can both satisfy the client AND enjoy yourself being creative. No more slavish copying of a reference.
And to depth, you can add detail, supplied by your depth of vision, which creates additional realism. For example, although hairs taper, locks never terminate in precise triangular points. The hairs vary in length, and might randomly split apart. Others might have flyaway or contorted ends. And some hair is simply... Wild! But no clumps or locks of hair ever end in perfect points. Over-grooming your subject looks contrived. And Nature is untidy, so you need to display that.
Finally, before we progress to putting all of this into action, I want to draw your attention to one more crucial aspect of drawing hair:
READING REFERENCES
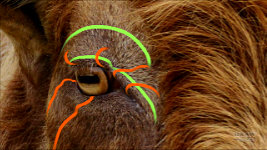
Now you have all that basic knowledge of hair in mind, DON'T just accept what you see in a reference. You know hair might clump into locks. That some locks form waves, ringlets, or even dreadlocks. You've run your fingers through hair and discovered different textures within it. And you've studied the direction of growth, which is very often the same for all animals - and people. This is a goat, but it could be a dog, or a bear, or a mouse, or an Echidna. Choose any area of any animal and the hair almost always grows in the same direction...
Apart from Moles.
Or Naked Mole Rats.
Or whatever this is.... but, on the whole... it does!
So, we've had a look at the directions in which the hair grows, but that's only half the story. Now, work out what you're
actually seeing - in three-dimensions. Ask yourself "what are those hairs doing?" Are they covering a surface that curves closer to you and then curves away around the side and out of sight? Imagine laying a ribbon on the surface. Does it dip then flatten before bending away? Well, that's horizontal, but what about vertical shaping? Look at it more closely, and you'll see that the eyelid bulges out towards you.
And that leads into a flatter area that curves up from beneath a fold. Mentally, run your fingers over the surface and feel every crest and valley of the solid three-dimensional form. In short:
understand it. A reference is two-dimensional, but now you have a three-dimensional picture in your mind. It's a living animal; not a collection of values and shapes. Now... draw what you understand, not what you see.
If I'd done that when drawing this German Shepherd... I would not have thought the shadow of its ear was a marking on its coat. Lesson learned. Understand what you're actually seeing first, and then draw.
PUTTING IT ALL TOGETHER
Now we know what to look for: Layers, Locks, Form, and Depth. And how to handle it: that Depth of Detail, whether invented or observed, aids realism. And
we can extract detail, and three-dimensional form, from a reference. So, let's bring everything together.
I mentioned earlier that Layers present us with an ideal benefit. An animal's hair, or a human's, is not a random collection of hairs, but an organised structure created by the way hair hangs or grows in layers. You can see this most clearly in short coats, such as this Pug. Even a very smooth short coat will display layers. They might not be very obvious, but they are there, so look deep into the reference to find them - because LAYERS ARE YOUR ALLIES.
They are natural divisions that allow you to break up the drawing into manageable sections. We've already divided it into line and tone, or detail and shaping. But you can use the layers to break it down even more, so even the most complex subject becomes manageable. Dividing your work into its various parts, whenever and however you can, will simplify any drawing. For example, an old tennis racket might have a leather-bound handle. A varnished wood frame. And cat-gut... [CAT-SCREAM] strings... Oh - umm - maybe nylon then. Even the handle can be split into dark and light areas. So, instead of being confronted, and confused, by a complex arrangement of shapes and textures, we can use divisions - such as the layering of hair - to concentrate our focus on just - one - manageable - area at a time.
DRAWING BREAKS
I call these natural layer boundaries "DRAWING BREAKS". As I'll demonstrate later, they allow me to define an edge that I can then work up to. And, once completed, I find the next drawing break and create that edge. Then I get back into the previous edge to seamlessly graft on the next section. Shadows are ideal for that purpose because the grafting is much easier and less noticeable.
Although the Pug is an ideal candidate for this method, it's universally employable. This Beagle's head shows how each layer of hair was drawn using this method. The edges of hair layers - the drawing breaks - were identified and then, working from the bottom upwards, each layer was completed in turn. And finding those edges, or even creating your own, becomes easier the more you use this system. This step-by-step approach is a great tool for simplifying even the most complex subject. And here's how it works:
DEMONSTRATION
Notice that I first created the ends of the hairs along the drawing break. And then joined the previous edge to the new one. It's a two-stage process. And, because it offers even more control, each layer of hair is further broken down into individual locks. No copying of a reference; just a process you can enjoy.
I've drawn one layer, so we have something to work with. It's a bit... Mickey Mouse. In other words: a little cartoonish, and larger than life - because it's the principle I want to explain; not the more subtle realistic approach. So, we have a guideline here that tells me this is the next edge - where one layer sits on top of the next and casts a narrow shadow. So, the first stage is to create the ends of the hairs along the guideline. And a hint of the shadow they will cast on the layer below them. I'm making this sound very planned and mechanical, but it isn't. Just go with the flow. Create the first hair and let that suggest the next. And look... all you have to think about is
the end of the hair you're creating. Not the animal, not the three-dimensional shaping, not the locks that hair belongs to; nothing but that hair. It couldn't be more simple.
Well, you do have to keep in mind that these are the ends of hairs that emerge from the opposite shadow, so you need those ends to point in a suitable direction. And there's something that you absolutely must do, and that's to avoid repetition
. The human mind is programmed to recognise patterns, so don't create any. If it helps, look at your reference for inspiration - but there's no need to copy anything. The guidelines ensure you're drawing that layer of hair in the correct position and width. Nobody cares, knows, or remembers what the hairs look like in any layer - so have fun inventing them.
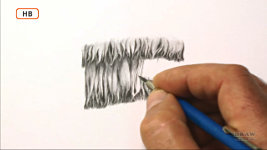
This is negative drawing, so look at the white as you draw. And always draw up into a separation and taper the end of the line to a fine point.
Continue defining hairs along the edge, and fill in the gaps between them whenever you feel the need to do so, feathering the edge, so it won't show when you graft later drawing on to it. Remember, this is larger than life, but it's a good scale to practice with. Later, when you reduce it to a more natural size, your hand and mind will understand what needs to be drawn.
Done! And what we've created is not the right-hand legs of an intoxicated millipede. No - these are the ends of the locks of hair that fill that layer. And we've created the shadow that the next layer will spring from. So, that's STAGE 1 - creating targets for STAGE 2.
However Before we move on, I want to address a common response: "Surely there's a quicker way than this!" Well, yes, you can simplify it. As I said, what I've just drawn is exaggerated - over the top. In normal use, some edges will need to be inventive and sharply defined, and for others, you probably only need to create thin strands for the tips of the hairs. It depends on the results you want to achieve. Sketch it; hatch it; just draw a bit of sawtooth line to represent the end of the layer. Sure, you can do that. But it'll look like a drawing. It won't look like hair. My take on it is: One patch of mould ruins the entire loaf of bread. One fly in the soup taints the whole bowl. No matter how good the artwork looks, viewers will typically judge it based on its weakest part.
So, we've found the next edge and defined it. And the previous edge has an area of shade, running its full length, that can be seamlessly extended. We can place our pencil into that shade, cast by the first edge, and complete the central area by drawing towards the second to connect the two. And, because the second edge already exists, every hair we draw in between the two has a place to start and end; we know where it's going, because we have a choice of established ends that we can aim for. Why is that important? Because, once again, we can use natural boundaries to divide the area up into locks, which reduces the drawing to single manageable segments. And then we'll break it down again into Line and Tone.
Let's say this edge of a lock begins here in the shade and joins this established end. And its other edge begins here and sweeps down to this end. This can be quite a dark line, because it represents the deep shade in the gap between this lock and the next. Now, just think about that single lock of hair - where its highlights might appear, and its three-dimensional form. I like to draw the line detail first. And then add tone - the three-dimensional shaping. Because you're only drawing that single lock, you can give it your full attention. Make decisions as you draw and allow for "happy accidents". Shape it, split it, curve it, push a part of it back into the shade, and mould it in any way that suggests itself to you. And then do the same for the ends of the hairs. Tuck some behind others, bring some forwards, force others back deep into the shade. You're adding depth, interest and realism.
Just to clear up a possible miscomprehension: Line is drawn first and then tonal shaping added,
as i draw each lock to completion. I do NOT draw line throughout the entire drawing before adding tone. To do that would damage the overall perception of "reality". You would not be creating your own world step by step. Instead you'd be involved in a mechanical "drawing exercise" that has no soul. Line, then Tone, then complete each lock, because now the next lock has something solid, three-dimensional, and "real" to react to.
I mentioned the chisel point earlier. This is it in action. The sharp edge produces sharp-edged lines that are ideal for clarity of detail. And the flat face draws soft-edged lines that flow into each other, forming areas of smooth shading. Do consider the QUALITY of the lines too. If the shading looks grainy, change to a harder grade. Or layer a harder grade over your existing shading. Either way, smooth suggests hair far more readily than grainy does.
Finally, don't forget, the locks you're drawing emerge from under the previous layer. Consider occasionally cutting through the shading to suggest the lock continues deep into the shade. And, as always, don't think of anything as "drawing". Always think "what would I naturally expect to see right here?" You really are creating your own world, one easy step at a time. And, talking of three-dimensional worlds with three-dimensional form...
THREE-DIMENSIONAL FORM
Form is dependant on lighting - its strength and direction. But you only really need to know its direction before you begin to shade. Drawing an arrow in the margin might help, as a reference and reminder. Here, I'm assuming the light is a little diffused. Strong light will create hard-edged shadows. Diffused or reflected light produces soft shadows, which won't dominate the drawing.
As I mentioned earlier, there are two types of form and lighting to consider: LOCAL and GLOBAL. This is Local shading. I'm thinking "the light is shining from there so this rounded lock of hair will be in partial shade down this side". Local describes its actual three-dimensional form, regardless of the overall lighting. Global then modifies it. Its shading takes into account where on the subject it is. So, Local will probably suffice if the feature is in full light on an animal's back. But the whole area will be darker if it's under the neck in semi-shade. That doesn't affect the shaping; it just determines how bright the highlights are. And highlights are the principle tool for describing the three-dimensional structure.
I explained earlier that "It's the hair, and only the hair, that describes the three-dimensional form", and that's undeniably true. It's purely the highlights and shadows within the hair that relate that form. Here we know this area is facing the light. And here, less light. Then again, more. So, that tells us the muzzle falls away and then curves outwards again. The highlights and shadows combine to tell us how that the area is shaped. And we know this area beneath the muzzle is receiving little light. In fact, no direct light at all; just reflected light. But the only difference between a lock in this area and one in full light is the value of the highlights. So, you could create its form locally, as though it's receiving light, like this area of ear, and then shade over the highlights to push it back into the shade. Every time you can break something down, both you and the subject will benefit. One from the simplicity; the other from the additional attention to detail.
So far, I've been focusing on rather localised features - such as single locks - but you also have to stand back and look at the broader picture. Here, it's evident that a curving line of highlights exists. It's a wide wave in the hair. And another partial one exists above it. And so it is that we understand the form of an animal, or a human's head, by reading the shadows and highlights in the hair. The hair is not just something covering the form beneath. It's far more important than that - it actively displays and describes the three-dimensional form beneath it, while relating its own form too.
DEPTH OF DETAIL
Now, we've reached the point that I term "Depth of Detail". Or - behind the foreground - how deep do we need to supply detail in the midground and background. Well, this final aspect of drawing hair is so important, and helpful, to you as an artist, especially for medium to long hair, that we'll continue this in depth in the next video. So, next time, we'll continue to explore the depth of detail - designing the foreground, inventing the background; and dividing sections, and line and tone, wherever we can.
I'll show you how you can use this way of working to produce a lifelike result that's not a slave to any reference; that displays a sense of realism and "life"; and that permits you to immerse yourself in a creative and most enjoyable experience. Because drawing should be fun!
© copyright: Mike Sibley 2022