Transcript
Before any drawing begins, you need a set of GUIDELINES to determine the overall size and orientation - and the relative proportion, shape, and spatial relationship of each element.
Whichever method you use, the result is essentially the same - a reasonably accurate map to guide you as you draw. However, where some methods employ copying without understanding, others offer a much deeper exploration.
Ideally, as you deconstruct your reference, you should be learning more and more about its individual elements. And any method that offers that exploration and understanding, is inifinately more useful than one that doesn't.
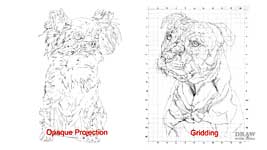
Having already covered the GRID, in this and the next video, I'll introduce you to ten more ways of creating your guidelines. And I'll split the methods into two:
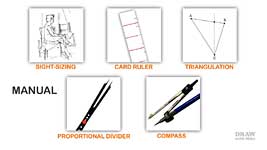
DEVICES, which covers equipment, such as projectors, I'll cover in the next video. And this time I'll introduce you to five MANUAL methods, which is anything hand-held.
The manual methods also generate the greatest benefit, because they encourage a much deeper exploration and understanding of the subject than mere copying can accomplish.
Sight-sizing
Let's begin with sight-sizing, which, apart from a pencil, needs no tools at all. You've no doubt seen artists close one eye, hold their pencil at arm's length, and move it around while sliding their thumb up and down the barrel. As I'm doing here. I'm measuring and comparing lengths and angles - plotting key points to be joined by eye. And, basically, that's all you need to generate a faithful copy of the subject in front of you.
I used sight-sizing for these two drawings from my college days. They clearly display all the key marks and construction lines that fix the relative position, shape, size, and angle of each element. This dimension, for example, can be used to determine this one, or this. Or this angle can be checked against similar angles to see if, or how, they differ. Of course, this only works in a live situtation. But there are many other methods, most adopting a similar approach, that work with inanimate reference sources, such as photos.
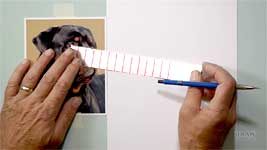
Card Ruler
This is one of those methods, and it requires nothing more than a very basic tool - a strip of card. Think sight-sizing, but on steroids! It's how I first began transferring my reference to my drawing paper. And it quickly taught me that what I think I see is not necessarily what it really looks like.
This method is based around the twin principles of measurement and drawing by eye. It's as accurate as a grid without sacrificing the artistic integrity of freehand drawing.
Choose an element in your reference that you can see clearly. I often refer to this as the "EYE-UNIT" method, because I usually choose the width of an eye.
Mark its width on the card strip. This is your 'eye-unit' measure. Then repeat the marks along the strip to form a ruler.
Next, decide how much bigger you want your drawing to be. Let's say 50%. Measure where to place another mark to create a section 50% wider than the first one. Then repeat that along the ruler. To see which is which, you could use a coloured pen for the second set, but I usually just use longer marks.
Now you have two sets of marks on your strip - one for the photo's eye-width and one for your drawing's eye-width. And you have the means to measure the placement and size of any part or feature in the photo.
It doesn't matter which feature you choose, because all subsequent measurements will be relative in size to it. The eyes might be 4 eye-units apart. The top of the left-hand alar fold, 2 eye-units from the right-hand pupil. And 3 eye-units marks the base of the nose.
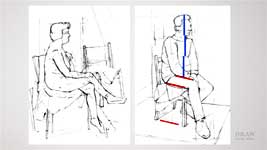
But, before you transfer any measurements to your drawing paper, you MUST first establish a major angle. This is where your strip of card performs its other function. It can transfer angles. With your photograph square to your paper, lay your card between two features or known points - for an animal I'd choose the two pupils - and then slide it across to your drawing, maintaining the same angle, and draw a line along it. Now you know the rotation, or tilt, of the head. Not being aware of that tilt, or assuming the eyes are level, will throw your entire drawing out of perspective.
Mark on the line where you'd like one pupil to appear. Then use the card to measure the 'eye-units' between the eyes on your reference. We already know it's 4 units, so I can mark that distance on the line and that's accurately positioned both.
You can also measure and position two points relative to each other. For example, in this case, if I lay the card exactly vertical from the edge of the left-hand eye, I might measure the distance down to the corner of the mouth. Now I can drop a similar vertical on my drawing and mark the point that exactly identifies the postion of that feature.
However, you can also use triangulation with this method, which gives really accurate results.
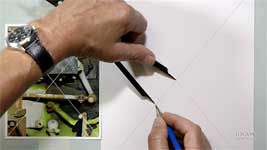
Triangulation
This is how cartographers survey and draw maps, where accuracy of position is paramount importance. Triangulation is based on the fact that a triangle CANNOT be distorted! For example, Let's take the pupils - which we know are correctly distanced apart - and use those to find the top centre of the mouth. Using a ruler, or the card strip method, measure the distance from one pupil to the mouth, and then the other. Transfer those measurements to your drawing, and where the two lines cross HAS to be the correct position of the mouth. Like this...
Again, make certain your reference and drawing paper are square to each other. If both eyes are visible, draw a line to connect both pupils. Slide your ruler across to your drawing paper and repeat that line. Now we know the angle but NOT the scale, but we can decide where we'd like one eye to appear.
OK - let's say we want the drawing to be 25% larger than the reference. So, the distance between the eyes is... 10cm (or 4 eye-units if you're using the card). 10 + 25% is 12.5cm (or 5 eye-units in this case). Mark that on the new line and now we know the distance betwen the eyes.
Now for the centre of the mouth, which we can find by triangulation. Lay your ruler from the left-hand pupil THROUGH the apex of the mouth. Slide the ruler across to your paper and lightly draw a line. Now connect the right-hand puplil to the same spot. And, again, slide the ruler across and draw that line. No measuring required. Where the two lines cross is exactly where that apex of the mouth exists. Using these positional methods teaches your eye to detect and recognise angles and relative positions.
The line drawing that results has, of course, been drawn freehand, but the placement of individual features, and their relative angles, will be known to be accurate. I found it a great way to learn how to 'see' relative positions. And the true angles between features were often surprisingly different from the angles I perceived.
You can also do that in reverse and check for accuracy and rotation. On your reference, place a vertical from the most central point of the three to bisect the line between the other two. In this case, that's from the mouth to between the eyes. Measure either half of the bisected line on your reference. If the measurement of that half on your drawing matches your reference, then both the position of the mouth and the rotation are correct. However, if your drawing's measurement doesn't agree then you have your triangle rotated. And the good news - triangulation is MUCH easier to use in practice than it appears to be here!
Triangulation works very well with the CARD and the RULER methods, but there's a tool that's dedicated to trianglation and enlargement...
Proportional Divider
...the Proportional Divider. You do lose the ability to directly carry angles across from reference to paper, but the proportional divider can copy an image from a monitor, laptop, tablet - or even from life, which you can't efficiently do with the ruler methods.
Proportional dividers transfer measurements from reference to paper while maintaining the same proportions, so your drawing stays true in scale. Compared to the card ruler, one end forms the SOURCE ruler, and the other is set to the required COPY size enlargement. This is set up to enlarge by 1½ times or a 1:1.5 ratio.
To set it up release the central catch insert the pin into the hole corresponding to the enlargement of your choice and replace the clip.
The first hole gives you a 1:1 ratio, so your copy will be the same size as your source. And, on this particlar model, the last but one hole equals a 1:5 ratio, or 5 times larger. I'll use the the fourth hole, which gives a 1:1.5 ratio to enlarge my reference by 1½ times.
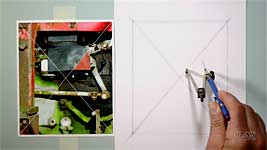
You have to have a fixed starting point on your drawing paper, because you don't want to be half way through the transfer, only to find it's too far left or right! The simplest solution is to rule a couple of crosshairs both ways across the middle of your reference. They can be vertical and horizontal, or diagonal crosshairs, or both. There aren't any rules - just use the array that assists you the most. This time, I'm going to use diagonals.
Whichever you choose, repeat those lines on your drawing paper. Now you know where the centre is, and you can take your measurements from that. Simply align the SOURCE points between the centre and the edge you want to copy. Then use the COPY end to reverse the proceedure on your drawing paper. You might find you get the best results by plotting points and then manually joining them.
This gives us the width... and now we can construct that bar. If straight edges and accuracy are essential, use a ruler.
And don't forget you can use it to check accuracy too, Be creative with your measurements. For example... this distance is the same as this one, and this, and this too. If your copy agrees, you're good to go.
You can also use this tool for drawing from life, but that's a subject I'll cover in a later video. And one final point: If you only want to copy at the same size - 1:1 - you DON'T need a Proportional Divider...
The Compass
...you only need a compass. You could, for example, print out your reference - enlarged to the size of your proposed drawing, to ensure a 1:1 ratio - and then use
your compass to mark all the key points. You do that by using triangulation to accurately find any point. The key point is where the two arcs bisect, so just join the dots. Connect them by eye. And that "connect them by eye" is important - it instantly involves you - immerses you - in the subject. By the time you begin your drawing, you'll understand your subject - something that blind copying doesn't promote.
That's the final manual method. In the next video I'll introduce you to five more ways to generate your guidelines, this time using Devices.
© copyright: Mike Sibley 2019