
MULTI-SOURCE COMPOSING: Part 1
Discover how to easily move, resize and rotate photos, drawings and sketches as you construct a storytelling composition. With step-by-step demonstrations.
The computer's versatility for building compositions is unmatched. And its ability to test an idea, and then revert to an earlier version is unparalleled in its excellence. It gives you so much freedom to experiment to precisely tell your story.
Be sure to watch REMOVING BACKGROUNDS first.
WHAT YOU GET...
Introduction
Discover how to efficiently compose your work in Affinity (or any other app, such as Photoshop, GIMP, or PaintShop Pro). With practical demonstrations and keyboard shortcuts.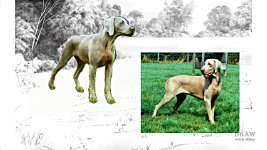
Computer Composing...
The basics of mixing different media to create a suitable setting. Then introducing your players onto your stage to move them around until they begin to tell a story.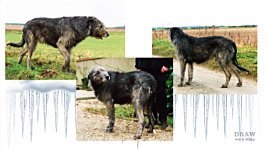
Sourcing images...
Before telling any story, you need material to work with - photos, sketches, downloaded images... everything that might be useful. Mike took up to 180 photos to work with each subject - including local photos of use.
Forming the Story...
Now well-armed with source material, Mike explains his method of sorting through the images until a story forms. Three piles result: POSE (the characters), DETAIL (for rebuilding or altering the poses), and DISCARDED.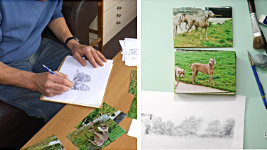
Building the Setting...
As the story gradually begins to unfold, begin to sketch and gather ideas for a suitable a setting or background. These sketches can be combined with the photos, and other sketches and line drawings, to tell your story.
Conception to Completion
Mike takes you through the opening scene step-by-step using the new Affinity. But everything equally applies to the older Affinity Photo 2 and apps such as Paintshop Pro, GIMP, PhotoShop, and others - and often using the same procedures and commands.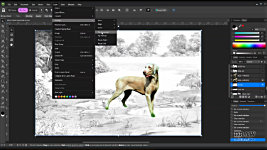
Demonstration...
This features dogs, but it could be any subject that requires elements to be brought together to tell a story. And, once everything is on its own layer... it can be Moved - Resized - Rotated - Flipped...
Beware...
Beware of being too commercial. By all means, engineer the composition to be generally acceptable, but don't overdo it. Ultimately, this drawing is for YOU. You have to want to draw it - to enjoy the process and execution.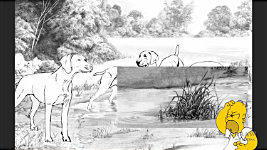
Photo Heaven...
The great benefits of always taking too many photos - including anything going around you at the time. You never know when a photo you took can be useful later...
Top Tips...
Featuring very useful TOP TIPS from creating and using copies, to grouping layers that act together, and removing the pesky bounding box.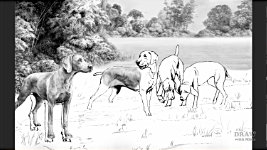
The Drawing Begins...
With the composition finalised... and everything reduced to LINE... the drawing begins. By now, you have a pretty good mental picture of what you intend to do with it. All due to Affinity permitting you to experiment.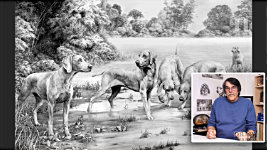
And finally...
This video teams up with "MULTI-SOURCE COMPOSING 2", where we fill in the blanks between creating the composition and its line drawing... to ensuring the main subjects are drawn accurately. And solutions to problems that might appear along the way.Watch the 5-minute PREVIEW:
Multi-Source Composing: 1
Duration :
17 mins Downloads are superior high-quality HD videos
Transcript...
Transcript
INTRODUCTION
Where painters can compose directly onto their canvases we pencil artists can't. Every mark we make might be visible in the final study so ideally we need to compose away from the final drawing surface. I now, almost exclusively, use the computer for composition - because its versatility is unmatched. And, perhaps even more important, its ability to test an idea, and then revert to an earlier version is... well, priceless! It gives you so much freedom to experiment. To tell your story.
USING A COMPUTER FOR COMPOSING
And there's more... It's the only viable way to mix different media. I could - and often do - for example, make a sketch of a suitable setting and then introduce my players. Initially as cropped photos that I can move around my stage - until they begin to look natural. Then I'll reintroduce them as line drawings. And I can, of course, move or remove anything at any time.We'll return to that scene soon, and I'll take you through all the steps from conception to completion.
PHOTOGRAPHS, SKETCHES, IMAGES
But, before we venture into telling that story - any story - we need material to work with. We need photos - sketches - downloaded images - of everything that might be useful. Remember, I'm from the days of film. So, during a photography session, I'd use 4-5 rolls of 35mm film, which gave me 150 to 180 photos to work with. And not all were of the dogs... take what film makers call "B-Roll", too. Look around you and take photos of any aspect of the setting you're in that you might be able to use.For example, it was a bitterly cold morning. So cold my eyes were watering so much I could hardly focus my lens. And this dog, which had taken very little part in the photography so far, was happy to find shelter behind a hedge. And, while it tried to hide its damaged and bandaged tail from view, it was the one opportunity I had to photograph it where it was comfortable... quietly laid under that hedge. Then, back in the studio, this body was modified with this head to result in "AT SPINNEY COTTAGE". The scene is from my imagination. The plant was constructed from one I knew well. And the fork and flowerpots drawn from memory.
And then another day unsuitable for good photography - a howling wind - as I photographed these two Afghan Hounds. I thought the photos might be good for detail but little else, and I'd have to return. But then I realised I had the golden opportunity to show these dogs as they really are, rather than the usual perfectly groomed and staged image. You can never take too many photos. And in these days of universal smartphone ownership and throw-away digital images, you have no excuse for not taking anything and everything of possible value. You simply never know when anything might be of future use.
FORMING YOUR STORY
So, now we're well-armed with source material for our Weimaraners, let's sort through them to see if a story emerges. You'll find your own way, but mine is: to go through the photos a few times and discarding anything of no value to the potential story. Then split the remainder into two POSE and DETAIL heaps - or folders, of course, since you'll be sorting through digital images. Then take the POSE pile and begin to mentally combine them until some sort of story begins to emerge. And that includes using parts of photos: so you might, for example, choose to mix photos of one dog's head with another body - possibly not its own as I did with the Irish Wolfhound earlier.Gradually a story begins to unfold - and that might take a few minutes, a few hours or even a week or two. Then, as it emerges, I usually begin to sketch and gather ideas for a suitable setting or background. And let me make something quite clear - I'd do the same even if it was just a commissioned head-study with no background. There's a STORY TO TELL.
By the time I've completed the process, I'll have a head with ears and a nose - but not necessarily all from the same photo. And I'll know what the dog has just been doing - and what it's thinking of doing next. It has history, and dreams and plans. And I'm saying DOG, but this could be any animal-related drawing, or human - like a sport or hobby. Anything with active elements that can be woven into a story. So, now I'm not drawing a static image that's frozen in time. I'm drawing a subject with LIFE. And that life will inevitably become built in as I work.
OK so, now, we've got something to work with: (1) Images that tell a simple story. (2) More images that will provide DETAIL for the chosen POSE images. And that means you can confidently use soft-focus or blurry images for a pose - because you can rebuild it using the DETAIL photos. And (3), an idea of the setting that the story takes place in - and that could easily be from your imagination - from something seen in the photos - or based on photos you've previously taken and stored.
CONCEPTION TO COMPLETION
Well, let's return to the scene you saw at the beginning and I'll take you through it, step-by-step. I'll be using the new Affinity 3, although everything equally applies to the older Affinity Photo 2 - but let's keep this up to date. And, no matter which version, everything I do can be done in other image apps such as Paintshop Pro, GIMP, PhotoShop, and others - and often using the same procedures and commands.First, don't waste time carefully removing backgrounds. Just hack it away and play around with the story idea. Then, only when you know you're going to be including that element, carefully and completely remove the background. Watch "REMOVING BACKGROUNDS" for full instructions and assistance with that. There's a link below.
Now sometimes I see a picture of the finished drawing in my mind and photograph whatever I need. At other times, I take a bunch of photos and pour over them until a story unfolds. In this case, I have two or three static dogs I'd like to include, and a central pair that add a little action. So I have that in mind as the setting comes to life. I often, for example, make sketches of possible contenders - or parts of them. Then I might take one - recognise it's got potential and decide to refine a part of it. Now an idea is beginning to form so - just to test the waters I'll rework and refine the part I've already drawn and then perhaps extend the idea into the midground. This is slowly becoming a scene with a lake, and early-morning mist hovering over it. So, I'll pencil in a few rough ideas to explore the foreground. I've nothing in mind, but the dogs need something to stand on, so I'm thinking "wet mud and puddles" - and that will help solve the problem of the feet being hidden in the grass.
I'm beginning to feel this setting is at least a serious contender, but at any time I can turn off one or more parts, or replace or move them. That's the beauty of composing this way. Obviously, I'm using a scene with dogs to demonstrate, but, as I mentioned, this way of composing can be used for any subject. Flowers in a vase, or a country garden. Race cars on a track. Shopping in an oriental market. Birds of prey hunting or nesting. Anything that requires elements to be brought together into a composition that tells a story.
And, once you have everything on its own layer each can be independently moved into any position, resized, rotated, flipped with Layer > Arrange > Flip Horizontal, or you can add the icons to your toolbar and instantly flip in any direction. And, because each is on its own layer any one can be placed behind another, or in front of it, and closer to us.
So far we've used photos for our characters, but suppose you've already drawn up an idea to combine two photos. No problem. Just introduce them into the composition as line - which can be a quick trace at this stage, or more refined, if you know they are here to stay. And let's fill that empty gap, and direct the viewer's eye back into the scene.
Gone are the days when I'd compose on paper. What if one dog needs to be nudged to the right? Well, obviously I had to erase it and redraw it. Often many times. It was a necessarily unavoidable, but very time-consuming, way of working. But using this system - in Affinity, or any other image app - you can combine ANYTHING into a single composition, and have absolute control over every element.
PRACTICAL STAGES
So, how do you go about doing the same? Well, let's take what we've just seen and I'll lead you through it step-by-step, with tool tips and advice along the way.For simplicity, I've combined all the parts of the background into one - named BG-ALL. Click it in the layers palette to select it, so anything added will appear on a layer above, in front of the background. Go to the folder where you keep your photos. Drag the one you want into the scene, and it will appear on its own layer. So, we have our first character with a background that needs to be removed. As I said earlier, watch "REMOVING BACKGROUNDS" for help with that. And our second dog needs the same background removal.
OK Let's position these two roughly where we think we want them and begin to tell our story. This particular drawing is destined to be a Limited Edition print, so it has to appeal to the breed enthusiast and pet owner alike. So, it has to display both the breed characteristics and their natural behaviour. Now, I think this is important: That's as far as my commercial compromise goes. Do NOT draw for the market. Draw for YOU. From here on in, everything is for ME. It's the scene I want to draw. Not the scene that's designed to sell and make money. Although hopefully it will

When my publisher was selling 20,000 FRAMED prints a year other publishers employed artists to take a bite of the cake. I was drawing what I loved. They were drawing for money. Believe me - the difference really does show. Especially in sales volume.
So, with all that in mind, commercial considerations do have some part to play. This bitch is the specimen dog. She feeds the eye into the scene while displaying the salient points of the breed, which keeps the exhibiting and breeding folk happy. Then this one displays more characteristics, while adding natural movement and connecting the solo bitch to the rest of the scene. But we're still missing a little action. So, something has distracted these two - to the point where they're jostling for position to view whatever had attracted their attention. Remember what I said? About never knowing when a photo you took could be useful?
And, finally, the fifth dog adds some depth; connects the foreground and background; and steers your eye back to the action, rather than letting it slide out of the picture.STORY TELLING
Does that work? Does it tell your story? Well, you make changes or experiment at any time. Might it work better if the pair were between the two main dogs? If you find the Bounding Box distracting, Make sure you have: VIEW > CONTEXT TOOLBAR > set to DOCK and SHOW. Click the gear wheel icon. Check "Hide selection while dragging". And now moving the images feels far more natural.Well I think it worked better before. But note that I didn't create copies. Thats OK, but now you've got to cycle back through the history with CTRL+Z, or click the appropriate step in the history pallette, to return everything to its previous position and size. But here's a much better practice: Copy - that's CTRL+J - Dog #2 and Dog #34, and turn off one of the two copies of each. Now work with the copies. And if that doesn't work out... Well, you can simply delete the copies.
DRAWING COMMENCES
And when you've finally moved everything into their prime and final positions
and everything is reduced to line, the drawing itself takes place. But by now, you're so engrossed in it that you have a pretty good mental picture of what you intend to do with it. And all because Affinity - or similar - permitted you to experiment with "what ifs" and to easily backtrack if an idea didn't work out.Now - there are potential problems involved with forming multi-source compositions - such as Relative Proportions. And Lighting and Shadows. And did you notice that once it's reduced to line, you can light it any way you want to. Well, we'll tackle all those problems and benefits in the next video: Multi-Source Composing: Part 2.
In the meantime - enjoy the freedom of digital composing - and I'll see you there.
© copyright: Mike Sibley 2026

Research of natural behaviour is so important, as you explain. Whether through direct observation or the use of videos, I find that my creativity is sparked by watching the animal in its environment. My references are often from wildlife rehabilitation centers or even museums, but by using these digital tools I can restore a missing eye, or straighten a badly mended broken wing. I use PaintShop Pro or Procreate, but I can work very similarly to what you've shown here. Composing the story is almost more fun than actually drawing!!
Thank you, Mike. This is a wonderful video!