Transcript
INTRODUCTION
There are a number of reasons why you might want to remove the background from a photo. It could be a commissioned portrait and you're inventing new surroundings for it. Or no surrounding - like a head-study on blank paper. Maybe the subject is destined to become a part of a larger scene - perhaps a racecar relocated to race on a busy track. A horse in its stable magically transported to another stable - one it's never seen or visited. A lovely bunch of Flowers placed in a more appropriate vase. Or... Well, for whatever reason, there are many ways to remove the background from any subject in a photo.
AI is improving but I still favour the freehand methods. You could use the Extract tool in Photoshop, Foreground Extract in GIMP, or any semi-automated MAGNETIC solution... but I've found none to be entirely satisfactory.
Now, if you're just roughly removing a background to try out an image in a scene, that's OK - but they all involve dragging or clicking around the subject.
REMOVING SOLID BACKGROUNDS
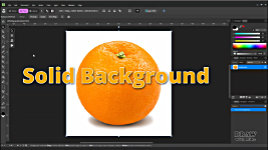
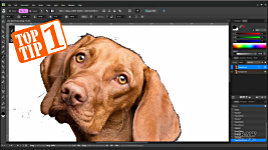
So, let's begin with a useful alternative - the FLOOD SELECT TOOL - and on a variety of backgrounds. This solid background first. Keyboard shortcut W calls up FLOOD SELECT. Click and drag and you'll gradually access all areas of the same value - or within a chosen range. Let's reset this and I'll show you how.
What we have is a plain white background with a soft-edged shadow beneath it. First, select CONTIGUOUS (which means touching or adjoining), so it won't select any white in the orange, and ANTIALIAS, so it doesn't leave jagged edges.
And I'll set the TOLERANCE to 0%. Keep an eye on that.
If I now just click anywhere within the white, notice that it's selected all the white except some around the shadow, because that has a soft woolly edge. Now watch what happens if I slowly drag the pointer in any direction. The TOLERANCE increases with the amount of drag, and the shadow begins to be cut into. And around 30%, the selection begins to eat into the lighter parts of the orange's edge. Then, if I drag back.... the reverse happens. That gives us a lot of control.
Everything look good at around 16%, so let's press the DELETE key... Nothing happened? Make sure you've got a
transparent background layer. Go to DOCUMENT > SETUP > and click TRANSPARENT BACKGROUND. I have that set to SHIFT+T as a speedy shortcut.
Use CTRL+D to Deselect everything - or press ESCAPE. Now, we could remove the shadow at the same time, using SHIFT to add to the selection and ALT to subtract. But that's more prone to error. Personally, I'd select and delete in stages, and have more control over the final result.
And talking of control - you can achieve the same as the Flood Select with FLOOD ERASE - that's keyboard E, and then pick from the Erase options. But the only advantage is that you don't need to press the delete key. Stick with FLOOD SELECT - because that gives you time to check for errors before you commit to deleting. It's far safer.
REMOVING WHITE PAPER
Right - before we move on, there's a situation I want to cover first. There are times you might have traced or copied an element in a photo onto white paper, or just sketched something, and now you want to insert into a larger scene.
Deleting the white background can present a problem, because the outline is probably
not solid and unbroken.
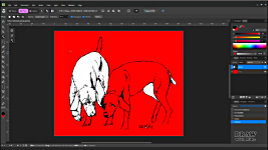
This example has a coloured layer behind it (I'll explain how to do that later), so you can clearly see what happens when I use FLOOD SELECT, set to contiguous, and apply it to the background. It will inevitably find the smallest of gaps and flood into parts of the interior. The simplest solution is to ERASE the background up to the line. But, if you erase white with a white layer behind it, you can't see your progress - or
any progress. Even a transparent background is not that helpful.
So, create a new layer behind the current one and colour it. I favour RED. By the way, if you get this unwelcome series-of-circles effect - go to MORE > then reduce the SPACING. Now your erasing will be in a smooth, solid line. And you can easily view your progress - and see how close to the line you're erasing.
REMOVING GRADATED BACKGROUNDS
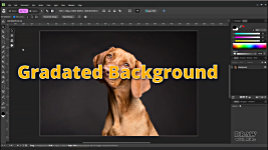
Well, that was a plain background, so let's move on to one that's gradated - smoothly varied in colour and intensity. First, we could select the FREEHAND SELECTION tool (L) and simply draw around the subject to remove the bulk of the background. The default behaviour is "polygonal", so you can just click your way around it in straight lines. Or hold down the mouse button and draw. It's the background we want to select, so make sure you can see ALL the image - CTRL+0 FITS TO SCREEN. Draw around a chunk of it and then click around the outside of the box… finish by double-clicking to close the selection... and press DELETE.
If you want a subject very quickly and roughly extracted, that often does the job. This time, I won't do that.
So, let's revert to an earlier point, and the FLOOD SELECT TOOL before speeding up the process. If I click in the background and drag - it gradually eats into the background until... it takes a bite of dog. So, as previously, reverse the drag until NO dog is selected, and press DELETE... and again... until nothing remains, except a few stray pixels that can be ERASED.
That's fairly good, But the top of the head is too soft and hairy to be cleanly selected. If you try to use FLOOD SELECT - even with
contiguous selected - you risk digging into the dog. Dragging will increase the tolerance until it finds a path through to matching internal areas. You can backtrack until it's safe again, and then DELETE - but I'd rather ERASE around that edge. Like this...
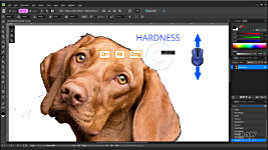
Press E for ERASE. Hold down CTRL and ALT. Now drag your mouse vertically to alter the HARDNESS. I'd go for something around 70%. And drag HORIZONTALLY to increase or decrease the SIZE of the brush. You can instead set both up on the bar above, but CTRL+ALT and DRAG is a much quicker way to make changes as you're working.
OK, we have the brush set - 72% hardness and width to 26px. It's always a good idea to create a copy whenever you've completed a stage - so you can easily backtrack if the next process fails. So, copy - that's CTRL+J. Now, you could try to carefully erase along the edges but... the eraser doesn't appear to be working!
TOP TIP #1
It could be that something is still selected. So, press ESC or CTRL+D to Deselect and try again. Still not working? Well, we're ERASING - removing the top layer - so we can see through to the layer below... which is a
copy . It's
the same as the layer we're erasing. If that's turned on:
turn it off.
As I said, you could try to erase freehand along the edges but - believe me! - errors will soon occur.
TOP TIP #2
Don't erase for extensive lengths. Erase then CLICK in short sections. That way, if you've made an error and UNDO with CTRL+Z, it will only take you back to the last step, not right back to the beginning. Instead, place the brush where you want to begin erasing. Click the brush, and then hold down the SHIFT key. Now move a little further along the edge. Click again. That will erase a straight line between the two clicked points. Keep the SHIFT key depressed and you can.... CLICK, CLICK, CLICK your way along the entire edge... and UNDO will only return to the last place you clicked.
When you reach the edge of the window, release SHIFT, press the SPACEBAR and DRAG the image to where you need it to be. Affinity will remember where you last clicked, so hold down SHIFT again, and continue moving and clicking the brush. Just release SHIFT if you need to do a little freehand erasing.
USING THE MAGNETIC TOOL
Another option, because this subject has relatively sharp edges, is to use the FREEHAND SELECTION TOOL set to MAGNETIC. Click at the start point, release the mouse button and, staying on the cleanest side of the line, drag the pointer around the edge of the subject. Don't try to fix errors at this point. As you drag, you'll see nodes appear and move themselves to the edge. You can click once anywhere to confirm a correct position. That's quite useful if the edge runs into a sharp corner and then continues at an angle. In all cases, double-click to close the selection.
To fix errors, click the REFINE button above. Paint over the error and click APPLY. That usually works immediately. If it doesn't, you can try again or correct it manually. So, hold down and draw as close as you can to the edge. Swing away from it, and double-click to close the selection - which is now added as a correction to the original selection. To SUBTRACT, press ALT and remove from the selected area. CTRL+0 takes us back to FIT TO SCREEN... and everything looks OK.
Now,
bear this in mind - you have selected the SUBJECT. NOT the background. You need to INVERT the selection And then press DELETE. To INVERT, can go to Pixel > Pixel selection > Invert - or use CTRL+SHIFT+I. Or you can do what I did and customise the bar by adding the INVERT icon to it. I've done that with quite a few of the useful Affinity Photo 2 icons that are now missing.
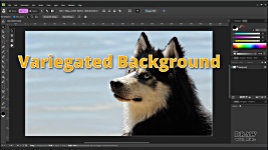
REMOVING VARIEGATED BACKGROUNDS
OK, let's move on to a more variegated background - the water behind this Husky. And very few hard edges - this is one soft, hairy dog! So, let's copy it, turn off the lower layer, and go straight in with the FLOOD SELECT tool again. That's W. Same settings - 0% tolerance, contiguous, antialiased. Click in the blue and drag... When it starts to eat into the hair, back off a bit. Try again. Keep trying until you've selected all the background and not eaten into the dog.
Then press DELETE. And CTRL+D to deselect.
TOP TIP #3
This often helps: Drop down a layer and press CTRL+SHIFT+N to create a new empty layer - or click the NEW LAYER icon. You could use the FILL tool, but save time by using SHIFT+F5. Select the foreground or background colour and press APPLY.
Or to REALLY save time and effort - I've set up mine to use SHIFT+BACKSPACE to immediately fill with the foreground colour. And CTRL+BACKSPACE for the background colour. Foreground. Background. Quick and Easy. And it's done a pretty good job.
Hmmmm... I'd rather that hadn't been cut into. Well, we have the original copy on the layer below, so, we can use the FREEHAND SELECTION TOOL to isolate that part. CTRL+C (copy), then CTRL-V (paste) places it on its own layer. CTRL+SHIFT+] sends it to the top of the stack. FLOOD SELECT (W) removes the blue background again. And then CTRL+E merges this layer with the one below. Job done.
Except... sometimes it really matters that the background is clean of all stray pixels.
TOP TIP #4
So, here's another Top Tip I often use. To ensure you've completely removed the background, go to LAYER EFFECTS > OUTLINE >. I set the colour to RED. Then increase RADIUS until the outline appears. Now go around the image and ERASE anything you missed. This trick catches all the errors from small to large.
All those marks you might later regret missing. And when you've finished turn off the outline.
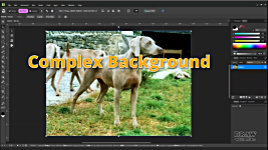
COMPLEX BACKGROUND
Finally, we'll take a complex background and remove that. And we'll begin with shortcut C for CROP - and then drag the handles close to the subject, cropping away everything of no use. Then Rasterise & Trim.
Well, let's set up ERASE. You might be able to use the FLOOD SELECT in parts, but it will leave so many stray pieces to be erased that you might as well just ERASE instead.
You can zoom in and out using the middle mouse wheel... I'm going to be fairly careful with this one. I've already decided it will take part in a drawing, so a degree of accuracy will do no harm. Otherwise, I'd just quickly erase around it, so I could test its suitability without wasting time on extracting it accurately.
To decrease or increase the brush size as you work, use the square bracket keys.
LEFT bracket to make it smaller, and RIGHT bracket for larger. I'm going to cut around the paws where I think they are in the grass. Hopefully, they'll be back in grass or weeds in my drawing - or perhaps in water.
For really tight spaces, use the FREEHAND SELECTION tool - or FLOOD SELECT - as I'm doing here - to select and delete the relevant part. Then revert to ERASE,
and continue erasing up to the edge all the way around, taking as much or little care as you need to, until you reach the starting point. Now you have a clear area surrounding the subject, you can use the FREEHAND SELECTION tool to quickly remove the remainder of the background... Invert... Delete.
If you have a white background, turn it off as I explained earlier - SHIFT+T in my case - and SAVE the transparent background image as a PNG for use in your project - or any other file type that can handle transparency - which a JPEG can't.
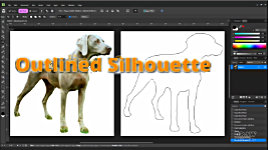
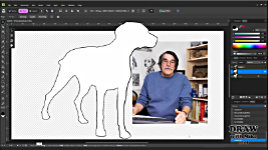
OUTLINED SILHOUETTE
And finally, if you need a quick outlined silhouette for your potential composition, you can use Affinity to produce one. Create a new pixel layer with the button or CTRL+SHIFT+N. Drag it to the bottom, or use CTRL+]. Fill it with white (SHIFT+F5 or SHIFT+BACKSPACE if you followed my suggestion). With the
lower white layer selected and both layers visible - CTRL+CLICK in the
upper layer. Now you have a mask of the dog on the lower WHITE layer. Invert the mask, so you select everything that is not dog. Press DELETE, then ESC to remove the selection. Turn off the top layer. And you have a white silhouette of the dog.
Now, go to EFFECTS (FX). Then, as you did for the RED outline, click the checkbox and then OUTLINE to select it. Change ALIGNMENT to CENTRE or even INSIDE. Increase RADIUS for a solid outline - 2 pixels might be sufficient. Copy (CTRL-J), so you can backtrack. Right-click the copy and choose RASTERISE AND TRIM. Turn off PRESERVE FX, so it becomes embedded, and Rasterise. Then save as a PNG file.
And now you have a solid outlined figure you can resize and move around in any drawn sketch or scene, which is what we'll be doing in the next video - "MULTI-SOURCE COMPOSING" - when we use this dog as one of the players in the story.
Don't forget to download the CHEAT SHEET provided below of all the keyboard shortcuts used in this video, which will save you so much time.
© copyright: Mike Sibley 2026