Tips & Techniques
Joining or Stitching Multiple Scans
How often have you had artwork to scan that was larger than your scanner? Have you perhaps photographed your work instead, then been disappointed with the results? All is not lost. Your scanner can still be used and the results are nearly always better than using other methods. Photoshop CS3 can perform this task for you, as can other stitching software, but if you prefer to have full control over the process... Just scan your work in pieces then stitch them together again. How? Read on......
Simple is often best...
The good news... Multiple-scanning does not require a degree in Rocket Science. Possessing a super-computer with state-of-the-art imaging software might help but it is by no means essential. I now use Adobe Photoshop 6 in an up-to-date computer but I've used the following methods quite satisfactorily in my old Pentium II, 166Mhz machine.... using Microsoft's PAINT!The Basic Kit to SuperPic...
This tutorial will focus on the use of MS Paint (for simplicity) through Adobe PhotoDeluxe (The forerunner of Elements) to Adobe Photoshop (for total flexibility). But don't think you must have one of these - although I haven't tried many others, I have no doubt that most image manipulation programs will suffice. GIMP or Corel's PhotoPaint are definite alternatives, as is the excellent Photoshop Elements.Five steps to Heaven...
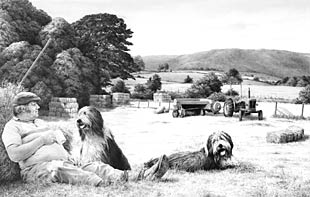
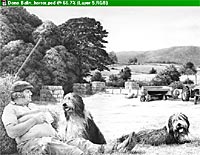
This is "Done Balin'", my Bearded Collie limited edition print. The quick-witted (you, of course!) will have realised that in order to show you this I've already scanned it in five pieces and glued it back together.
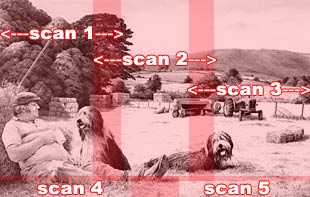
The five stages of scanning used for this image. Note how each scan overlaps those around it - and the two narrow scans at the bottom that complete the set. This image measures 17¾" × 11½" (45 x 29cm).
Making your scans...
I'll assume you know how to scan your work. However, when using the techniques I'm about to explain, there are two very important points that you must pay attention to...
Art (A) face-down on scanner glass (B) and pushed up against case edge (C) so it lies square to the glass.
2: Your scans must overlap. Each scan has to overlap all the scans surrounding it. It may seem sensible to just butt the pieces up to each other but overlapping them will prove to be far more beneficial - as you will see...
Ok, let's get down to it.
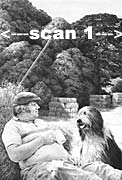 Scan #1: Top, left hand end of the print and scanned in greyscale. For web use there's no point in scanning graphite pencil work in colour and by discarding all colour information your file size will probably be reduced by two thirds - this is important as all five scans may add up to 30MB or more (For print use, scan in colour at 300ppi). Give your scans useful names - I use "pic_tl", "pic_tc" etc - to designate "top left", "top centre"...
Remember - your second scan must overlap the first and the third scan must overlap the second - it doesn't matter by how much but more is better. Similarly, when you turn the drawing through 90° to scan the bottom edge, the drawing must be exactly square to the edge of the glass and the scans must overlap each other and the those above.
With the instruction to "keep everything square" in mind - scan all parts of your image, naming and saving them all as separate images for now, then read on.
Making your scans...Basic techniques with MS Paint...
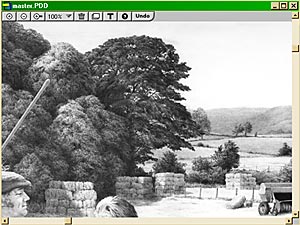
Yes, it really can be done!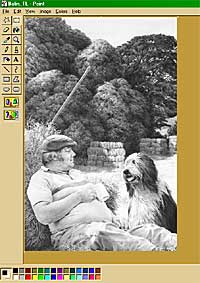 Step 1: Open the scan of the top left part of your image and "save as" another name - just to humour me, call it "Master". This "Master" file is going to become the canvas on which you paste and position all the other images. We could have used the original file but didn't for reasons of safety. Once something is pasted and positioned in MS Paint it cannot later be separated out, so we need to be able to revert to the original if a major error occurs.
Step 2: Note the width of the image as it is now (that's 384 pixels in this case as I've reduced the original size so you can see it better). Multiplying this by the number of scans across the image (three in this instance) will provide more than enough width because the three actually overlap. If, like me, you have additional scans across the bottom, you need to increase the depth of the image also. From the top menu select "Image" then "Attributes" and change the dimensions to your new figures. Here I'm changing 384 to read 1150 and the depth from 590 to 650 pixels. Click on OK and your new enlarged canvas will appear.
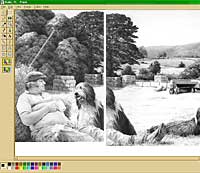 Step 3: Open the next scan (the central one), press your CTRL and A keys together (CTRL+A) to select the whole image then CTRL+C to copy it. Instead of the keyboard, you can, of course, use the Edit menus or the icons on the main toolbar for this. Now re-open the "Master" image and, if you can't see the right hand edge, scroll sideways until the picture part is only half showing at the left hand side - you'll see why in a minute.
Paste your copied image by pressing CTRL+V or using the menus. You'll notice that your cursor has changed to a four-pointed star. You use this to move the pasted image - just left-click, hold the button down and slide the segment sideways. Slide it too far left (pictured above) then slowly back until you almost join the images together.
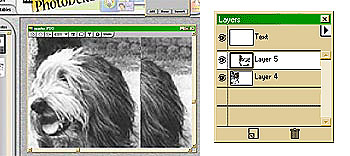
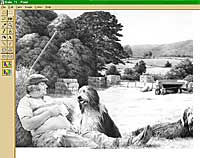 Now pick an area of activity, one where you can see if the two are joined perfectly - here I'll use the dog's head - then carefully position the segment so it joins seamlessly to the first one.
Finally, when you're satisfied, click anywhere outside of the image and the two will combine. If you've made a mistake press CTRL+Z to undo it (or use Undo on the Edit menu). And if one segment is a little darker than the other, complete the join as described, zoom right in and use the airbrush tool to spread the lighter tone across the join. If the tonal differences are too great, this is where MS Paint will fail you as it doesn't allow you to change the contrast or brightness settings.
Using the flexibility of layers...
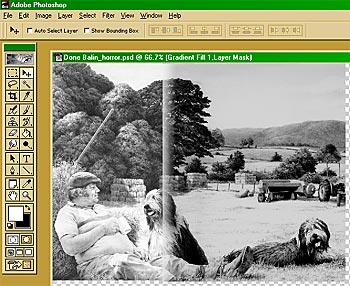
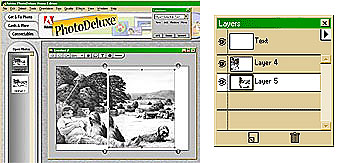 Here you can see the same procedure taking place in Adobe's PhotoDeluxe as you previously saw in MS Paint. But notice this time that pasting in the second segment has caused it to appear on a new "layer" (see Layers Palette at right). This means you can treat the second segment as being entirely independent of the first one. It can be moved around, placed on top of or behind other layers, even turned on or off and it will not become a part of the first segment until you decide that it should be. To achieve the joining, on the layers palette, click the black arrow in the white box then choose "merge layers" from the menu. In fact you may never have to do this - the application supports up to 99 layers and when you save the combined image to any other format, all the layers will be merged for you in the new file. This system of joining scans is also available in Corel's Photo-Paint where Layers are referred to as "Objects".
 This system offers many advantages over the more basic MS Paint but here I'll concentrate on just two - the ability to choose between two join locations and a tool that can blend an obvious join.
 Step 1 : First, if you are using Adobe PhotoDeluxe click on the "Advanced Menus" text at the bottom of the Open Photos bar. Now click "View" then "Show Layers" and in the layers palette, drag the layer containing the latest image to be pasted to the top of the stack. This is to ensure that, when moved, it overlays the previous image and doesn't slide beneath it.
Step 2 : Zoom in to an easy place to match the two halves - here I've chosen the head again. Zoom in as tight as you need to then look for at least one identical element in both halves, click within the half to be moved, drag it over the first half and carefully move it into its correct position.
Step 3 : When you are satisfied that the two halves are correctly matched, release the mouse button and click outside of the image. If the join is at all obvious or needs to be blended a little, first try checking the alternative position of the join. Remember that you have one independent layer on top of another and an area where they overlap. If you click in the first layer this will temporarily bring it to the top exposing the other edge of the overlap. If this looks better then drag that layer (in the Layers palette) to the top of stack.
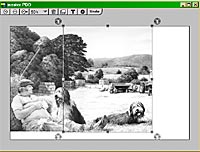
Second (right hand) image on top of first
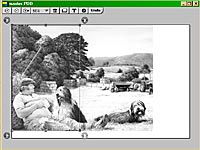
First image on top of second showing alternative join location
Disguising the join (part 1)
Where an image is destined for web use and is to be greatly reduced, there is no real need for overall accuracy. Fooling the eye is more important than remaining faithful to the original. Let us begin with one simple tool, the eraser, and one typical scenario, the scans were not perfectly square. Often all that is required to hide a join is to destroy the hard edge where the halves meet. For convenience here I've added a black background, a white line down the edge and turned off the left hand half. The selected eraser is soft-edged and as large as can conveniently be used in order to spread the graduations over the widest area. Of course you must erase within the overlapping area of the two halves. On completion, turn the other half back on and the eye will no longer have an edge to detect.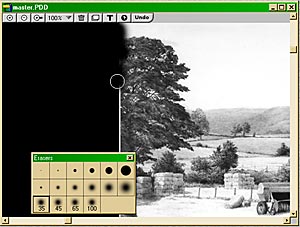
The soft-edged eraser is being used to erase and blur the edge within the overlap area.
The underlying layer has been turned back on and the eye can no longer find a sharp edge to detect.
Using layers in Adobe Photoshop 6
Where Adobe PhotoDeluxe (or Elements) is perfectly adequate for most uses there are instances where the increased power of Photoshop (or PhotoDeluxe's successor Photoshop Elements) are required. And the power of Photoshop is truly awesome!If you have been able to try some of the ideas given here, using anything other than Photoshop, you'll be aware of the sheer, hair-tearing frustration when you attempt to nudge a segment just one last pixel up or down to achieve perfection......It always moves just one more! The mouse is rarely good at such minute alterations but here's where Photoshop comes to your rescue. Photoshop possesses the ability to position with pixel perfection because, instead of just being able to drag the layer with your mouse, you can also use your keyboard's arrow keys. With these you can nudge the image in any direction, one pixel at a time. And you can zoom in and out as you are doing so.
There is very little indeed that cannot be successfully accomplished with Photoshop and it is not my intention here to catalogue all the available tools - there are plenty of online forums and websites to give you all the help and information you need. I will, however, attempt to cover a few of the basic tools that substantially assist with the joining of scans. I should point out that many of these tools are also available in PhotoDeluxe although they are not quite as flexible.
Disguising the join (part 2)
 Horror story 1 : Here I have artificially darkened the right-hand layer and faded one edge. These sorts of problems are not unknown and can often be tackled in a number of ways. As we have a reasonable width of overlap I would begin by deleting the light-toned band using a soft eraser. Enlarged below to 300%, you can see that the under-layer is now showing through as I work my way down with the eraser...
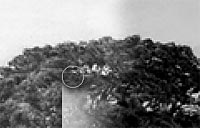
 All that remains now is to adjust the brightness of the dark segment. This can be achieved by using the Brightness and Contrast controls, the Levels feature or the Curves. And for greater security you can apply any one of these to an Adjustment Layer, which can be turned off if required or altered at will without causing permanent changes to the image layer.
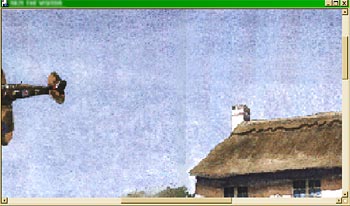 Horror story 2 : Here's part of a picture I received for inclusion in a website, already joined and merged into one image. The join wasn't too noticeable in the lower part of the image but, I'm sure you'll agree, it's extremely distracting in the sky. The only action open to me here was to use the few good parts of the sky to repair the rest. For this we can either select the parts then copy and paste them into place (the only available method in MS Paint) or use the splendid Clone tool. The Clone wins hands down!
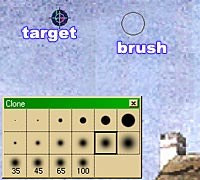 Here I'm using the Clone tool in PhotoDeluxe, but the operation is very similar, though more complex, in Photoshop. Just select the tool, choose the hard or soft edge version, drag the "target" on top of the area you want to copy (in Photoshop just ALT+click) then click and hold down your mouse button where it is to be copied. As you move your mouse around, you will copy the area under the cross that travels in sympathy with the brush.
If you're using PhotoDeluxe, release your mouse button often, and occasionally save your work - it does not possess the multiple Undo steps of Photoshop and you may need to "Revert to last saved" at times to delete errors.
There are many other invaluable tools available but one worth singling out is the Smudge tool. You may be wondering why I didn't use it to blur the lines in the sky? Well, it's great for flat, smooth tones but not for broken or pitted surfaces such as this watercolour sky.
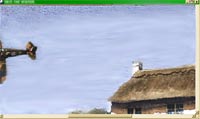 I'll show you... this is what a smudged sky would look like →
 I've left the top edge un-smudged for comparison. Overall it looks OK but it in no way represents the surface of a watercolour painting.
As with most things in life, the more you try something the easier it becomes. Even keeping track of the layers you're using can be troublesome at times but it won't be long before you learn to carry a picture of the structure in your mind and can manipulate each element at will.
Happy stitching...!
TOP TIP
When taking photos from which to work, take the same picture with a variety of focuses. That way you can draw the whole scene in sharp focus if you want to. It puts you, not the camera, in charge of your drawing.
Available here...

320gsm super-smooth Brilliant White paper
The ultimate versatile kneadable eraser
288 pages of drawing techniques and more...

Pencils, Starter Packs and accessories...
320gsm super-smooth Brilliant White paper
The ultimate versatile kneadable eraser
288 pages of drawing techniques and more...
Pencils, Starter Packs and accessories...
