Drawing Wiry Hair

Post your art and WIPs for critique. Start a discussion or ask questions about all forms of drawing. Mixed media permitted.
Forum rules
You are allowed to post tasteful nudity. To avoid surprise or unwelcome comments, please indicate that it's a nude in the thread title. Also include a warning in the title if there's a possibility of the subject matter causing offence.
Post Reply
Jo_Long
Posts: 6
Joined: Mon Jun 20, 2022 11:44 am
Location: Norfolk, UK

Drawing Wiry Hair

Post by Jo_Long »

….help!! I’m really struggling to understand the process for drawing wiry hair – more particularly that of the Border Terrier etc. I’ve watched the drawing hair videos over and over and can see how the methods work for the smaller scale drawings of the bear. I have tried to analyse the Border Terrier drawing to try to work out the layers and drawing breaks and I just can’t see it! I have a habit of over-analysing things so perhaps this is my problem :roll: Would it be possible for a little help please on the layering process involved with the Border Terrier – what the initial layers look like and how these are joined together?

Thanks in hope!
Jo

User avatar
Mike Sibley
Site Admin
Posts: 981
Joined: Thu Jun 20, 2019 1:32 pm
Location: York, UK
Contact:

Re: Drawing Wiry Hair

Post by Mike Sibley »

Without looking at a Border terrier, there are a few aspects of wiry hair that spring to mind.

1: The hairs tend to clump with pointed ends that don't split into wispy strands.

2: Definite V shapes. For me, they are the main Visual Clues. The clumps contain sharp, dark, V-shaped gaps between them.

3: Very obvious wayward hairs that add the "scruffy" appearance.
B32_BORDER-TERRIER-face.jpg
It IS a time-consuming coat to draw, but well worth the time spent.

Also, Border Terriers have dark, silky ears, and that really helps. If you exaggerate the silkiness of the ears that contrasts with the wiry coat, and both benefit from that contrast.

And, they have very dry noses. No shine at all. And that dry nose adds gloss to the ears. It's a win-win all round.

Let me sleep on it. It might be that a short video on wire hair might help you? I'll give it some serious thought overnight.

Oh, and it's far more controlled than the Grizzly Bear. That's almost intuitive. But the Border is carefully considered and mapped out as each area is reached. Not exactly matching the reference, but capturing the essence of each area, and with the main edges adhering to the reference. I'll dig out the line drawing too, which might help.
You do not have the required permissions to view the files attached to this post.
Mike Sibley
WEBSITE: Sibleyfineart.com
BOOKS : Drawing From Line to Life
VIDEOS : DrawWithMike.net

Jo_Long
Posts: 6
Joined: Mon Jun 20, 2022 11:44 am
Location: Norfolk, UK

Re: Drawing Wiry Hair

Post by Jo_Long »

….brilliant. Thank you so much.

User avatar
Mike Sibley
Site Admin
Posts: 981
Joined: Thu Jun 20, 2019 1:32 pm
Location: York, UK
Contact:

Re: Drawing Wiry Hair

Post by Mike Sibley »

I don't think a video would help you any more than the image I posted - but this might help?
B32-LINE-head.jpg
It's the head section of the original guideline drawing I used for that Border Terrier drawing. You can see where I thought those dark V-shaped shadows were really important, and where the main edges ran through the image.

I work out where the individual hairs are (or I'd like them to be) as I'm working my way through the drawing. I don't need to know their shape or exactly where they are; only where they begin and end, which the marked EDGES supply. Unless I think a lock is crucial to the look of the dog, in which case I map it exactly.

It's also a "map" to keep me on course that contains features I can easily find again. But those features wouldn't necessarily be included in the drawing.
You do not have the required permissions to view the files attached to this post.
Mike Sibley
WEBSITE: Sibleyfineart.com
BOOKS : Drawing From Line to Life
VIDEOS : DrawWithMike.net

Jo_Long
Posts: 6
Joined: Mon Jun 20, 2022 11:44 am
Location: Norfolk, UK

Re: Drawing Wiry Hair

Post by Jo_Long »

…this is perfect. Thank you. It gives me an excellent idea of the level of detail required when mapping out the layers etc. I have a starting point now which I was struggling to find!

User avatar
Mike Sibley
Site Admin
Posts: 981
Joined: Thu Jun 20, 2019 1:32 pm
Location: York, UK
Contact:

Re: Drawing Wiry Hair

Post by Mike Sibley »

Jo_Long wrote: Fri Jan 12, 2024 9:25 am …this is perfect. Thank you. It gives me an excellent idea of the level of detail required when mapping out the layers etc.
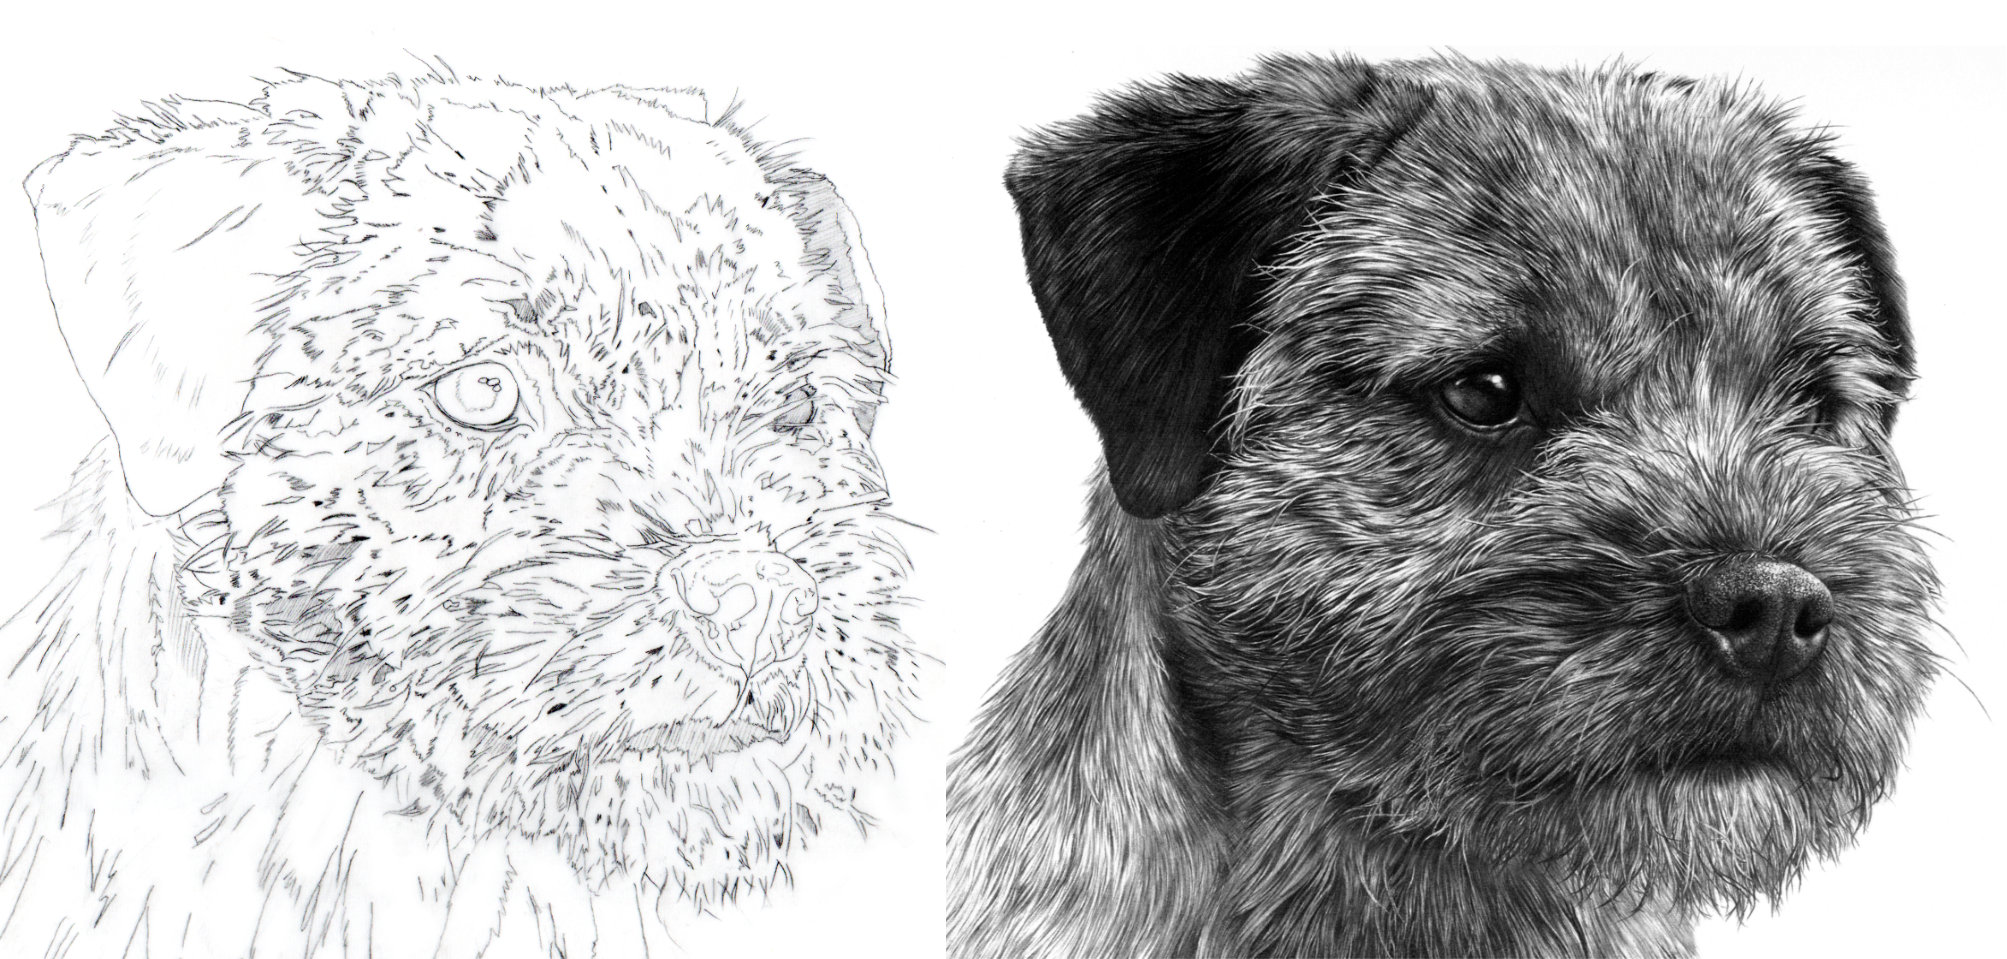
It is, as I said, a map. Because I work on, and complete a small area at a time, it's easy to forget where I am in the drawing. So, my maps include every feature I can see in the reference - whether I eventually include that feature. Well, not every feature, but every feature I can easily find again. Like crossroads and junctions and places of interest on a road map.
B32-LINE-DRAW-1000.jpg
I appreciate that this 1000px wide image isn't the easiest to see, so you can download a bigger image here.

I also include important areas of shade that I hatch. Sometimes I mark essential growth directions with arrowheads. But this whole exercise brings another benefit too: I'm looking deeper and deeper into the subject. I'm finding anomalies that I can sort out now, instead of within my drawing later. I can carefully create perfect ellipses, where imperfect ones would ruin my drawing. Briefly, I have a much better understanding of my subject, and how I'm going to treat it, after the map is complete.

Although most guideline maps, especially for dogs with long flowing tresses, are far simpler, this particular map is quite complex. That said, it doesn't directly outline any individual lock of hair. The exception is the plotting of important ends of locks, where those ends are wayward and add to the sense of reality. The hairs themselves are created as I reach, and begin drawing, each local area. I fade my guidelines to mere shadows and then redraw on top.

And, before I forget, don't ever treat a map as carved in stone. Ultimately, you draw what best suits your drawing, rather than what the reference or map might say. And be aware that the map might not be perfect. As soon as I put these two together for you, I realised the right-hand eye in the map is incorrect. Fortunately, I must have noticed that and drew it correctly in the final drawing.

As I recall, the reference photo was a standard 6" x 3" enprint (15x10cm) in size, and the guidelines were drawn from the photo projected downwards by my Artograph DB300. Usually, the result would be a 10" x 8" (25x20cm) line drawing that is then put back into the Artograph, enlarged to my drawing paper's final size, and traced off on a sheet of tracing paper or Mylar. That, in turn, is used to transfer the line drawing to my drawing paper (watch the Advanced Method section of: GUIDELINE BASICS - THE GRID METHOD).
You do not have the required permissions to view the files attached to this post.
Mike Sibley
WEBSITE: Sibleyfineart.com
BOOKS : Drawing From Line to Life
VIDEOS : DrawWithMike.net

Post Reply