Transcript
Given that you can only successfully draw what you understand... if you want to draw Nature - in any way - then you need to explore and soak up what you see.
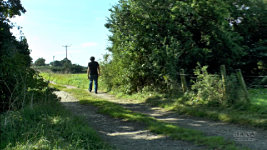
Take a walk - preferably in the countryside. But even in towns and cities, you'll find weeds sprouting from walkways and walls, and untended plots.
Walks like this are good for building up your available store of knowledge, and for firing up your imagination, too.
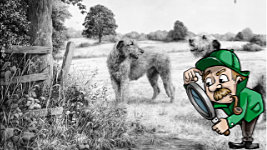
It's early September, so most of the flowers have gone to seed by now. But it's not flowers. It's foliage we need for our drawings. And if you're lucky, you might meet a couple of local "foliage experts", such as April and Duncan here, on the other side of the ditch.
Of course, we can also include flowers in our drawings - although not their colours - and they might help to break up any monotony in the foliage. Like this Hairy Vetch, for example. The flowers are beautiful. And, without them, the complex foliage might quickly overwhelm your drawing if the area is large.
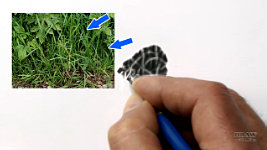
Now, be aware on your travels that flowers can easily grab ALL your attention. So, take care to stop and study the leaves and grasses, too, which can be very varied and interesting. And if you're seeking inspiration, or just want to better commit something to memory, stop to make a quick sketch. Photograph it too and add it to your library.
Take a close look at the leaf shapes. The way they twist and bend. Study the flowers seed pods and leaf textures and shapes. Well, you don't need to remember all of it. : As Albert Einstein once said, "The only thing you
absolutely have to know is the location of the library." Or, these days, the internet. But nothing really beats personal experience.
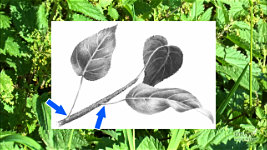
This is Himalayan Balsam. Touch those seed pods... and they'll explode, launching seeds over a wide area. It grows readily around here, up and down the ditches. Again, don't just admire the flowers - or play with the seed pods! Study the foliage and take note of its features, because you'll find that far more useful. Look at the stems. Some might be round, some square; some smooth, others hairy. And notice how the leaves spring from the stem. Some species will have ALTERNATE leaves, and others will be OPPOSITE. You can never know too much. And now, armed with this knowledge, you can happily invent your own weeds. Weeds with growth patterns that appear to be quite natural.
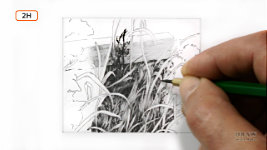
And studying the foliage will add to your mental store of images, and the many intricate shapes it can take. A quick sketch and now I have a range of shapes and growth habits I can use in my nettle patch. And talking of sketching, and the drawing of both Grass and Weeds, there are potential problems you really need to be aware of. The two to avoid are REPETITION and PATTERN.
An all-to-common way of drawing grass and weeds is this...
The problems are many.
There's an unnatural LACK OF RANDOMNESS. It's the same stroke, same length, same angles, over and over again... Now the spacing is becoming repetitive. It's creating a pattern, which the human mind always looks for. Pattern is unusual in Nature, so avoid creating it. Nature doesn't sow seed with regular spacing in straight lines. THIS is Nature. Nature specialises in random.
There's an even greater problem too - It's all
positive - that is: your
marks represent leaves. So, there's no depth. The truth is - you're using BACKGROUND VALUES for the FOREGROUND - so now you have nothing available to create the darker depth.
OK, I understand that if you live in an arid area that features small clumps of dark grasses in areas of sand, then the positive method MIGHT suffice. The same might apply to reeds emerging from water - where the leaves are darker than their background. But any time your foreground leaves are backed by midground and background leaves, you have to apply negative drawing - because the foreground leaves are always lighter than the leaves behind them. We can't draw LIGHT on top of DARK - so we have to draw around them, and that IS negative drawing.
Try what you might - You cannot use this method to create anything with any depth at all. For example, you can clearly see here that this casts shade on this. The foreground leaf is receiving more light, so it's lighter than the background leaf. That being so - this - if we're only using graphite - cannot be drawn with a dark positive mark! Only negative - making use of the white of the paper. You simply can't create depth using only dark pencil marks.
And notice how wonderfully everything flows in random directions. There's no repetition. No pattern. Just a perfect feeling of it being entirely natural. Nature is bountiful. Nature is chaotic. No repetition. No pattern.
Notice that the holes - the deepest depths - as far back as we can see... are BLACK. Not the leaves and stalks, the HOLES. This is worth repeating: if you use pencil marks for leaves you have nothing left to create the dark holes - and that's why you cannot create any depth. And, just as we saw in Part 1, "Drawing Grass", notice how readily you can understand the foreground, but not the crazy mixed up midground or background. Remember in "Drawing Grass" how the foreground told you what the midground and background are? The same applies here. The foreground is recognisable, and tells you everything you need to know about the midground and background. So, you can happily accept everything further back as being a part of the same plant. Now that we can use to our advantage. We can control the foreground to send the necessary messages, and happily invent the midground and background.
Let's take an actual example, based on a query I received, and work with that.
Our DrawWithMike member Michael said:
"I'm looking at the bottom left side of Spinney Lane End and pulling my hair out. I cannot conceive how you planned this portion of the drawing, how you began it, and where you began, so before I become bald, please give me a brief description of how it was accomplished."
OK, let's break that down:
Planning
How it began
Where it began, and
How it was accomplished
PLANNING: None, except for the immediate foreground. I prefer these areas to grow organically - based on what I've seen and recalled.
HOW IT BEGAN: By adding foreground shapes to the composition wherever I felt they were required to tell the story, and for balance.
WHERE IT BEGAN: With a single area of intense shade, and probably near the base.
Because the closest weeds will be in the foreground with the midground physically behind them, it seems logical to begin with the foreground... BUT you can only guess the foreground values until its background is in place. So, you have to establish that first. I'll show you how soon.
HOW IT WAS ACCOMPLISHED: By breaking every section down into small, manageable, and enjoyable pieces.
And... not like this:
Michael told me, "...after laying down a light base, much of my grass is done with a chisel pointed eraser, and then working in between. It's not even close to the realism you achieve."
Well, that is a fairly common method. And one I tried many years ago, but quickly discarded. That's partly because erased shapes have soft edges, and the initial shading has compromised the use of really bright highlights. So, that system has its faults.
To solve those problems, I outline the foreground leaves and then work around them. That gives me a lot more control. And to protect the foreground's pristine white, I never apply any prior shading, and begin in the extreme background and work forwards. It embraces the undeniable fact that we cannot draw white and rely on the white of our paper. So, I work background to foreground, and dark to light - like this:
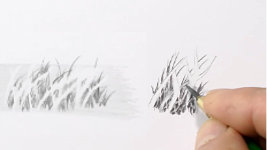
Background first. These are the pure blacks - the deepest shade in the foliage. And Yes, the deepest shade is naturally black. It might surprise you how dark the gaps are between blades of grass or the stems of weeds. Imagine I'm creating areas like this... or this.
Holes in foliage
are very dark, because there's hardly any light getting into them - if any at all. And those dark holes are essentially as far back as you can see. Using this system, in the background and midground, you just create whatever feels natural to you. So, for instance, that edge there is coming through to there... and that edge comes through to there.
The background is the darkest value in these areas, and probably within the entire drawing. So, now you know the full tonal range from the outset - from these blacks to the white of your paper. Try to keep the edges parallel, and each strand even in width - so the eye can follow them through.
Before we move on to Stage 2, take a look at this and ask yourself "Why can I clearly see individual leaves?" And "Why do I know one is further forward than another?" It's all to do with EDGES. What's happening here is that each layer casts shade on the one behind it. That in turn shades the layers behind that. And so on. Until you can see nothing but black. Each darker layer behind exposes the edges of the lighter layer in front, so we can easily follow them.
Our black background has clearly defined the edges of the background and midground leaves, or stalks, which are merely white silhouettes at present. So, now we'll begin to make some sense out of this. Let's say this one is underneath this one... we'll let it come forward towards the light... That means this one has to be behind it... and so does this one... I'll push it even further back...
Let's have this one going behind this one... and in front of this one... and this one can go along here... I'll push this right back, so it almost disappears... the same with this one... So, it's a method with many advantages:
- It preserves the white of your paper - the only white we have - until you know exactly what you want to do with it.
- It means: no ERASING back to white - EVER... because erasing never does return it to pristine white.
- It preserves the sharpness of edges, which erasing never creates. Dragged graphite always softens the edges of an erased line.
- It establishes references at each stage. You can't correctly judge the values required until you know what's behind the element you're drawing. With the background established, you can push the foreground into the shade - because the shade is there - or bring it forwards.
- It breaks a drawing down into easily manageable parts.
- And it's fun, and taps directly into your imagination, which knows "lifelike" when it sees it.
So, that's the background and midground method. Now let's introduce the foreground - our weeds in this case.
MAIN "WEEDS" DEMONSTRATION
The foreground is what interests the viewer, and it tells them what the background is. So, it's deliberately designed. It contains the composition and its balance; the clues to understanding everything behind it; and it needn't be completely accurate, because you can alter it, add to it, and clean it up as you go along. Think of these foreground elements as being placeholders - marking positions and shapes but not necessarily cast in concrete. Just create what you'd expect to see if you looked into that area in real life. Use your imagination - your innate sense of "what looks natural" - and you can't go far wrong.
So, let's make a start on the background - by making the first black mark. I begin at the base, because weeds grow upwards. And the weeds at the base are closer to us, so they'll be in front of those higher up. Remember, these black holes are as far back as you can see - the absolute depth. DO NOT draw into those isolated foreground shapes. You cannot make viable decisions about them until they are surrounded by their environment.
I'm going to push almost all of this area into the shade... I could leave this till later, but I'll push it back into the shade now. So I can get a feeling for what that looks like... I don't think everything would be growing upright, so I'll push this area over to the right... Inventing the midground all the time. Outlining it to keep its edges sharp. And isolating it, like the foreground, until I know what I want to do with it... I don't want too much detail in this area… I could easily over-think it... but simple is often the best choice. You're creating little features for the viewer to discover if they delve deeper than the foreground.
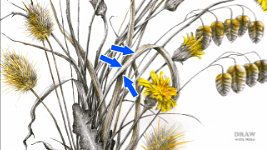
Here, I've decided to add a positively drawn weed. I can draw positively within this, because this weed is physically darker than the grass behind it. And this darker weed adds depth by pushing the foreground grass further forwards.
All these little things might seem to be a lot of work, but they combine to add a greater overall sense of realism... These, I think, are quite close to the foreground. That goes behind that one, so I'll throw a bit of shadow on it... I'll curve that off around there... There'll be a shadow from that one onto this... I'll leave it near the front... and this one even further forward.
I want to split this part up a bit. I do want to make a feature of this - oh, there's a lighter bit there. I like that - so I'll keep it... I'll throw a bit of positive drawing on top of that. Again, it will add more depth and interest... I'm going to invent some parts of a plant in here - negatively. I don't know what it is, but I think it might have shade-loving flowers. I'll take the white out... This part will be in the shade of that... I've decided this area in here is going to be quite dark. But it still needs some depth, so if you look into it, there are things to discover.
What this way of working creates is sharp drawing that's never overworked. And a good sense of realism, because you're drawing what you'd expect to see. So, I'm not going to just fill it full of black shading. Partly because that would create a very large hole, and in real life you'd expect to see something in a hole of that size. And because taking shortcuts is rarely successful.
I'll change from 2B to HB, to give me a little more control over the values. Now 2H I think... not because I want it lighter but, again, because it offers more control. This is midground and this is foreground, so we don't want this to be using foreground values.
Right now, I need to get some feeling for the foreground. This is the underside - the edge just highlighted.... just a touch of central rib... and a narrow band of highlight along this edge - very very subtle. There are no rules. Just work wherever you feel you need to.
Although I haven't drawn the broken fence rail yet, I don't want it to dominate this area. So, I'll push it back behind a big woody weed. This is a positive version of the one I drew lower down. It's dry, full of old seed heads, and the leaves departed long ago.
Now I have some idea of the values I need for the rail - so it's time to begin work on it. Not all of it, just the section I can visualise alongside the drawn area below. And notice, that area is finished. I'll not be returning to it, apart from maybe adjusting a value or two later. This method promotes sharp, ONE-TIME drawing, so overworking is essentially non-existent.
As long as the shading is darker than the guidelines - at least, not lighter - the guidelines will disappear into the shading... I'll curve this away into the shade... I'll work on the foreground now. So, that is coming up and tipping over... and it will cast a shadow on that bit... The visible guideline here can represent the thickness of the shady side of the leaf, so that's OK....
That I think is behind this one... so I am going to push the base back a bit... This is behind this one, which is going to cast a shadow on it... And this one will curl down into the shade. The light might just catch that top edge, I think... And this needs to be pushed back just a bit... And that will do for now.
As you can see, what's behind the foreground elements need not be completely clear, as it isn't in Nature - it just needs to be seemingly natural. But, the work put into these areas is all-important. When your viewer's gaze strays from the main subject into its surroundings, if those surroundings are lacking, you'll simply destroy all the hard work you put into the main subject. So, the negative drawing method, which involves working background to foreground, creates sharp drawing that's never overworked. And a good sense of realism, because you're always drawing what you expect to see.
When you couple that with your knowledge and experience of foliage - maybe gained by study, sketching and photography - you can break free and enjoy the invention of new species of plants. Well, it's your world you're creating, so you can interpret and bend Nature to best suit the story you're telling.
Study the world around you. Adhere to the Rules of Nature. And your weeds will be entirely believable.
© copyright: Mike Sibley 2023