Transcript
If we look at a ceramic vase standing by an old wooden wall - in real-life or in a reference photo - we know one is ceramic... and the other wood. There's absolutely no doubt.
We KNOW that's what they are. So, something is sending our eyes a message; visuals clues that we understand and correctly interpret.
When it comes to drawing surfaces and textures, the focus shouldn't be on HOW to draw something, but on WHAT to draw - to make it appear to be WHAT IT IS.
If you're not certain about how to render something, try describing it IN WORDS, as if to someone who has never seen it before. Search for its unique properties; describe what you see.
This vase is devoid of surface texture. The lighting suggests it's round, with a slightly flared top rim. It's not a soft surface that absorbs light - or scatters it - it reflects light. And the reflections are hard-edged, which only occurs on a hard, smooth surface. Maybe those bright, sharp-edged reflections are the clue we're looking for?
The wood is almost the opposite. It appears to be old and weathered. And the splits and shakes, and surface imperfections tell us it's had a hard life. Wood isn't glossy and smooth, so it usually soaks up light, but this wood reflects light to some extent. So, maybe it's been worn smooth, or been waxed at some time. Or both.
You can do that exercise with any texture or surface. There will always be concrete visual clues for you to extract. Once you have them, you can build those clues into your drawing, and it will read successfully. And that extends to organic features too, such as grass from foreground to background, weeds at any position within the grass, and trees, which contain their own unique set of visual clues.
METHOD #1
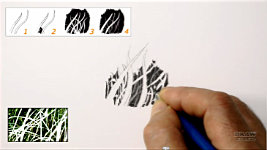
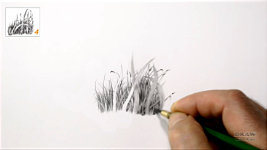
We'll begin with grass and, if you watched the DRAWING HAIR videos, you might recognise the techniques. That's because many techniques have a multitude of uses - shading a sky, for example, uses the same techniques as rendering skin tones. And drawing grass shares this Grizzly Bear's rough or wet hair technique.
At its heart, it relies on the separation of Line and Tone... and tapered lines, negative drawing, spontaneity, and a relatively quick application.
Later, we'll study a slower and more controlled use of negative drawing for grass. But the quick and spontaneous way is ideal for drawing midground grass, or in any situation where it's a secondary feature. It's quick, immediate, requires only a little retouching, and some surprising results can emerge.
Imagine there are only two marks we can make: one upward and one down.
We can use the tapered upward stroke to draw the stalks that spring up from the base of a clump of grass. These up-strokes are positive marks - they represent blades of grass or stems. Imagine them silhouetted against the sky.
The tapered downward stroke is going to define the tops of the grass in the clump below the one we're working on. They are NEGATIVE marks, because they create the dark gaps - the negative spaces - that form between the white blades.
UP - positive. Draws grass.
DOWN - negative. Draws gaps.
Already you can see: lower blades appearing here. With that in mind, and for clarity, I'll use a larger-than-life example to explain.
We have our UP stroke - tapered at the top, and preferably the bottom too.
And our DOWN stroke, necessarily tapered at both ends - because blunt ends don't naturally exist in grass. We'll add a few more strokes. Looking at the dark line as we draw up. And the white gaps being created as we draw down.
Already we can see lower blades beginning to make an appearance. We'll expand it... And expand it again, but concentrate on the lower edge to more clearly define the lower blades - the white shapes that we left.
When you feel the time is right, move down and begin again. This time, drawing back up into the existing work. This is the basic drawing hair method with two differences: you are drawing down between blades of grass instead of creating divisions between hairs, and only the downward strokes are drawing negatively - creating the white blades beneath the area you're working on.
And, finally, you can make sense of those blades - the white silhouettes. And here you can draw both ways. Perhaps creating a few positive marks to run over the negatively drawn areas, or others that appear to be behind them, because both create a greater sense of depth. Once you get used to it, this is a quick and enjoyable way of working, but it does require the ability to see white shapes emerging as you draw the downstrokes.
And, as I said, this is a larger-than-life example, and that gives me a problem. :) In normal use, as you can see, I use this method in a much looser and small-scale manner... so I can't show you examples of what you've just seen. But it's a perfectly valid, spontaneous method.
Here's another, where every layer of grass is drawn down to create the tops of the layer beneath it, and up to create the dark positive blades. And this one, too, where it produced a recognisable resemblance to rough grass. It contains all the necessary visual clues to it being grass, without overpowering the main content.
Before we delve deeper into grass, weeds, and negative drawing, try the steps we just covered. It is at least good practice in seeing white shapes as you draw dark lines, because, as I said, it can take some to time to attune your eye to seeing that way. But once you can recognise negative space without consciously doing so, you'll never regret the time spent on practice.
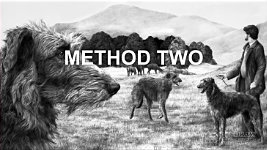
METHOD #2
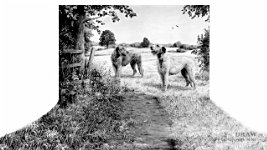
So, let's move on to a more controllable method. Instead of spontaneously creating grass-like shapes - the method used here beneath the central dog - we'll be deliberately silhouetting foreground blades of grass. And then inventing midground grass as we work, backed by solid dark shade. That's the method used to the left and right and in this area, too. With a little practice, this soon becomes a free and creative process.
The "trick" is to "think grass", and to work just fast enough to confuse the rational part of your brain that tries to control the creative side. Aim to let your subconscious do the work. It always knows best.
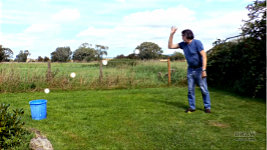
Don't believe me? Try this:
Pick up a ball. You're going to throw it at a target the instant you see it. So, quickly… turn around and
throw. You'll hit it nine times out of ten. Or, at least, be very close.
Now let's be more "scientific"...
Pick up the ball again. This time facing the target. Take aim. Compute the initial speed of ejection required, against gravity, and the arc of decreasing velocity. Include the current wind direction... and make allowances. Consider the placement of your feet in relation to your centre of balance and compute the degree of symmetry. Account for the angle of rotation of your body to the target. And equate these to your known muscular power. Let fly ...and miss!
Failure arises from letting your conscious mind dictate your actions…
Success comes from allowing your natural intuition to rule. In other words, you're trying too hard - just let it flow.
The beauty of working in graphite - the reason I love it - is that you have a near-perfect mind-to-hand-to-image contact. Don't let your conscious mind interfere - you think, you draw, it becomes reality - in one unbroken and continuous process.
Now there is something important to consider: We understand the foreground, But the midground and background are increasingly vague. And it's that lack of understanding that we see as being real.
Here, the grass is in two planes. The prominent foreground stalks and blades that tell the eye "This is grass". And, behind a less distinct plane that the eye cannot make real sense of. It's just a mess, isn't it. Bits of leaf shapes, bits of stalk. Complete chaos. But you know it's grass, because the front plane gives your brain the clues that it craves. It's a greedy animal is the brain - always wanting to make sense of everything it sees!
So, we'll help it out a bit. Let's start with the front plane. If you have a go at this, keep it relatively small and manageable. And don't, at this stage, expect realism. We're just exploring the method to see what's possible. OK?
I'll begin by mapping out a couple of foreground leaves - blades of grass. Lightly drawing a line either side of them to mark their positions and shapes. Just be aware that it's the
inside edge of your line that counts - you are drawing those lines around white shapes.
Now the midground and background, which we can lump together, and split apart later. You can outline a blade of grass, or just imagine it and fill in the background around it. I like to begin with a triangular shape and then let the background grow from there.
There are two important considerations:
What you start you must finish. Every blade or stalk must have a beginning and an end - it must go somewhere.
And, where one shape crosses over another, try to avoid drawing across the junction. Then you can decide later which one is in front of the other.
Keep inventing those background shapes. See the edges in your mind and shade around them. And ensure you keep the edges of everything sharp. You'll understand why soon. And all the time you're doing this, you're
pulling yourself deeper into your drawing.
So, we have what amounts to a single flat white silhouette. Now we can push the midground and background blades back into the shade of the background - because that shade exists. The aim is to be inventive with the shading as you create three-dimensional form with your darks and highlights. But keep it subdued - no foreground values, because these are secondary features in the foreground's shade.
I won't complete this, but with the background established, you now have full control over the presence of the foreground. This method is perfectly adequate for shady weeds and grass, but now we'll take it a stage further and move into very visible foreground grass.
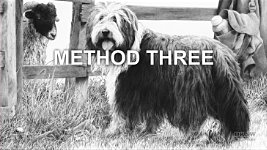
METHOD #3
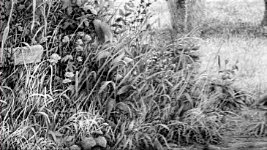
This is a more spontaneous method that combines the first two. And you NEED to have experienced those first before you attempt this method, because what you learned from each one is passed on to the next. This method creates depth with ever-diminishing detail. We'll use METHOD 2 to design and outline the foreground blades. That will isolate them and protect their pristine whiteness. Then we'll use the spontaneous METHOD 1 to create the midground and background grass.
And now the foreground blades are surrounded by their background, we know what we need to do, and can confidently work on them. So... we begin as we did earlier - designing foreground blades that are food for the brain. The "this is grass" visual clues.
Now I'll switch to a more spontaneous style of working. Instead of using a solid black background we'll replace it with midground and background grass, although some deep shade is essential to add depth. Those solid blacks say, "this is as far back as you can see". The absolute depth. Then the viewer understands the depth, and that everything is further forward. And those solid blacks increase the contrast, too.
Here is where you let your imagination go free - working at a pace that prevents conscious intervention. You can imagine, or lightly outline, a stalk of grass and then spontaneously create more grass to fill in the empty space around it. Completing these background areas as you draw, will help you keep track of which outlined shapes are "DO NOT TOUCH" foreground leaves, or "waiting to be worked on" leaves in the midground.
Again, the edges MUST be sharp. Sharp edges divide elements. Soft edges combine them. If your shapes have SOFT edges, they'll just look like lighter patches in the dark once you push them back into the shade, and you'll lose all sense of depth.
Let's extend it further. You'll have noticed that I'm using our Method 1 for this - negative downstrokes at the base, and positive upstrokes at the top. The aim is "natural" so let Nature take over. Nature knows all about balance - you might even find yourself introducing stalks here and there that surprise you. Don't be tempted to intervene, just let Nature take over. And don't touch those outlined FOREGROUND leaves - you can't properly judge the tonal values they need until you have completed the grass behind them.
You know... with practice, this is a quick and free way of working. Seeing the midground shapes in your mind and drawing the background around them.
That'll do...
This time, with the background and midground completed, let's work on the foreground. And we have full control over that now, because those shapes all exist in their immediate environment. Now you can push them back into the shade, or bring them forwards - and confidently, because the background already exists.
So, to recap:
Once the foreground leaves are outlined, work quickly so your brain is forced to work intuitively. Too much forethought can lead to regimented or stilted drawing, so just let invention flow. With practice, the drawing of the foreground elements can be incorporated into the drawing as you work.
If you work quickly and introduce a degree of randomness with the background blacks, you'll find blades suggesting themselves. Slow down a little to develop these happy accidents, then move on.
Occasionally, introduce a subtle variation - include a positive element to add depth to the grass, such as a fallen twig, but don't overdo it. Grass almost always constitutes a minor element in a drawing, so it should enhance and not compete with the main subject.
Have noticed something… ODD about my grass? I draw DEAD grass. It's far lighter than it would be in real life. But that lightness of value suits my drawing. And because the visual clues tell you it's grass, you happily accept it IS grass. The value plays no part in your understanding.
It should, however,
behave realistically, and there's one error I often encounter… grass
does not grow from the baseline of your drawing. It extends below the baseline and right under the feet of the viewer.
Notice the recession, too. Grass recedes quickly with distance into bands of broken values, and finally softens and fades into areas of gradated tone and suggestions of bumps and hollows.
My midground here in Spinney Lane End isn't particularly accurate - it suggests, rather than being tightly controlled - but that doesn't matter. The viewer's eye will see the foreground grass, as intended, and assume that what lies behind is also grass.
Study Nature around you and work out how things change as they are positioned further away. For example, you'll quickly realise - as you saw earlier - that while the foreground can be understood, understanding very quickly diminishes with distance. And that it's that reduction in understanding that we recognise as recession and reality. Overwork or overthink and you'll damage that sense.
So, keep everything loose. Describing the
feel of something in the midground and background, using simple clues, is sufficient.
All the methods we've studied can provide the identifiable foreground element, and the natural recession, or sense of depth. And all three can equally be used for both grass and weeds, so weeds is what we'll look at in the next video.
© copyright: Mike Sibley 2023


I don't know why it seems so intuitive when drawing hair, but like many people, I create difficulties for myself when drawing grass. Your comparison between hair and grass was very helpful!
Method 2 has always been very challenging for me. Your little demo of tossing a ball in a bucket was a real eye opener!
I must admit that I'm still quite intimidated when I see your beautiful results, but understanding the process logically as you've explained it is extremely helpful.