Transcript
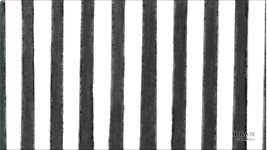
Negative Drawing is the graphite artist's white pencil. If you draw two parallel lines how many lines have you created? Three! Two dark and one white. That white line could, for instance, be a white tape on a black floor. The "tape" exists only because of the lines enclosing it. Now, instead of consciously drawing two lines, imagine picturing the white tape on your white paper and then drawing lines down either side of it. THAT'S negative drawing.
The switch in concentration is what is required to draw negatively - using negative space to create positive white images. In
positive drawing, the lines you draw are more important than the space between them. In
negative drawing, the space is the important element - the lines merely define its edges.
Let's add more lines, perhaps to form a recognisable object. Now you might be wondering what we're creating here... which lines actually represent something?
The dark? Or the white? Regardless of which are the most important, the white lines cannot exist without the dark. So let's expose the subject until one or the other becomes a defined shape... Now it becomes obvious that the subject is the white comb. It existed only in my mind until I enclosed it by defining the dark negative space. In effect, drawing the background around it.
As soon as you switch from looking at the line you're drawing, to the white line you're creating - your brain sends feedback about the white line and its width. Being able to see the white you're leaving as a positive white line or mark is essential when you're drawing. The only white we have is the white of the paper, and the only way of drawing white is to work around it.
Erasing is
not a viable alternative, because that leaves soft blurry edges and probably won't return the paper to pristine white. Negative Drawing, if you're drawing spontaneously, involves 'seeing' a white shape on white paper and shading around it. The same is true if it's planned beforehand, but then you'll have guidelines to assist you. It's not easy to begin thinking this way. But, with practice, negative drawing becomes second nature and, more importantly, you'll learn to switch your mind between negative and positive drawing at will, and even to blend the two together.
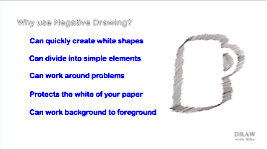
Why use Negative Drawing?
Well, it offers important advantages that no other system can fully compete with.
- You can quickly create white shapes on your paper by simply drawing the area behind them - hair and grass, for example.
- It can divide a task into simple, manageable elements. If you're drawing the side of a wooden barn, it's easier to concentrate on that if you just work around anything that overlaps it.
- You can work around problems too, by splitting your drawing into elements that you understand and those you don't. By drawing around the unknown elements first, you often gain a better understanding of them. You can literally draw around potential problems and return to them later.
- It protects the white of your paper. No erasing is involved because graphite is never placed where it doesn't belong. Your whites remain pristine, and your paper's tooth is preserved for really crisp results.
- And you can work background to foreground, dividing your drawing according to depth. Beginning with the background and working forwards affords much greater control over tonal relationships. We'll be returning to that soon.
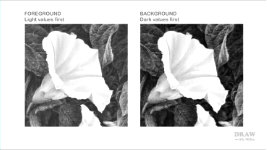
Why is Negative Drawing so important? REALISM! You need to draw the way we see.
For example, we see edges because of value changes - nothing in life has a line around it. And we see depth by looking at the edges of overlapping elements.
Where Negative Drawing begins with the background and works forwards, with Positive Drawing you're effectively drawing the foreground, working backwards. Bear with me - this can get a little complex - but Negative Drawing IS the solution to many problems.
Drawing the main interest first - the focal point of the drawing - is a purely human tendency. But it's flawed... because you're working in a vacuum. You're creating something completely isolated from its surroundings. And
you're guessing. You're guessing the values as you work - because
you have no idea of the values surrounding what you're drawing. You know the flower is white, so you use very light values. That makes sense... You know the base and stem will be darker, so you use darker values
based on the values of the flower. And in the same vein, you expect the midground to be darker than the flower's stem. And, finally, you create the background, knowing it will be in the shade of the midground and therefore even darker. But... maybe not too dark? Because... well, you've been a bit timid with your other values. Why? Because you've
only now created your darkest value!
So, let's try that again - beginning at the back and working forwards. And that requires Negative Drawing. First, in the background, choose the darkest values to draw first. Now you immediately know the entire range of values available to you. Then move forward to the dark background elements. Suddenly, this is easy. Because from the very first mark
we knew the entire tonal range - from our darkest value to the white of the paper.
It's so easy to create depth - because every time you draw something it has an adjacent background, or it's surrounded by it. Every element exists in its environment, so, you have full control over it. You can pull any part of anything forwards, or push it back into the shade because that shade
already exists. Let's complete the midground - one leaf at a time. And, finally, the flower is as easy to control tonally as the rest of the drawing.
The difference?
Foreground to Background - drawing the light values first - involves a lot of guesswork. And, potentially, a lot of overworking, because the values require constant adjustment, which leads to soft edges and - well, an overworked drawing.
Background to Foreground - and dark values first - offers full tonal control and
no guesswork. The reality will increase too, because you're creating your own world as you draw, not just "colouring in" shapes - shapes that won't make complete sense until the drawing is complete. And no overworking, because you draw once and move on - creating super-sharp, fresh drawing.
I am not, incidentally, proposing that you draw all the darks, then all the midground, and so on... but to create them in the area in which you're working.
The extreme background first - that's the absolute darkest depths - and then the background itself. Then the midground. And the foreground - in that order, so you have something to refer to at each stage. But if it makes more sense to complete the entire background first, then do that, There are no rules - only your own.
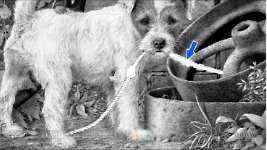
This is that concept in action. You can see I drew around the rope because I needed to control the way it stood out from the background. I was also either drawing dog or rust and not rope at the same time, but the reasons for that are covered in DIVIDE TO CONTROL. Also, the rope has light, wispy fibres that will be visible against the dark rust and brick. That requires negative drawing. Anything light-against-dark requires the negative approach. Now that section of the rope can be drawn.
Drawing the rope first would have caused it to dictate the values available for both the dog and the background, which is not at all ideal. In this case, the rope passes in front of both the dog's white leg and the dark ground. By drawing both of those first, I know exactly how to make that rope stand out - and how to make it blend into the ground at its lower end. Also, in this section the dark wispy fibres are drawn
positively against a lighter background, because that's the way we'd see them.
Negative drawing will allow you to concentrate on one aspect at a time. And, by working from dark to light, and background to foreground, all your lighter values will just be flat white spaces - like the rope and its wispy fibres. Now, surrounded by their immediate backgrounds, you can begin to draw within those spaces to give them the tonal values and shaping that they require.
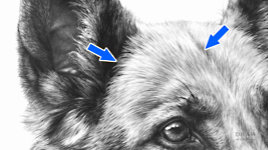
Practice is essential. As essential as actually developing the skill to draw negatively. Why? Because many things depend on it - such as hair. This dog's white hair is all drawn negatively. And drawing hair is how I developed negative drawing.
Why can you see hairs? Seriously. Why can you see hairs? Or locks of hair?
Does this remind you of anything we saw earlier? Deep dark holes. Shady midground. Bright foreground? It's because the scalp or skin beneath the hair is
darker. It's in the shade of the hair. It's the dark shade between the hairs that permits you to see their edges. We'll return to drawing hair in later videos but, for now, consider this... If you draw actual lines to represent hair - or grass, or a bale of hay, or a bird's nest, or... you are drawing... dark marks against a white field. And
you couldn't be further away from reality. That's NOT what hair looks like. Hairs are light against a dark background. Even black hair has reflections that are lighter than the dark spaces between the hairs.
I drew this in 1979 and these hairs are actual marks. That they don't look entirely wrong is simply because your brain thinks those marks are the gaps between the hairs. That's what it expects to see. It knows hairs are surrounded by darker shade - even if the part of my brain that drew them didn't! I was drawing dark marks and not thinking negatively. And that's why I hit problems.
Drawing dark marks won't permit you to draw light hairs against dark. But I was learning, and beginning to understand the solution. This is crude but it's correct. It's
negative drawing; drawing the dark background to expose the positive white foreground. In this case, I left the fringe of hairs white, but I could have chosen to tone them down or add detail. With that solution found, I soon realised that almost everything is better drawn negatively. Two or three German Shepherds (and years) later, I knew what I had to do.
This fringing is clearly negative drawing - but, in fact, almost the entire dog is too. Every time you see a hair, or group of hairs, it's because the dark gaps between them describe their edges. And let me make something quite clear - in negative drawing the white space is NOT erased, it's created by drawing around it. Erasing creates soft edges and adulterated white paper. Negative drawing preserves the pristine white and creates sharp edges. And sharp edges do matter! Because: Sharp edges separate planes. Soft edges merge planes, so you lose depth.
As we saw in the previous video - you draw the negative spaces to expose the positive shapes. Once you understand the shape you need, you begin shading the area around it, using that negative space to reveal the positive shape as a white silhouette. I've heard it said that drawing the outline first and then shading around it is not negative drawing. Well, strictly speaking that's true - because the focus is on the shading and not the shape. But if the accuracy of the positive shape really matters then outline it first. All these ends were first considered and then outlined. But in more general use negative drawing is spontaneous.
So, to round up: When Negative Drawing - to create a white shape of any size or form - you imagine, or map out, the shape. You draw the negative space around it. That leaves a white silhouette. Later - now nested in its surroundings - you go back into that shape to add shaping and detail or, perhaps if it's a whisker, it might remain pure white.
So… is drawing ever positive? Yes, of course it is - every time a dark feature overlaps something light you have to draw positive dark marks. But
dark doesn't mean
positive. If you're shading an area or element that isn't enclosing another shape, such as this nostril, that's positive drawing. But the nose is negative... because that shading - by omission - created the reflections and little white highlights. As our white paper is the only white we have, and that white needs to be protected until we know for certain that graphite belongs there... always think Negative first.
Next time, we'll begin to look at practical Negative Drawing applications, and the mechanics involved.
© copyright: Mike Sibley 2021