Transcript
Once you understand the basic concept of negative space and that it's of equal importance to the object it encloses, you will be able to use its presence to solve problems of visualisation. Recognising negative space and drawing around it - treating it as an object in its own right - allows you to completely divorce from reality the adjacent object you are trying to draw.
This time we'll take a look at INTERNAL negative space, which can be problematic, because internal boundaries often don't exist.
And we'll finish with a universally useful method that you can use with a reference or when drawing from life.
In the previous video we found that negative space exists within an object as well as around its outline. In fact, negative space exists everywhere and even seemingly positive shapes can equally be negative spaces.
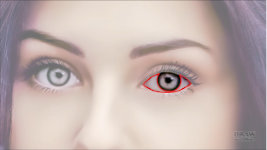
This pupil is a positive element surrounded by negative space - the iris. If you draw the iris you also draw the pupil. The iris is surrounded by the white of the eye. Draw that and you draw the iris. You see where this is going? The eyeball is enclosed by the eye socket, and they share a common boundary.
But the bottom of the eye socket
isn't surrounded by anything with a near-by boundary that we can make use of. Hang on to that thought because we'll be returning to a solution later.
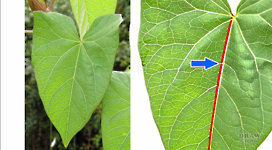
Dividing our work, like the way the eye just divided, makes complex drawing simple, and working from dark to light prevents guesswork and preserves the white of our paper. This leaf, for example, has ribs and veins
lighter than the body, and we can't determine their true value until the dark body of the leaf has been established. We also need to determine their positions without drawing along each one. If, for instance, we attempt to outline the central rib we run the risk of "cutting off" the side veins - drawing a line across them where graphite should not have been applied. All of them, from the most prominent... to the most minor.
Any way of avoiding that problem is worth investigation. So, let's look at it from a Negative Space point of view.
It quickly becomes apparent that the sections of the body of the leaf are actually the negative space around the rib and veins. By outlining those, we achieve our goal - determining the position of the veins without outlining them directly. Creating the leaf without actually drawing it. And we can break those sections up into ever-smaller ones if we need a greater level of detail. Always look for both positive and negative shapes and spaces as you work. Every positive element has to have a negative neighbour, because they share a common border.
Sometime, however, that neighbour is too large to be of use. In that case... I'll introduce you to the solution. A diabolically clever, carefully crafted, high-tech precision instrument... This!.... This trusty strip of card will permit you to create your own boundaries to form workable negative spaces. For example, if you are drawing one of this young lady's eyes and having a problem with the correct curvature of the lower edge. The only available negative space is the flawless cheek below. And it's far too expansive to be of any practical use. So, simply lay your card on your reference photo close to the feature you need to study, so you can gauge the curve against its straight edge. You can use it either above or below. In this case, above might be the best choice, because it renders the eye itself incapable of influencing what you see. But in either case all you're doing is studying the
negative space between the edge of the card and the edge you need to draw.
Of course, the same solution can be used for any curve or feature, such as the side of her nose. Perhaps the curves of her nostrils and the shape of her septum. And, as the card hides the nose from view, we can concentrate purely on the edges and shape.
We can use it to study her top or bottom lip. Again - this hides most of her lip from view, so we don't see it as
being a lip. And if that doesn't work for you, try it from below. Study the distances along the negative shape, from card to edge, to accurately understand that edge. The card presents a boundary against which you can judge that shape of the negative space - or a positive space (such as the bottom lip) that you treat as though it
is negative. In each case, the card creates an unrecognisable shape. One that your brain cannot interfere with. Remember: "That's a
mouth and I
know what a mouth looks like!" from the previous video? Here you might think, "Well, I know what a nose looks like." But you don't. You carry mental icons that instantly tell you it IS a nose, but you know nothing about
this nose. So don't let what you think you know interfere with what you see.
By looking at and drawing only the negative space your concentration is no longer on the object. With practice you will be able to dispense with the card and see the negative space directly. But sometimes the card can be the perfect solution.
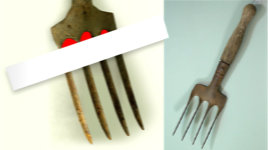
If, for example, you are having problems determining the correct curvatures of the twisted tines (or prongs) of this old handfork, stop looking at each tine as a complete object. Instead, treat it as just a collection of curves; divide it into manageable sections and look at the negative spaces that surround each one. Except... the negative space is not readily available.
You can use the outer edge of the reference to isolate negative space outside the fork. That's not a perfect solution but... feasible. However, you really can't use the space between the tines at all, because that internal negative space has problems - of the Catch 22 kind - in order to determine the curvature or shape of one edge you're forced to use an equally unknown edge as a reference. If you make an error with one you'll compound it by repeating that error with the other. So, we need a "known" edge to refer to... and that's our strip of card.
To keep this simple, let's reduce the fork to a shape. Now place a strip of card on your reference photo alongside each tine. That will show you precisely how those curves are individually formed - exactly as they are. That's the magic of this method, it divorces what you expect to see from what is actually there. It doesn't even have to touch the problem area - just provide an adjacent known straight edge as a reference. Now, you might be thinking "But I can see that edge perfectly without using any devices," and that's true. But we're looking at a flat, featureless copy of the object. In use - you have textures, cast and contact shadows, and other distractions to contend with. And, of course, you'd be looking at the fork and not the surrounding negative space.
Capturing such subtle differences can often make the difference between a successful drawing and an awkward one that unsettles the viewer - they'll know something isn't the way they expect it to be even if they can't identify it. I chose this fork for a particular reason: Because the tines are twisted, the arcs between them are a variety of complex curves. It's so easy to assume those curves are similar, or even identical. But they aren't. Far from it. And using the card's straight edge as a reference immediately shows us that - and the fork
isn't influencing what we see. This is another exercise I use at Drawspace, and the most common error is the assumption that any edge of any tine that isn't obviously curved... is straight. Yet, almost all are very subtly curved.
As we've seen, laying a strip of card along them displays the true curvatures. That's the chief benefit of this method, it separates what you expect to see from its actual reality.
So far, most of the examples have used reference photographs, with only the occasional mention of working from life. Seeing negative space, initially at least, is not quite so simple when confronted by a three-dimensional world, but there is a tool that will greatly assist you.
Applying the card method to two-dimensional photos is really effective. But it's far more adaptable than that. When working from life, for example, close one eye, hold up the card (or even your pencil) and align it in the same manner. This might cover up parts of the subject from view, but that often helps to prevent the subject being recognisable. Now you're displaying the negative space with an artificial boundary reference. Study the space you've created and draw that for a far superior and accurate result. But I want to develop this idea for you, because it can be made even more useful.
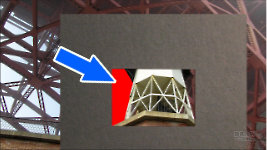
You've no doubt see film directors and artists use their hands to frame a scene. It's a basic but very useful compositional aid. However, a refinement is to replace your hands with two L-shaped cards. It's a more exacting method with accurate straight edges. They can be moved around to alter the height to width ratio. And, of course, be used just like our card strip to expose negative space, if that's what you need to explore. But now let's develop that into something you can use one-handed... a cardboard viewer you can easily carry with you.
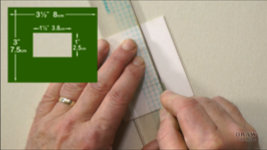
A stout card is preferable, and matboard perfectly matches that description. Choose a size to suit your own requirements, but I suggest making it about 3" x 3½" (7.5 x 8cm). Just cut out a rectangle from the centre, leaving a 1" (2.5cm) border, which will give you a viewing area of 1" x 1½" (2.5 x 3.8cm). It needn't be that size but it is conveniently almost a Golden Rectangle. And if you increase the 3.8cm width to 4.1 [1:1.618 ratio], it will be.
A viewer is something I've very rarely used, but I found using a dark matboard was the best choice. It gives you the option of turning it around so the white side is facing you. Depending on the scene you're viewing you'll find one side or the other produces the clearest viewing.
As with the card, hold the viewfinder in front of you and close one eye (to remove parallax errors). Study your chosen object or scene, so one part of it touches the edge of the viewfinder. Using that edge as a boundary, look at one of the negative spaces surrounding your subject. Study its shape and then draw that negative space. Then move your viewfinder until another part meets one edge; and repeat the process until your line drawing is complete.
As a bonus, Any inside or outside edge of your Negative Space viewer can be used to check comparative angles. Does the angle of this beam look similar to the one above it? Maybe not EXACTLY the same? Perhaps a little more up-tilted to the left? No! It's not even close! Your mind can play cruel tricks with you. Checking angles and verticals against each other is a very useful way to understand exactly what you're seeing. The viewer is a good tool for that, and it is an excellent tool for composing your drawings too. Viewing your subject through it will allow you to see how the finished drawing will look. And, if you customarily centre your subjects on your paper, you'll quickly learn how a simple movement to either side will improve the balance and vitality of your work. In fact, what you'll be doing is creating a pleasant balance between the positive subject and the negative space.
Negative Space is the artist's secret magic. It opens up a whole world of possibilities that mere observation can't handle. And an offshoot of that is creating your own Negative Space to expose Positive elements to be returned to later. That's Negative Drawing, which, in its own way, is as powerful as Negative Space. And that's what we'll begin to study next time...
© copyright: Mike Sibley 2021