Transcript
It's a hazy distinction, but I'm going to break this subject up into external and internal negative space. That is, spaces outside of the object you're drawing. Spaces that will help you to clearly understand the angles and curves. And spaces within the object, which we'll cover in the next video.
But first, your eye has to be able to recognise negative space, and your brain has to know what to do with it. Both of these involve some training. You have to teach your eye and brain to detect negative space, because it isn't something they've ever looked for, or even known about. They're much happier dealing with identifiable shapes and objects.
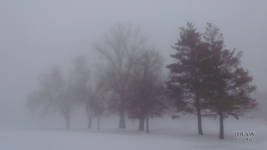
I didn't discover negative space - or its power - until I was at Art College. I remember having problems drawing a part of Wendy, our life model, when my tutor said "Don't look at Wendy, look at the space outside of her. Then draw that." To be honest, I thought he was joking :o) However, that evening, walking home through the park, a fog descended and, as it thickened the trees became flat silhouettes devoid of all detail. I stopped to study them, and suddenly I understood. I could look at the shapes of the trees... or I could look at the shapes between them.
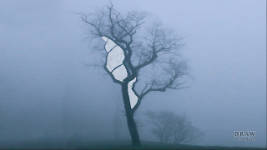
The fog was a flat mid-grey, the trees were flat darker grey shapes. Neither was dominant. I discovered I could look at the shapes within the trees too. Now it all made sense. I could draw the tree, or the shapes around or within it. Either way, the result was a drawing of the tree. BUT I could study the shapes far more easily because I
had no pre-conceived notion of what they might look like.
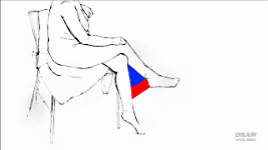
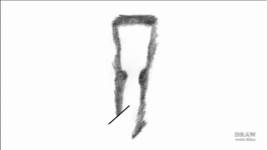
To return to Wendy, I was having problems placing the right-hand leg and getting its angle correct. My mistake was to look at the legs. However, by studying the negative space
between the legs I could clearly understand the angle and, because I wasn't looking at, or drawing, a
leg... the legs no longer influenced the result. And it was much easier to judge the true length of that leg. In this case, the heel is clearly half way to the floor.
It's also far easier to understand the details of the curves involved when they are a part of an unrecognisable shape. And all of that achieved by
not drawing either leg. Of course, you can apply this way of working to any situation... as long as you've learned to see the Negative Space.
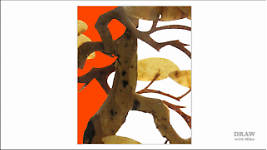
For example, this Bark Carving. I've no idea how I became the owner of this but I appreciate the work that went into it and I'm determined to preserve it. When you look at this, you most probably notice the trees first perhaps the stylized foliage next, then the pagoda, and maybe the white Cranes - but the spaces between them are meaningless.
So, here's the challenge... to reproduce this bark carving using only Negative Space. Well, it's unnecessarily complex for an exercise, so let's take a section and study that in more detail.
Exercises like this will not only help you to concentrate on the spaces between the shapes, they will also confound your brain - your logical mind that attempts to identify everything it sees. You'll give it a really tough time because instead of drawing an object itself, you'll be drawing the empty spaces within and around it.
Let's simplify it a little more first. We'll remove the fronds and round out the foliage. Now what's the plan? Well, as I mentioned in the last video, you can use the boundary to assist you. You might, for example, begin by marking where the branches meet the edges - especially along the top edge, which would be a good starting point. Or along one side.
I suspect the middle left-hand branch is half way down that side. It's easy to check - using sight-sizing, for example, especially if you're working from life.
Well, almost. It's slightly lower, But we can confidently estimate that slight drop and mark the point.
Along the top, you might estimate a point to be one quarter across. Well, it isn't - not exactly - but we can now confidently mark the central point. We can also fairly accurately estimate another point, which is half-way between the two. You can judge this angle. Then this one... to start to construct the negative space.
You
could build it up this way - choosing your own points of interest. Or you could be flexible and estimate the positions of each shape. Either way, as soon as you have one or two established, the rest fall into place more easily.
"Why", you might be asking, "do I have to draw the negative spaces? The branches are organic shapes. I'm perfectly capable of drawing those instead. And I'm an artist - I'm observant - I KNOW what branches look like...... Oh... I see... OK... I'll draw the spaces."
You know quite a lot about branches but not
these branches - which aren't even real branches. They're another artist's idea of what branches look like, carved into bark.
Squinting will help to remove the detail. Just concentrate on the internal shapes. And don't cheat by drawing around the branches. You'll only be cheating yourself out of learning a valuable lesson.
So, draw the negative spaces to reveal the positive shapes between them. That helps to overcome another potential problem too. The tree, and its branches, is a single body - a complete entity that splits and meanders this way and that. It's quite complex. But, the negative spaces are separate, smaller shapes, and very manageable. It is far easier to concentrate on those shapes, and appreciate their curves and edges, than it is to attempt to draw the entire tree.
As you work, you'll be using relative positioning - comparing the surrounding widths, angles, and prominent features to determine the position and shapes of additional space, which means you won't be treating anything as a recognisable object. And that's the main thrust behind the use of Negative Space. Reducing what you see to unrecognisable abstract shapes. It absolutely will enable you to see shapes, angles and curves exactly as they exist.
However, one point to bear in mind: Your line has a width. When you are drawing around a Negative Space, draw INSIDE its edge. It's the outside edge of your line that forms the actual boundary. In most cases this isn't something you need to concern yourself with. But where accuracy really matters, it's a practice you should follow.
Once you learn to use negative space without having to consciously consider it, you will have one of the artist's most valuable tools at your disposal. One that can help you solve many complex problems.
But, first you need to train yourself to see it. These are examples from artists taking my Intermediate course at
. They didn't set their expectations too high and neither should you. Experiment, and don't worry about accuracy. Your focus should be on teaching your eye and mind to see and use negative space. Accuracy will naturally improve later.
Like many things in life, it's often better to ease yourself in gently. So, try this far simpler exercise. And try it often, because it really does help.
Instead of creating and shading the negative spaces to create the positive element, let's turn that idea on its head. We'll work from the outside in.
Picture an uncomplicated object, such as this paintbrush. Don't concern yourself with details, just think about its shape. Picture that shape on your paper... Got it? Are you sure? Good...
Now shade around it! And, to add even more fun, shade diagonally. That will prevent you from drawing along any of the sides. Just imagine where the edges are and shade up to them.
The result is the same as you saw in the bark carving - a white silhouette of the subject - but now, the subject will have existed only in your imagination.
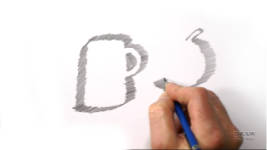
Grab a piece of paper and get to work drawing as many objects as you can think of, or find - using only linear shading and negative space. Keep the objects relatively simple - some with and some without internal spaces. Try a bucket or a mug with its handle on view from the side. Perhaps a vase or a paintbrush - anything you can picture on your paper. If you want to try something more complex, try a toast rack set at a three-quarter angle; or the leaves and stems of a pot plant. I suggest you keep your drawings small, but draw at whatever scale you feel most comfortable with.
Practice drawing articles you know. Try to picture each on your paper and then shade around it. And
do not draw lines around them first - if you do, you'll just be shading around a positive shape, not shading the negative space to cause the positive image to appear.
You can employ the drawing of negative space almost anywhere at any time. You can even practice mentally. Of course you'll want to try it on paper as well, but there is nothing to stop you from practicing during odd moments throughout the day. Waiting at the checkout; sitting in the dentist's office; in your car as you wait for the traffic to begin moving again...
You'll soon understand that negative space is as important as positive shape. One cannot exist without the other. You'll learn to quickly switch your mind from one to the other too. And you'll appreciate how drawing the negative spaces will make you really look at them. You can't guess their shape or draw what you think is there because they have no recognisable form.
Use this technique whenever you are having problems with drawing something the way it really looks. You'll almost always end up with a more accurate drawing.
Once you understand that negative space is of equal importance to the object it encloses, you will be able to use its presence in another way too. Using the shading of the negative space - as I'm doing here - to create white elements that you can return to later.
Almost all the elements in this drawing - the rabbit, the brambles, the tree roots - were created by first shading the negative space that surrounded them - in most cases that was the dark background shading. I've stopped here with one final foreground layer to draw. Strictly speaking, that's negative
drawing, not negative space. But these simple exercises are ideal for helping you to see the white you are leaving as you draw your dark marks. I can't stress how important it is that you gain that ability, and it's something we'll be looking at in depth in later videos.
For now, just think of Negative Space as being the ideal way to accurately study nameable objects and features - by totally divorcing yourself from them.
Often when we draw something from life or a reference photograph, especially something we know well, we stop observing and start drawing from memory. This causes us to draw what we "know" about the object rather than what its actual appearance. We resort to using generic icons, because we believe we
know that's what that element looks like.
However, by changing our focus to the negative spaces, there is nothing that can be recognised or remembered. We are forced to concentrate on what's in front of us - to see what is really there and not what we think is there.
Detecting and using Negative Space can sometimes be a difficult lesson to learn, although it's well worth the effort. And creating boundaries for internal negative space - such as around this eye - can be challenging... but in the next video, I'll show you how this is done.
© copyright: Mike Sibley 2020