Tips & Techniques
INDENTING (or INCISING)
I'm often asked about the technique of indenting - impressing grooves into your paper that later drawing skips over and leaves as pristine white lines. Indenting is an excellent method for creating whiskers, stitches and other accurate parallel-sided lines, but its use needs to treated with caution, as I shall explain...
Indenting - an introduction
Almost all erasing techniques suffer from a few problems, such as the inability to create pure whites. An erased area will never match the brilliance of an untouched one, and an erased line, however carefully carried out, will never possess a truly sharp edge. And removing graphite from paper often flattens the surface texture, which results in less tooth for succeeding applications of graphite to adhere to. So let me introduce you to a saviour — although not one for the timid, this method produces white marks with clean, sharp edges, and it protects the white of your paper.This technique is properly termed 'indenting' or 'impressing' but you may also know it as 'incising' - I used that term a long time ago and it stuck. Strictly speaking, of course, incising involves the act of cutting, which is not what we want at all! No, our goal is to produce a smooth-edged indentation in the paper that later drawing will skip over.
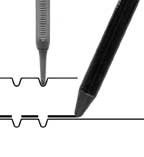 Indenting is pure magic - you apply graphite to the page and pure white lines appear. The method relies on the prior pressing, or indenting, of carefully positioned lines into the surface of your paper. Be aware that it works on some surfaces better than others, and it works best on smooth papers. If the fibre structure is too loose you may produce lines with irregular or fuzzy edges, so you may have problems with paper that is too rough, thick or soft. And speaking of softness, you will achieve the best results by having a really hard surface beneath your paper. Experimentation is essential and you need to find your own solutions.
Indenting Tools
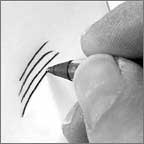
 I've experimented with the use of my thumbnail, a carpenter's bradawl, a raffia needle, a boxwood pottery tool, an empty ballpoint pen and other various points, and I know artists who use knitting needles quite effectively. I now use a custom-made stylus (shown right).
What we want to achieve is a controlled indentation, or valley, in the surface of the paper that succeeding layers of graphite will expose and leave as a white line. There is only one requirement - a point that will indent but not tear the paper's surface. In short, a rounded, smooth tip, not a sharp point. My own tool consists of a large darning or sewing-up needle mounted in an old clutch pencil.
Uses...
You've made or found your stylus - now, what can you use it for? Well, it's ideal for producing white lines and marks in dark areas, such as a cat's whiskers. Now you may begin to understand why I am so insistent on these indented lines being sharp-edged. Used properly and after some practice, you should be able to indent a line that has perfectly parallel sides. The secret to this is maintaining the same pressure throughout the length of the hair. If you increase pressure, the point will sink deeper and widen the line. Conversely, slackening pressure will narrow it, so any inconsistency of pressure will cause the line to look unnatural.To produce a clean taper at the end of the line, useful for dogs' and cats' whiskers, you need to produce a constant-width line ending in a fine taper, which is easily produced by a steady decrease in pressure, aimed at applying no pressure at all at the terminal point.
Experiment...
Try it for yourself. Because this technique uses a relatively fine pointed stylus it produces small-scale marks, so keep your experiments relatively small. If you haven't found something to use as your indenting tool, have a quick look for an empty ballpoint pen, a fine knitting needle, an embossing tool - anything that has a fine, but not sharp, tip. Indenting will usually work best if you hold your tool at the normal writing angle, and it often requires considerable force. Begin your indenting trials but don't shade over anything yet. Press your indenting tool into the surface of your paper and then pull it back towards you to see what happens. If your tool begins to tears the surface fibres, you at least know the limit to the pressure you can apply.
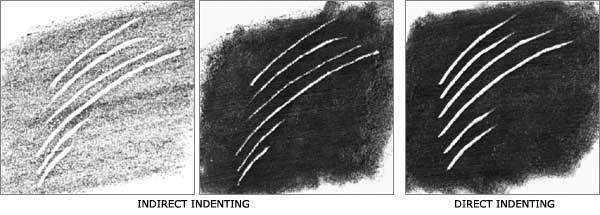
Experiment by indenting a variety of lines, dots, your name, anything... Also try indenting two or more lines that cross each other. When you've exhausted the possibilities, lightly shade over the entire area with the flat face of your 4B pencil. As if by magic your indented lines will appear before you!
Now that you can see where your indented lines are, shade again but this time with much more weight - apply as much pressure as you can without breaking your pencil's point. Try to destroy those lines! This exercise will show you how well indenting works on your choice of paper, and how some indenting designs, such as attempts at cross-hatching, can sometimes fail - keep it simple.
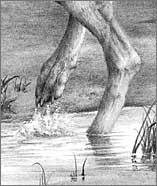
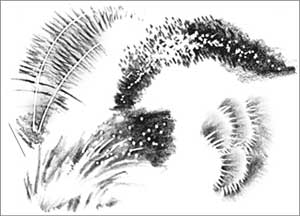 Now try that again, but use what you have learned to produce good, clean lines. Try indenting dots too - these can be useful for suggesting certain textures, forming midground flower heads, splashes of water flying up from a running animal's feet, and so on.
Try anything and everything that occurs to you, however weird or strange. This is your opportunity to explore the technique; to find out what it can do for you. Your paper, drawing style, and indenting tools all influence the way this technique works. Only personal experimentation will show you what works and what doesn't.
Caution...
Before you get carried away with enthusiasm for your newfound technique - a word of warning. An indented line cannot be erased, so you must get it right first time. It often helps to draw a very faint guideline following the desired path of the indent. Draw this slightly to one side of the required path, and with a single movement of your wrist, so you know you can recreate the arc with your stylus. If you incorporate any of the guideline into the indent, the deeply embed graphite will be difficult or even impossible to remove. Follow the golfer's method of practice swings - get yourself balanced and take repeated 'swings' with the point of your stylus just clear of the paper. When you feel your hand is following the correct arc and everything else is as it should be - indent the line.If you make a mistake all is not lost, you can draw into and carefully fill the indent until its internal and external values match, but it's a time-consuming and painstaking process. Better still to get it right first time!
The method in use...
Now you've made your first indented line, how do you incorporate it into a drawing? How can you, for example, make it look like a white whisker positioned on top of the graphite layers 'beneath' it?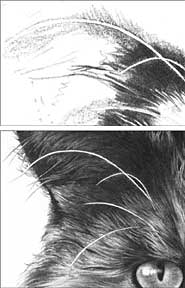 First, mark its presence by taking a soft grade pencil, such as 4B, and lightly shading across it with the flat face of your chisel point. Crossing it at an angle works best, because if you draw directly across at right angles, you run the risk of your pencil point dropping into it. I prefer to use a 6B Progresso solid graphite pencil for this stage - its physical lightness and wide, smooth tip keeps the shading light. This shading doesn't reflect the correct tonal value of the area; it is simply a marking device. And a light application means it can be removed later.
Having lightly marked the position of your line you can now safely forget it. Just be aware of it as you draw - stopping at one edge and continuing at the other.
Now all that remains is to complete the drawing around it and add a little reality. No hair or whisker ever just begins - it has a root from which it must spring. This may sound obvious but it should be made obvious. The root needs to be tucked behind the hairs it springs from, and it should display the shadow of those hairs. A little subtle shading with a 2H, or even an HB, drawn directly into the indentation's root and quickly fading to white as it progresses outward, will hide it from view.
Incidental uses...
So far we have looked at the use of indenting for a major element but its uses extend to more mundane, but equally important, areas such as...
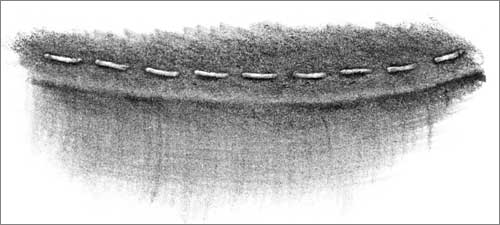
Stitches in fabric
Pencil eraser with metal ferule highlights indented.
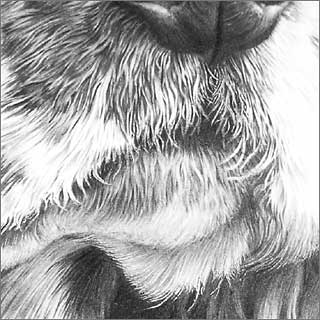 Here, on the top lip of this Springer Spaniel, indenting has been used to produce the fringe of top lip hairs that overlap the bottom jaw. Indenting often works best in situations where the indented hairs have a dark or black background.
Once the lines are indented, you have the freedom to concentrate on the underlying area in the knowledge that the hairs above are already established. The areas above and below the fringe employ only a negative drawing technique of drawing around white hairs.
Indenting in general is a very useful tool but one to be treated with caution. I suggest you always question the need for its use before employing it. Essentially, it is tool for producing a certain quality of line; it is not a shortcut. Treat is with respect and it may produce some astounding results for you.
That said; indenting might work for you where I wouldn't entertain it. You've nothing to lose by trying it.
Indirect Indenting
 If you're uncertain about using indenting and concerned about ruining a drawing with a misplaced or shaky indent, this method might be a good starting point. Instead of indenting directly into your paper's surface, you use an intermediate sheet of tracing paper. It's a technique I discarded many years ago, but you may find it useful when indenting soft or coarse paper surfaces, as it guarantees that no fibres will be torn. And, if you're new to the techniques of indenting, it offers safety leading to confidence. However, as with all the methods described here, lines indented in error still cannot be removed.
Among the definite advantages are having full sight of the drawing beneath at all times, and the ability to draw the indentations without physically touching the paper's surface. If you indent with a hard-grade pencil or pen, as shown here, you will leave visible evidence of the lines drawn. This allows you to plan ahead. You can for instance plot all the indentations by drawing them onto the tracing paper first and then re-tracing them to indent your paper.
However, don't dismiss the technique just because it doesn't work for me. It works well for other artists,and you've only to study the superb work of JD Hillberry to appreciate that truth.
FINALLY...
I thought I'd discovered the technique of indenting... but now I know many other artists who thought they too had "invented" it. Which goes to show what an inventive and inquisitive bunch of people we artists are!Never be afraid of experimenting. Many years ago I mixed graphite with cellulose varnish and found I could "paint" with it. Crazy, I know, and not a technique I'd dream of using - but occasionally these weird experiments will lead to a useful discovery.
TOP TIP
To create really intense and solid blacks, try applying 6B with some pressure, burnish it with 2B applied with equal pressure, and then spray with a matt fixative. Now repeat the sequence as many times as you need to. The fixative provides additional "tooth" for each succeeding layer.
Available here...
250gsm super-smooth Brilliant White paper
The ultimate versatile kneadable eraser
288 pages of drawing techniques and more...
Pencils, Starter Packs and accessories...
250gsm super-smooth Brilliant White paper
The ultimate versatile kneadable eraser
288 pages of drawing techniques and more...
Pencils, Starter Packs and accessories...
